|
The more code you write, the more likely it is, that if you create a new project, a more or less great part of the work is already done, because you already
wrote one or more procedures or functions, that do the same or something similar to what you want to do in the new application, or the GUI of the new application
is very similar to the one of an application that you created before. It may also be, that you found some units on the Internet, that includes the procedures and
functions that you need. There are several ways to use such already existing resources within a new Lazarus project. What way is the most suitable, depends on
what the already written or created resource actually is.
|
|
Using an existing project as template for a new project.
|
|
This applies, if your new application is very similar to one that you have written before. This similarity primarily concerns the GUI,
in particular if you preview a multiple form project, and because the new forms having lots in common with the already existing ones (form components or components
layout, menus, buttons...), it is easier to modify the existing forms than to create new ones from scratch. In the case of a console program, it's easier to
create a new project and copy/paste the code from the similar program. This is also true, if the new program uses some procedures or functions, identical or
similar to routines, that you have written before.
|
|
It is not mandatory to create a separate directory for each of your projects, but it is a good practice. The following paragraphs presuppose that you do so. If you
didn't do so far, I think that it would be a good idea to start doing it now. The case, described here, is the creation of a new language application, concerning
the conjugation of German verbs and where I decided to use my Luxembourgish verbs II application as a template for the new project. The
already existing project is called Luxverbes2 and located in the Luxverbes2 directory. The new project should be called GerVerbs, located in a newly created GerVerbs
directory.
|
|
First, lets save the project with its new name to its new directory. Open the Luxverbes2 project in Lazarus and choose Project > Save Project As. In the Save Project dialog box, browse to the new directory GerVerbs and enter
"GerVerbs" as new project name.
|
|
|
|
This not only copies the files Luxverbes2.lpi, Luxverbes2.lpr, Luxverbes2.res, Luxverbes2.lps and Luxverbes2.ico from the Luxverbes2 to the GerVerbs directory,
but also renames all these files to the filename entered in the Save As dialog box (in our case, to "GerVerbs"). On the other side, saving a
project with a new name to a different location, has no effect on the project's forms and units. This means, that if you open project GerVerbs and do some
changes to a form or a unit, these changes will be done to the corresponding files in the Luxverbes2 directory (thus, you would override the code of this program!).
To use the Luxverbes2 project as template for the new project, without overwriting its units, you will have to save all project units (with
a new name or not) to the new project directory. This is done, by setting the different units active in the editor window and then choosing
File > Save As. The screenshots show, how I saved the verbes2 unit of the Luxverbes2 project as gverbs.pas to the GerVerbs project directory.
|
|
|
|
Re-saving a unit, always re-saves the associated form, too. Thus, in the example above, the files verbes2.pas and verbes2.lfm are copied
from the Luxverbes2 to the GerVerbs directory and renamed to gverbs.pas and gverbs.lfm respectively. Note, that concerning the form, only the file is renamed,
the name of the form object remaining unchanged.
|
|
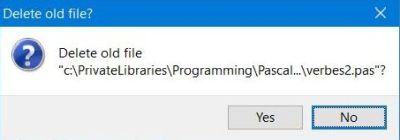
For each unit re-saved, Lazarus asks Delete old file? As I want to keep the Luxverbes2 project files, I answered this question (for all
units of the project) with No. This is the normal case, I guess; bizarre that the default selection in the corresponding Lazarus dialog
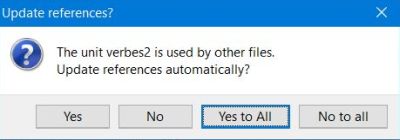
box is set to Yes. Lazarus also asks Update references automatically? This question has normally to be answered
with Yes or Yes to All; in the latter case, the question isn't asked anymore, when re-saving the remaining project
units.
|
|
|
|
You should re-save all units of the old project, including those that you'll possibly not use in the new project. If you don't do
so, the old units themselves would be part of the new project and the corresponding files would be those in the original directory. A possibility would be
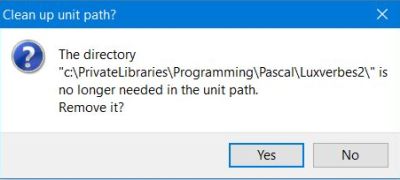
be to remove them from the project in Lazarus Project Inspector. But re-saving them all and answering the question The old directory is no longer needed in the unit path. Remove it? with Yes, will make sure that your new
project has no longer any relationship with the old one. So, in my case, I re-saved the conj2 and help units of the Luxverbes2 project to the GerVerbs project
folder (I actually changed the name of the "conj2" unit to "gconj", keeping the name of the "help" unit unchanged).
|
|
|
|
|
|
|
Using an existing form as template for a form in a new project.
|
|
This applies, if your new application uses a form that is identical or similar to a form that you have created before, in particular if
this form is such that recreating it from scratch would take lots of time. It's very rare, that I include an already existing form in a new project. Often, it takes
not lots more time to create a new form than to modify and adapt an existing one. And, as all copy/paste based operations, using an existing form has an issue:
you always forget to change something that should have been changed; classical examples are not changing component or variable names, or not adapting comments. This
has, of course, no effect on the application execution, but names and comments, that in the new program make no sense, may cause problems to others to understand
your code. And that's not desirable in programs primarily written to help other people writing their own applications.
|
|
The case, described here, is the creation of a new electronics application, concerning binary incrementers and decrementers where I decided to use several forms of
my Binary subtractors made with logic gates application as templates for the forms in the new project. The already existing project is
called LogicGates4 and located in the LogicGates4 directory. The new project should be called LogicGates8, located in a newly created LogicGates8 directory. First
create the new application project, create new forms and write new code as needed, then lets add the already existing form to the project. As example, the way how
I proceeded to add the already existing adder4f form to the LogicGates8 project. First, copy the form and the corresponding unit (the files adder4f.lfm and
adder4f.pas) from the LogicGates4 to the LogicGates8 directory. Then, open Project Inspector and choose Add > Add Files
from Filesystem. In the LogicGates8 directory, select the Pascal unit file, associated with the form (not the form file!); in our case
"adder4f.pas" (and not "adder4f.lfm").
|
|
|
|
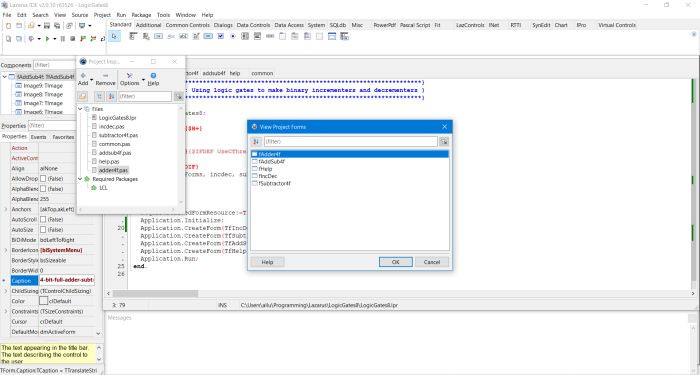
Normally, that's it! The unit added (adder4f.pas) should now be listed in Project Inspector, and the corresponding form (I called it
"fAdder4f") should now be included in the View Project Forms list.
|
|
|
|
|
Something missing, however: The unit's code is not displayed in the editor. Double-click the unit filename in Project
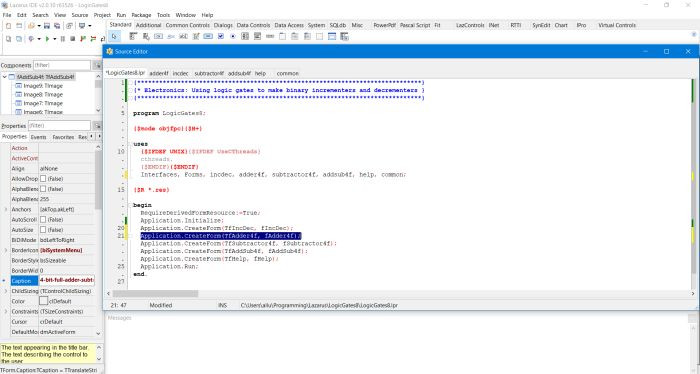
Inspector to add a new tab with the unit code to the editor window. And finally, check in the project source (to display the editor tab with the
code of the .lpr file, choose Project > View Project Source), if the Application.CreateForm statement is
present. One last thing to do: You have to manually add the unit name to the uses statement of the unit(s) that interact with the
new form.
|
|
|
|
|
Adding an existing unit to a new project.
|
|
This mostly applies, if your new application uses some ready-to-use "code-only" unit ("code-only" unit meaning here a unit, that isn't
associated with a form). This may be a unit written by yourself, or a unit that you found on the Internet, as for example UComplex (to work with complex numbers),
or ID3v2 (to work with MP3 tags). The procedure to follow is exactly the same, as described above: Copy the unit file to the project directory, add the unit to the
project, using Project Inspector, double-click the unit entry in the Project Inspector list and manually add
the unit name to the uses statement.
|
|
Adding existing components to a form.
|
|
It is possible to copy/paste a component or a group of components, that you already have created. Just select it (to select multiple components, hold down the
mouse button and drag over the area containing the components to be copied), right-click on the component (or one of the components) selected and from the opening
context menu choose Copy. Then, right-click the form and from the context menu, choose Paste. This procedure is
more than convenient if you create a form where the same component appears multiple times (as for example the shapes in my logic puzzle applications). It is also
possible this way to use one form of the project as template for another: Simply copy all form components on the existing form and paste them to a newly created
form. Note, that if you copy a component that has an associated event method, this one is also copied. Copied as such, meaning that the
method, associated with the new component, is the same as the one, associated with the component, that you copied. Use the Events tab
in the object's Properties window to define a specific action for the event occurring on the new component (and to generate the
declaration of the corresponding method in the source code).
|
![Using an existing project as template: Saving the existing project to the new directory [1] Using an existing project as template: Saving the existing project to the new directory [1]](./screenshots/existing1a.jpg)
![Using an existing project as template: Saving the existing project to the new directory [2] Using an existing project as template: Saving the existing project to the new directory [2]](./screenshots/existing1b.jpg)
![Using an existing project as template: Saving the project's units [1] Using an existing project as template: Saving the project's units [1]](./screenshots/existing2a.jpg)
![Using an existing project as template: Saving the project's units [2] Using an existing project as template: Saving the project's units [2]](./screenshots/existing2b.jpg)
![Using an existing form as template: Adding a file from filesystem in Project Inspector [1] Using an existing form as template: Adding a file from filesystem in Project Inspector [1]](./screenshots/existing5a.jpg)
![Using an existing form as template: Adding a file from filesystem in Project Inspector [2] Using an existing form as template: Adding a file from filesystem in Project Inspector [2]](./screenshots/existing5b.jpg)
