Setting up Windows Server 2003: 3. Addition of users and computers.
In the second part of my tutorial Setting up Windows Server 2003: Promotion of the first Domain Controller, I describe how to create and configure the first Domain Controller of a new domain. In this part, you will learn how to add users and computers to Active Directory.
Whereas on a workgroup based network, any computer may access the shared resources on any other computers, on a domain based network, the workstations have to connect to the Domain Controller on the server, and then can access the resources available on the server. This connection has to be done from the login screen of the client (not from an already "running" system). The credentials to log in to the domain (user name and password) are set in Active Directory, and it's only users known by Active Directory, that can actually login to the domain.
We can also add the information about the domain workstations to Active Directory. This is not really necessary; adding computers is primarily intended to add other servers, for example to join as domain controllers. However, adding a workstation is not really useless either. It helps to "guarantee policy consistency, and other administrative things. One can also specify who can reset the machine's password. This will allow an admin to create an account for a computer, and let a normal user join the machine with their credentials." (Brian Desmond, Windows Server MVP; cf. Windows 2003 article at visualwin.com).
Adding users to Active Directory.
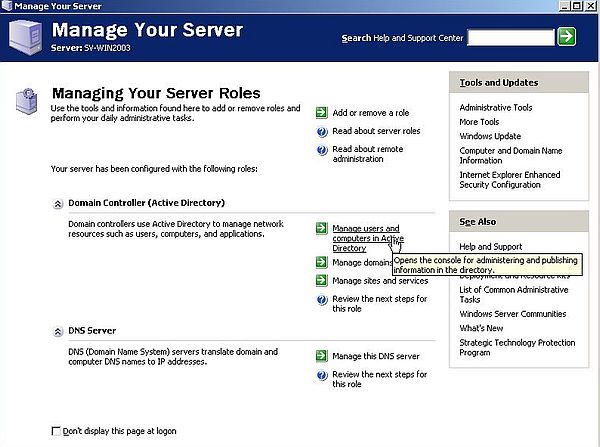
You can use the Manage Your Server window, that (unless you disabled it) shows up with the start of Windows Server 2003. Click the link Manage users and computers in Active Directory to begin.
 |
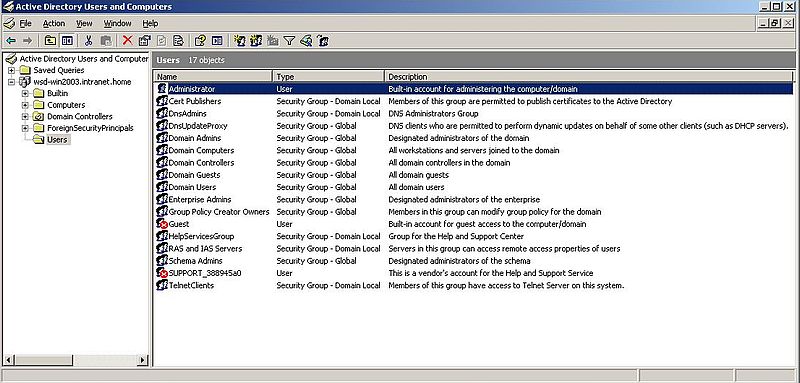
In the left pane of the Active Directory Users and Computers window, double-click the Users folder. A whole bunch of pre-defined and automatically added users are displayed in the right pane.
 |
From the menu bar, choose Action > New > User. The New Object - User window opens. Fill in the information about your new user. On the screenshot, you see the creation of user "Ali Baba", with username = "Ali" in order to login into the domain wsd-win2003.intranet.home (the domain that we have created in part 2 of the tutorial).
![Windows Server 2003: Adding users to Active Directory - Adding a new user [1] Windows Server 2003: Adding users to Active Directory - Adding a new user [1]](../screenshots/win2003_userscomputers3.jpg) |
Push the Next button to pass to the entry and configuration of the user password. I changed the default settings, choosing User cannot change password; I also selected the Password never expires checkbox.
![Windows Server 2003: Adding users to Active Directory - Adding a new user [2] Windows Server 2003: Adding users to Active Directory - Adding a new user [2]](../screenshots/win2003_userscomputers4.jpg) |
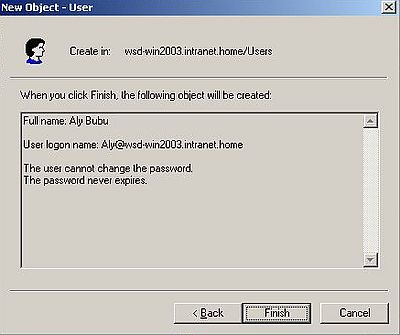
After you have pushed the Next button, a summary of the new user properties is displayed. Push the Finish button to actually create the new user. The screenshot shows the summary for "Aly Bubu", another user that I added to Active Directory.
 |
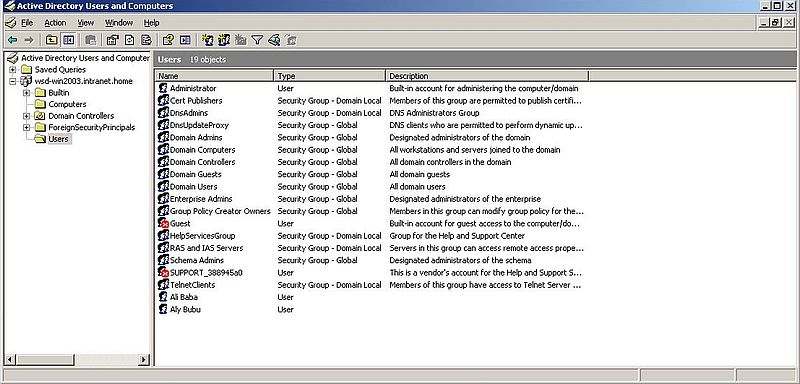
And finally, here is a screenshot of the list of the users defined in Active Directory of my Windows Server 2003, after "Ali Baba" and "Aly Bubu" have been added.
 |
Adding computers to Active Directory.
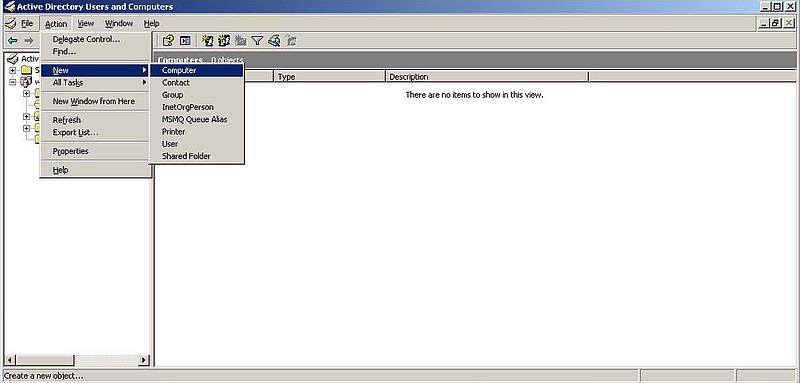
You can use the Manage Your Server window, that (unless you disabled it) shows up with the start of Windows Server 2003. Click the link Manage users and computers in Active Directory to begin. In the left pane of the Active Directory Users and Computers window, double-click the Computers folder. This folder is empty for now. To add a new computer, choose Action > New > Computer from the menu bar.
 |
We will add the two computers shown at the bottom of the network layout diagram in the Setting up Windows Server 2003: Introduction article. Note, that the name of my Windows XP Media Center Edition is wk-winxpm, and the name of my Windows 2000 Professional is wk-win2k.
Let's start with wk-winxpm. Enter this name as Computer name in the New object - Computer dialog box. All other settings may be left as they are...
![Windows Server 2003: Adding computers to Active Directory - Adding the new computer 'wk-winxpm' [1] Windows Server 2003: Adding computers to Active Directory - Adding the new computer 'wk-winxpm' [1]](../screenshots/win2003_userscomputers8.jpg) |
I must admit that I have not understood, what's the user indicated here is for. In fact, it seems that any user, registered in Active Directory, may use this computer to connect to the domain (?). Anyway, let's remove the user group Domain Admins here, and associate a custom user (the user that is supposed to work with this computer) with the computer wk-winxpm. To do so, push the Change... button.
The Select User or Group dialog box opens. In the text field below Enter the object name to select, enter the name, that you want the user of wk-winxpm to use in order to login to the domain (this must be a user name, that actually exists in Active Directory). I chose "Aly Bubu" (screenshot on the left). You can check if your input is ok, by pushing the Check Names button. The content of the text field should now be changed to Aly Bubu [Aly@wsd-win2003.intranet.home] (screenshot on the right).
![Windows Server 2003: Adding computers to Active Directory - Adding the domain user for computer 'wk-winxpm' [1] Windows Server 2003: Adding computers to Active Directory - Adding the domain user for computer 'wk-winxpm' [1]](../screenshots/win2003_userscomputers9a.jpg)
|
![Windows Server 2003: Adding computers to Active Directory - Adding the domain user for computer 'wk-winxpm' [2] Windows Server 2003: Adding computers to Active Directory - Adding the domain user for computer 'wk-winxpm' [2]](../screenshots/win2003_userscomputers9b.jpg)
|
After having pushed the OK button, we return to the New object - Computer dialog box. Push the OK button to actually create the new computer.
![Windows Server 2003: Adding computers to Active Directory - Adding the new computer 'wk-winxpm' [2] Windows Server 2003: Adding computers to Active Directory - Adding the new computer 'wk-winxpm' [2]](../screenshots/win2003_userscomputers10.jpg) |
Repeat the steps above to add the Windows 2000 machine wk-win2k, and configure the user name, that will (normally) be used on that machine to login to the domain, as Ali Baba [Ali@wsd-win2003.intranet.home].
You can right-click a computer in the list and choose Properties from the popping up context menu, to further configure it. I did not take the time to review the possibilities that we have here. I just added a description for my two computers...
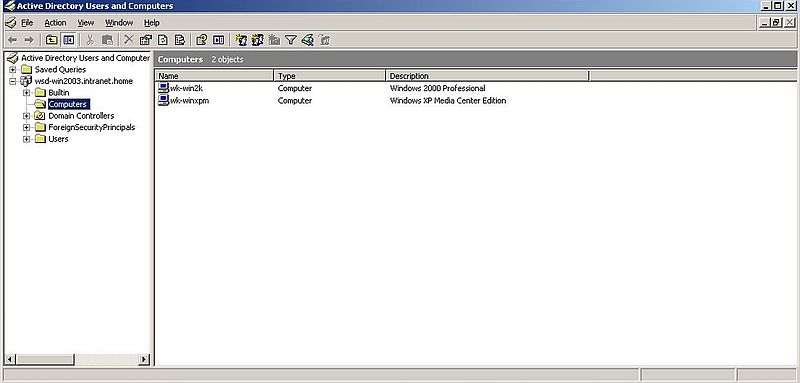
Finally, here is a screenshot of the list of the computers defined in Active Directory of my Windows Server 2003, after "wk-winxpm" and "wk-win2k" have been added.
 |
If you find this text helpful, please, support me and this website by signing my guestbook.