Setting up Windows Server 2003: 2. Promotion of the first Domain Controller.
Local networks are made of several computers connected to each other, either by cables connected one side to an Ethernet card, the other to a common switch, or connected without cables to a common WiFi access point. The reason why to connect computers to a LAN or WLAN is to share resources, such as sharing files, but also to commonly access devices like printers or serial ports on one computer from the others.
There are essentially two types of local networks:
- Networks, where the computers are part of a so-called workgroup. Workgroup computers use a peer-to-peer (P2P) model to share common responsibilities and resources. No computers have control over the behavior, permissions, or security of other computers within the group. Any computer in a workgroup can start a communication session and act as either the client or the server in the interaction. In a workgroup based network, each device or asset must be connected to the same LAN or subnet. Sharing of resources is done by configuring given files or devices on any of the workgroup computers as "shared". Home networks and networks in small businesses mostly use this type of communication between computers.
- Networks, where the computers are part of a domain. In a domain, there is a centralized database managed by a domain controller (it is also possible to have multiple Domain Controllers). All user accounts, machines, and additional hardware like printers are registered with the Domain Controller. Devices within the same domain can be located in different places, enabling remote work, while maintaining consistent security rules and corporate policies for all assets and employees. The workstations being part of the domain connect to the Domain Controller, running on a server machine, at the moment where they login (using a user name and password defined in the Domain Controller's settings). They can then access all those resources on the server, that have been defined as "shared" in the Domain Controller's settings. This type of communication is mostly used in larger businesses.
In the first part of my tutorial Setting up Windows Server 2003: Introduction, I describe the layout of the network, as used in the rest of the tutorial. The domain to be created consists of a Windows Server 2003 and two workstations (Windows XP Media Center Edition, and Windows 2000 Professional), the three machines being connected via their Ethernet adapters.
Promoting the Domain Controller.
The first step to take is to create (the technical word is "to promote") the first Domain Controller in the domain. From the Windows Start menu, choose Administrative Tools > Configure Your Server Wizard.
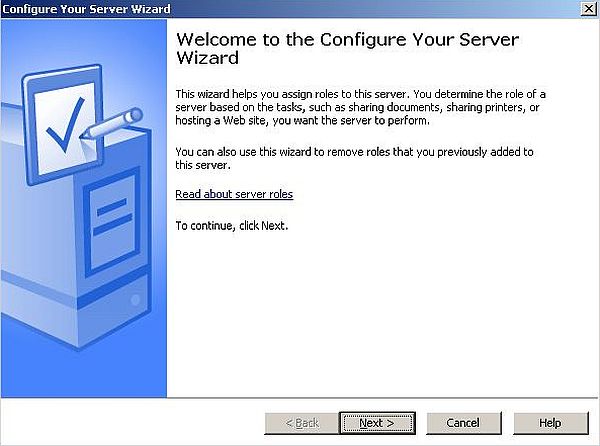 |
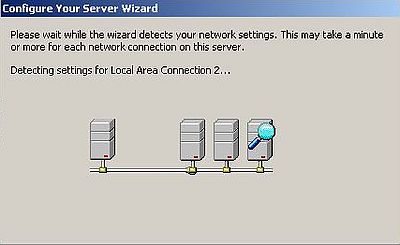
In the following window, you are told what you have to do, before starting the Domain Controller setup. This should all be ok. After you have pushed the Next button, the wizard starts with the detection of the actual network settings.
 |
In the next window, I chose to perform a custom configuration.
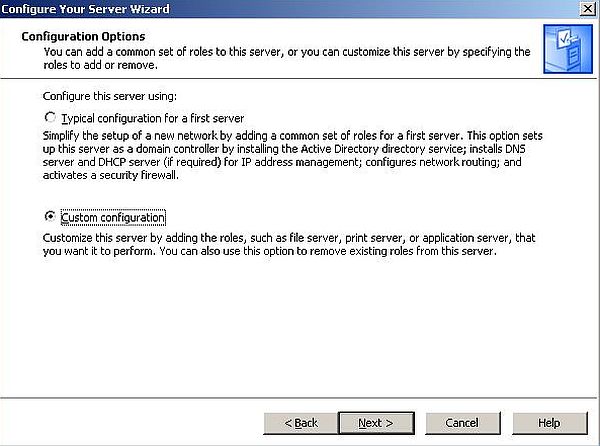 |
Note: If you read the text on the screenshot above, maybe that you wonder what Active Directory is. Active Directory has been introduced by Microsoft for centralized domain management. It's a framework that manages several Windows server domains. In contrast, a Domain Controller is a server on Active Directory to authenticate users based on centrally stored data. Each Active Directory forest can have multiple domains. The role of Domain Controllers is to manage trust among the domains by granting access to users from one domain to the other via a proper security authentication process. System administrators can also set complex security policies via Domain Controllers.
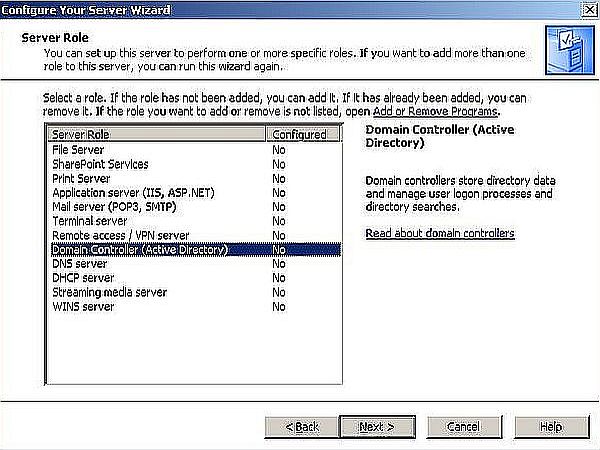
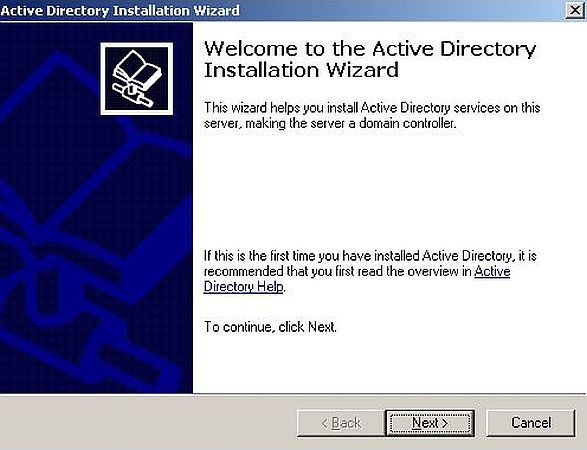
From the list of server roles, choose Domain Controller (Active Directory) (screenshot on the left). In the following window, confirm to run the Active Directory Installation Wizard in order to setup our server as a Domain Controller. The screenshot on the right shows the "Welcome" screen of this wizard.
|
|
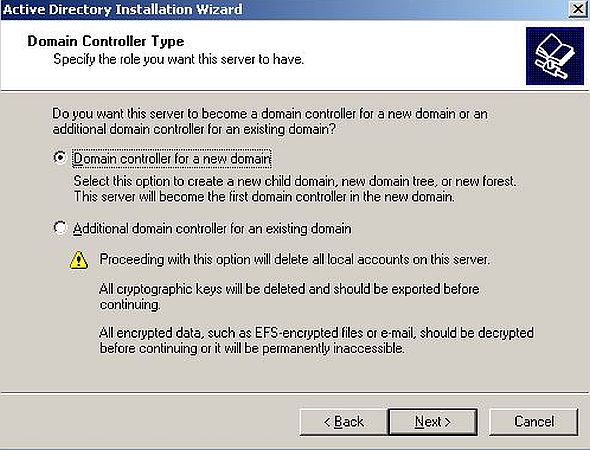
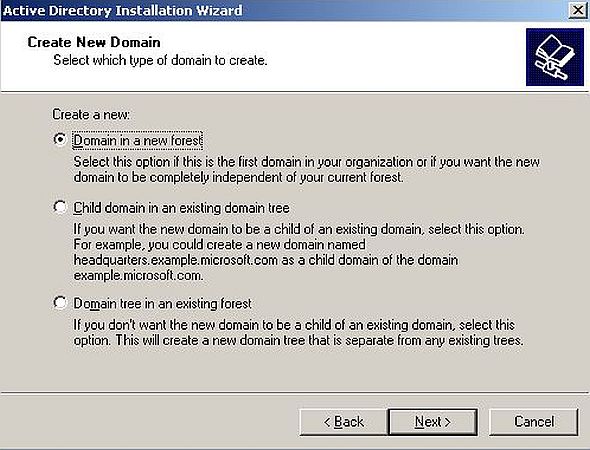
As Domain Controller type, select Domain Controller for a new domain (screenshot on the left), and as domain type, select Domain in a new forest (screenshot on the right).
|
|
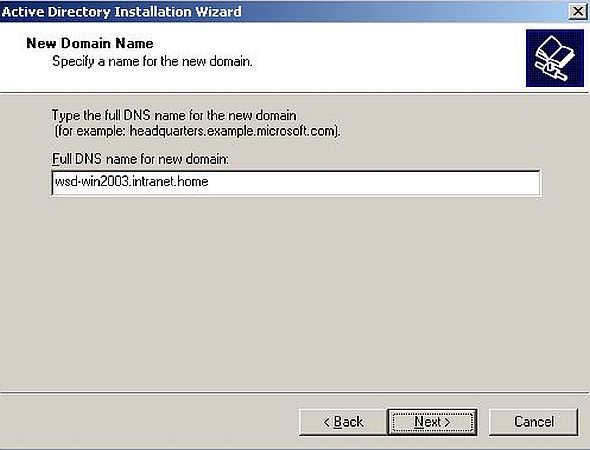
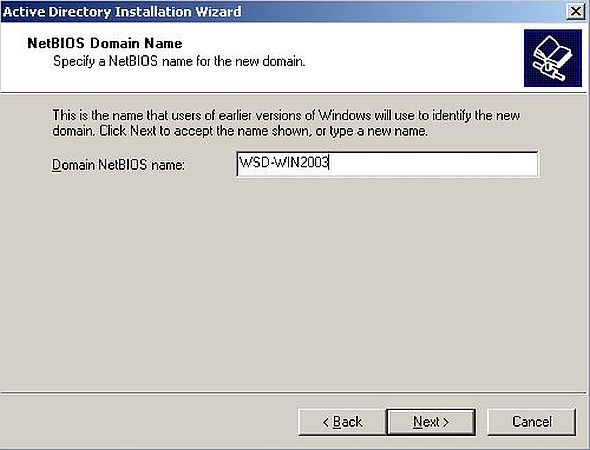
We have now to give our domain a name. Not really important what name you choose. As full DNS name, I entered wsd-win2003.intranet.home (screenshot on the left). As NetBIOS domain name, I accepted the accordingly automatically filled-in name WSD-WIN2003 (screenshot on the right).
|
|
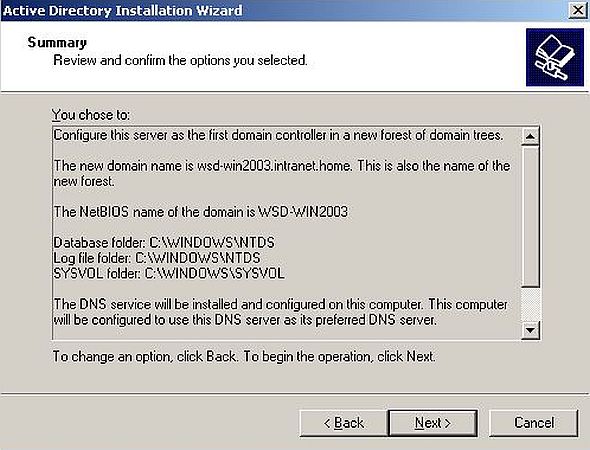
There are several domain related folders that have to be created. In the two windows following the domain naming, we can specify the path to the Active Directory database and the path to the log folder. On a real world computer, your server would probable have two hard disks, and in this case, for performance reasons, it would be recommended to create these two folders on different disks. On my try-out system, I kept the default path C:\WINDOWS\NTDS for the database and for logging. Another important directory is the SYSVOL folder. This folder stores the server's copy of the domain's public files. The default path is C:\WINDOWS\SYSVOL.
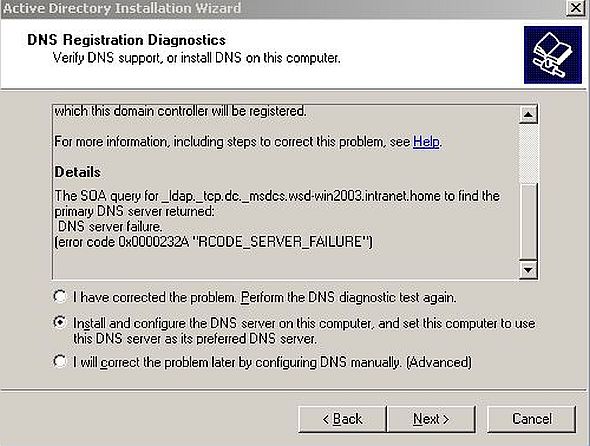
The installation wizard now tries to locate the primary DNS server that should be used as DNS server for the domain. I do not really know what it does and what configuration (on IPFire?) I had to do to prevent the detection failure. Anyway, we will install a local DNS server on our Windows Server 2003 machine. Thus, in the DNS registration window, select the second option: Install and configure the DNS server on this computer, and set the computer to use this DNS server as its preferred DNS server.
 |
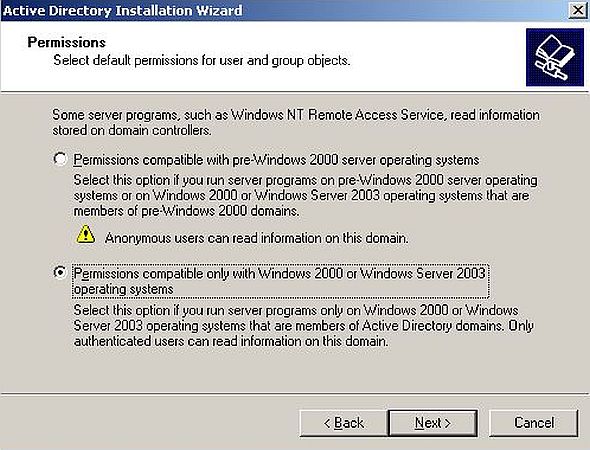
New security features on Windows Server 2003 don't normally allow access from services running on pre-Windows 2000 Server operating systems. It is however possible to allow such access. Obvious, that this is not a good idea (except if absolutely required). Thus, in the Permissions window, choose Permissions compatible only with Windows 2000 or Windows Server 2003.
 |
In the next window, you have to enter the password of the Directory Services Restore Mode Administrator (no screenshot). Then, a summary of the configuration options is displayed. Push the Next button to start the installation of the Domain Controller.
 |
When arriving at the setup of the DNS server, the installation wizard issues a message that at least one network adapter is configured using DHCP, and that for reliable operation, the IP addresses should be assigned manually.
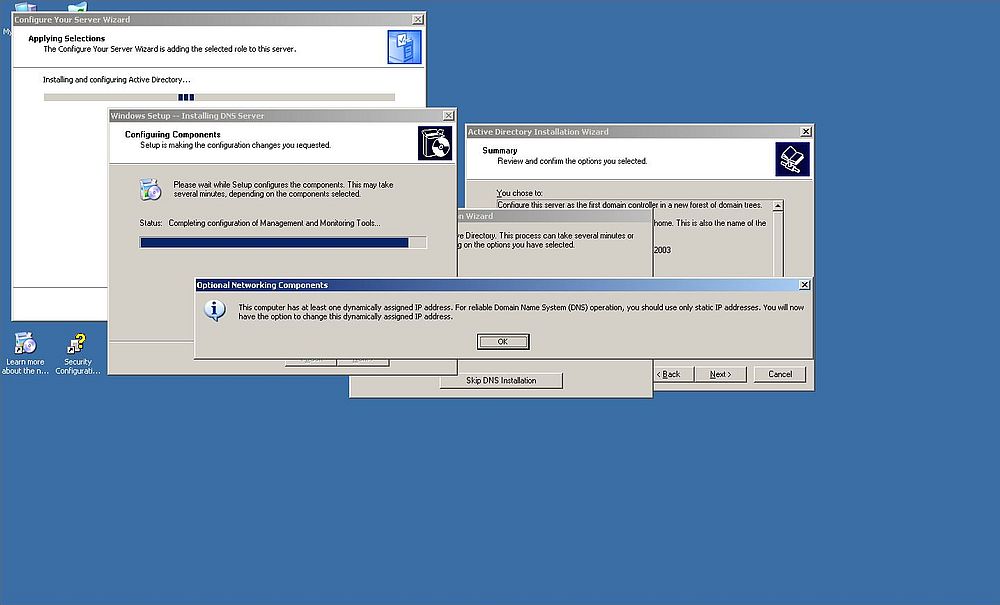 |
The wizard gives us the possibility to change network settings. Concerning the external network card, I decided to keep it to be configured by the DHCP server running on IPFire (which assigns the fixed lease address 192.168.41.100 to it). So, I chose to only modify the settings for the internal network adapter (referred to by Windows as "Local Area Connection 2").
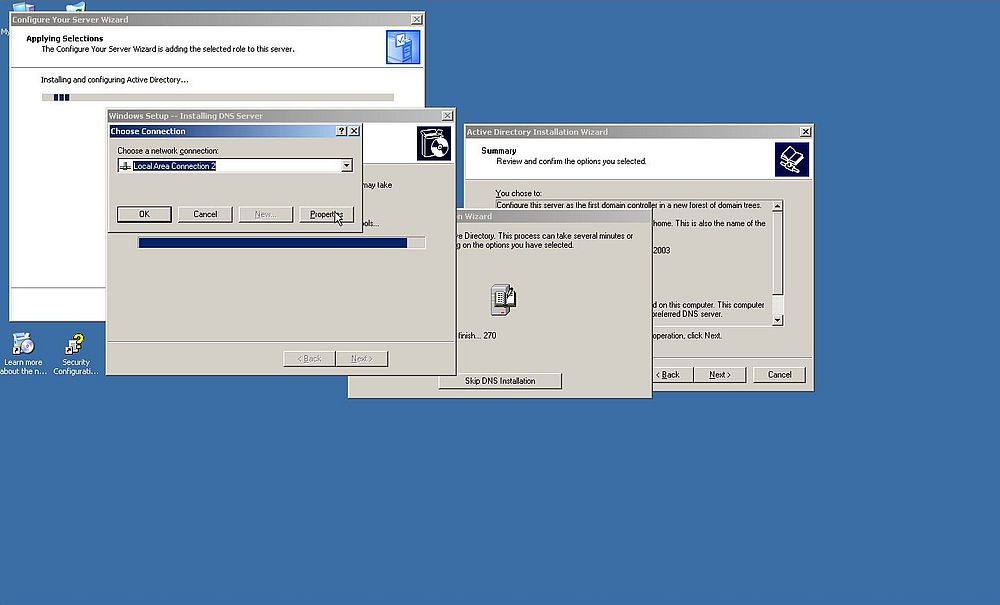 |
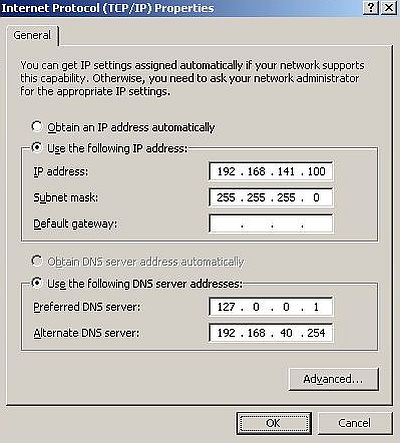
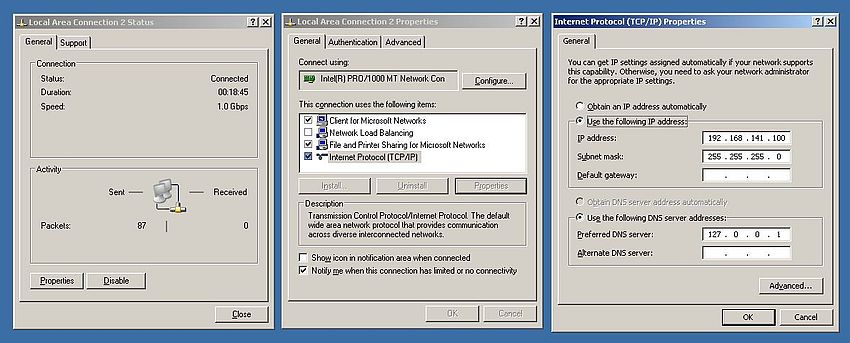
To change the network settings, in the Local Area Connection 2 Properties window, select Internet protocol (TCP/IP) from the list of connection items. Pushing the Properties button, will open the Internet protocol (TCP/IP) Properties window, where we can set the IP, the subnet mask, the gateway, and the DNS servers. To assign the IP manually, the radio button Use the following IP address must be checked. I set the IP of this network adapter to 192.168.141.100, the subnet mask is automatically filled in as 255.255.255.0. I'm not 100% sure, but I think that there is no need to set a gateway here (?). As DNS server, I entered the loop back IP 127.0.0.1 (DNS server running on localhost), and 192.168.41.254 (DNS server running on IPFire). This last setting is useless; we will review and correct the settings of both network cards further down in the text.
 |
The configuration of the DNS server continues; when finished, the "Active Directory Installation Wizard" terminates, and we are asked to reboot the computer. When Windows has started up, the "Configure Your Server Wizard" continues with a last window, telling that this server is now a Domain Controller. Push the Finish button to terminate the wizard.
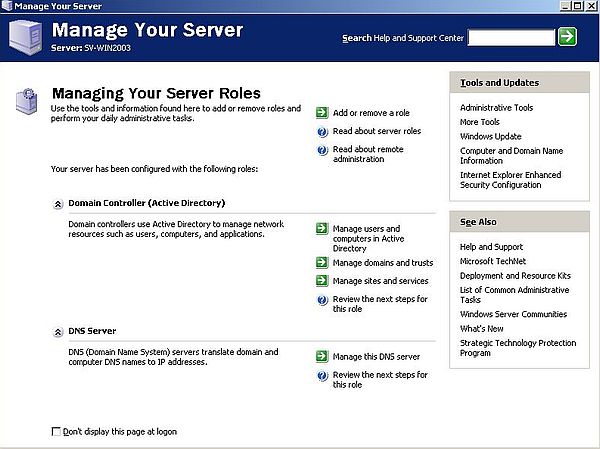
The Manage Your Server Roles window has changed. It now shows entries for the Domain Controller, as well as for the DNS server. With links, that we can use to further configure these two components.
 |
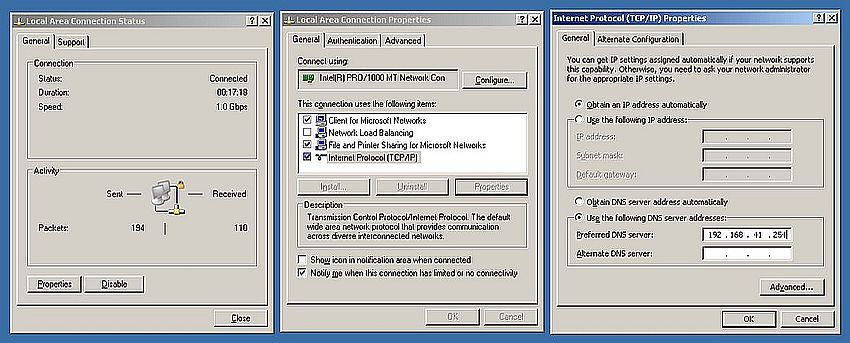
After the installation of Active Directory and the DNS server, DNS does not work anymore: Trying to ping IPFire with its name (ping fw-ipfire, or ping fw-ipfire.intranet.home) results in an unknown host error message. The reason is that the "Active Directory Installation Wizard" has set the DNS server for both network cards to the local DNS server.
So, reviewing and correcting the network settings for both network adapters. For the external network interface, we configure the IP address using DHCP (DHCP server running on IPFire). This will set the external IP to 192.168.41.100, and the gateway to 192.168.41.254 (blue interface IP of IPFire). The DNS server for the external network adapter has to be changed: not 127.0.0.1 (as set by the wizard), but the blue interface of IPFire: 192.168.41.254.
 |
For the internal network interface, we configure the IP address manually, setting it to 192.168.141.100; I did not set any gateway here (?). The DNS server for this network card has to be our local DNS server (the one that we installed before). Thus the DNS server IP has to be 127.0.0.1.
 |
Now lets test connectivity and DNS, using the command line tool ping with computer names, that have to be resolved to IP addresses. Let's first ping the two network adapters of our server machine (the DNS names have to be defined on IPFire, of course).
- ping sv-win2003 pings IP address 192.168.41.100. As "sv-win2003" actually is the name of the Windows Server 2003 computer, Windows sees it as a machine being part of the "wsd-win2003.intranet.home" domain; that's why ping displays the full DNS name as sv-win2003.wsd-win2003.intranet.home.
- ping wsd-win2003 pings IP address 192.168.141.100. Full DNS name: "wsd-win2003.intranet.home" (this "wsd-win2003" has nothing to do with the domain, but is just the DNS name configured on IPFire).
![Windows Server 2003: Domain Controller setup - Connectivity and DNS test [1] Windows Server 2003: Domain Controller setup - Connectivity and DNS test [1]](../screenshots/win2003_ad16.jpg) |
And finally, let's try to ping some other computers on the network (cf. network diagram in my Setting up Windows Server 2003: Introduction article).
- ping wlan-ipfire pings IP address 192.168.41.254, the blue interface of IPFire.
- ping fw-ipfire pings IP address 192.168.40.254, the green interface of IPFire.
- ping wk-winxpe pings IP address 192.168.41.102, a Windows XP Professional machine on the blue network.
- ping wk-ubt20 pings IP address 192.168.40.111, an Ubuntu 20 machine on the green network.
![Windows Server 2003: Domain Controller setup - Connectivity and DNS test [2] Windows Server 2003: Domain Controller setup - Connectivity and DNS test [2]](../screenshots/win2003_ad17.jpg) |
Windows Server 2003 can reach all parts of my network. Name to IP resolution is all correctly done by the DNS server running on IPFire (IP: 192.168.41.254).
If you find this text helpful, please, support me and this website by signing my guestbook.