Setting up Windows Server 2003: 4. Client connection.
In the second part of my Setting up Windows Server 2003 tutorial (Promotion of the first Domain Controller), I describe how to create and configure the first Domain Controller of a new domain. In the third part (Addition of users and computers), I describe how to add my two domain workstations (Windows XP Media Center Edition and Windows 2000 Professional) and the users, that are allowed to access the server from these machines, to Active Directory. We have now all together to set up the two workstations in order to be able to log in into the domain.
As I already mentioned, the connection from a workstation to Active Directory has to be done from the login screen of the client (not from an already "running" system). The credentials to log in to the domain (user name and password) are set in Active Directory, and it's only users known by Active Directory, that may actually login to the domain. The configuration on the server having been done, all we have to do on the clients is to configure the network connection, and change the network type from workgroup based network to domain based network.
Connecting from Windows XP.
The tutorial is about Windows XP Media Center Edition. It should apply as such to Windows XP Professional and Windows XP Home.
Right-click the network icon in the system tray, and from the opening context menu, choose Open network connections. In the Network Connections window, right-click the Local Area Connection icon, and choose Properties from the context menu.
![Windows Server 2003: Login from Windows XP - Configuring the 'Local Area Connection' [1] Windows Server 2003: Login from Windows XP - Configuring the 'Local Area Connection' [1]](../screenshots/win2003_clients1.jpg) |
In the Local Area Connection Properties window, select Internet Protocol (TCP/IP) and push the Properties button to open the TCP/IP Properties window. Here we can configure the computer's IP address, the default gateway, and the DNS server. We will do this using manual settings (maybe, some day I'll set up DHCP on Windows Server 2003, and then change the settings here to "Obtain an IP address automatically"). I actually use IP = 192.168.141.105, with subnet mask = 255.255.255.0. The default gateway and the DNS server address have to be set to the IP address of Windows Server 2003: 192.168.141.100 (obvious, that we have to use the IP assigned to the server's internal network card). You should also set the DNS suffix used by the LAN computers: In the TCP/IP properties window, push the Advanced button, then, in the TCP/IP Advanced Properties window, select Append these DNS suffixes, and add the suffix; in my case "intranet.home".
![Windows Server 2003: Login from Windows XP - Configuring the 'Local Area Connection' [2] Windows Server 2003: Login from Windows XP - Configuring the 'Local Area Connection' [2]](../screenshots/win2003_clients2.jpg) |
Before setting up the login into the domain, let's check if our network connection is ok, and if DNS is working. Open Windows Command Prompt,
and type
ipconfig
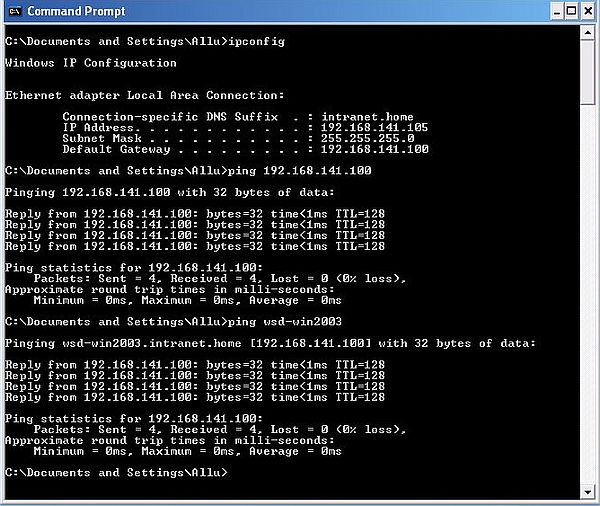
The IP address and default gateway displayed should be those that we configured above.
Now, try to ping Windows Server 2003, using first its IP address, then its DNS name.
ping 192.168.141.100
ping wsd-win2003
Connection to the server machine should be possible and the server's name should be correctly resolved.
 |
Pinging the Windows XP machine from Windows Server 2003 should also be possible. Depending on the firewall software used on Windows XP, you'll eventually have to allow ICMP in order to make it work.
To change the network type of the Windows XP machine, right-click My Computer and from the context menu choose Properties. In the opening Systems Properties window, select the Computer Name tab. To modify the computer name settings, push the Change button.
![Windows Server 2003: Login from Windows XP - Configuring the domain [1] Windows Server 2003: Login from Windows XP - Configuring the domain [1]](../screenshots/win2003_clients4.jpg) |
In the Computer Name Changes window, the name of the computer should be wk-winxpm. You may want to change the full computer name to wk-winxpm.intranet.home. To do so, push the More button, and make the changes in the opening DNS and NetBIOS Computer Name window.
In the Computer Name Changes window, type in the domain name: wsd-win2003.intranet.home. Then, change the network type (computer membership) from "Workgroup" to "Domain" by selecting the corresponding radio button.
![Windows Server 2003: Login from Windows XP - Configuring the domain [2] Windows Server 2003: Login from Windows XP - Configuring the domain [2]](../screenshots/win2003_clients5.jpg) |
While configuring Windows XP as a domain member, a login dialog box asking for user name and password should pop up. Enter the credentials configured in Active Directory (user name = "Aly"; password = whatever you set it to). A message box with the text "Welcome to the wsd-win2003.intranet.home domain" shows that your settings are correct and that connection to Active Directory works as it should.
![Windows Server 2003: Login from Windows XP - Configuring the domain [3] Windows Server 2003: Login from Windows XP - Configuring the domain [3]](../screenshots/win2003_clients6.jpg) |
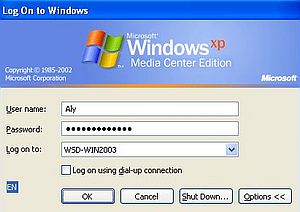
To make the changes become active, you'll have to reboot the computer. When starting up, you'll have to push CTRL+ALT+DEL in order to display the login screen. On the login screen, push the Options button. Besides the user and password input fields, a Log on to combobox is now shown. You have 2 possibilities to log in: 1. login to the Windows XP workstation as you did before (using the user name and password set on Windows XP); 2. login to the WSD-WIN2003 domain (using the user name and password set in Active Directory).
 |
To access the network resources, choose Control Panel > Network & Internet Connections > Network Connections. Another way is to right-click the network icon in the system tray, and from the opening context menu, choose Open network connections (if the network icon isn't shown, change the Local Area Connection properties, selecting the "Show icon in notification area when connected").
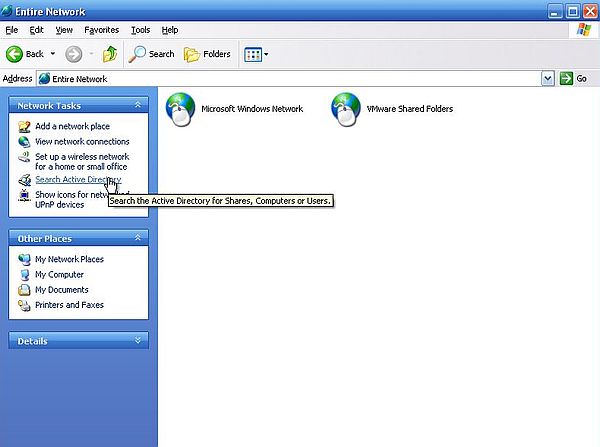
In the Network Connections window, choose My Network Places, then in the My Network Places window, choose Entire Network. In the right tab, the available networks are shown: Microsoft Windows Network is our "Windows Server 2003 network". On VMware, we'll also have the VMware Shared Folders network (unless you have shared folders enabled, trying to open it will result in an error message). In the left tab, we have access to various network related tasks, among them Search Active Directory.
 |
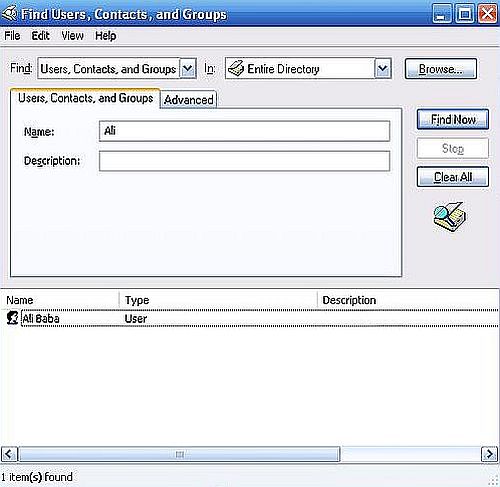
Active Directory may be searched for computers, users, shares, etc. The screenshot below shows how I searched for user "Ali".
 |
Opening the Microsoft Windows Network in File Explorer will display the Wsd-win2003 domain network (screenshot on the left); opening it will show two computers: Sv-win2003, the Windows Server 2003 machine, and Wk-winxpm, our Windows XP workstation (screenshot on the right).
![Windows Server 2003: Login from Windows XP - The Windows Server 2003 domain [1] Windows Server 2003: Login from Windows XP - The Windows Server 2003 domain [1]](../screenshots/win2003_clients10a.jpg)
|
![Windows Server 2003: Login from Windows XP - The Windows Server 2003 domain [2] Windows Server 2003: Login from Windows XP - The Windows Server 2003 domain [2]](../screenshots/win2003_clients10b.jpg)
|
Opening Sv-win2003, you'll find the folder SYSVOL, that contains the shared resources on Windows Server 2003 (screenshot on the left). This folder actually contains several subfolders and files. Trying to delete or rename these files will result in an Access denied error message (screenshot on the right).
![Windows Server 2003: Login from Windows XP - The Windows Server 2003 SYSVOL folder [1] Windows Server 2003: Login from Windows XP - The Windows Server 2003 SYSVOL folder [1]](../screenshots/win2003_clients11a.jpg)
|
![Windows Server 2003: Login from Windows XP - The Windows Server 2003 SYSVOL folder [2] Windows Server 2003: Login from Windows XP - The Windows Server 2003 SYSVOL folder [2]](../screenshots/win2003_clients11b.jpg)
|
Connecting from Windows 2000.
The tutorial is about Windows 2000 Professional. It should apply as such to Windows 2000 Home, too.
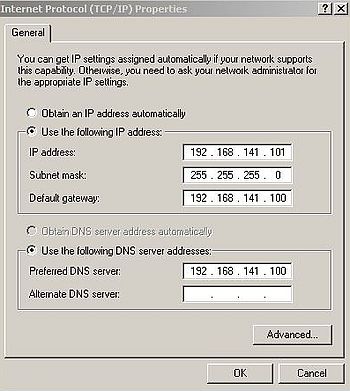
Right-click the network icon in the system tray, and from the opening context menu, choose Open network connections. In the Network Connections window, right-click the Local Area Connection icon, and choose Properties from the context menu. In the Local Area Connection Properties window, select Internet Protocol (TCP/IP) and push the Properties button to open the TCP/IP Properties window. Here we can configure the computer's IP address, the default gateway, and the DNS server (screenshot). We will do this using manual settings (my Windows 2000 is part of a dual boot with Windows NT4). I actually use IP = 192.168.141.101, with subnet mask = 255.255.255.0. The default gateway and the DNS server address have to be set to the IP address of Windows Server 2003: 192.168.141.100 (obvious, that we have to use the IP assigned to the server's internal network card). We should also set the DNS suffix used by the LAN computers: In the TCP/IP properties window, push the Advanced button, then, in the TCP/IP Advanced Properties window, select Append these DNS suffixes, and add the suffix; in my case "intranet.home".
 |
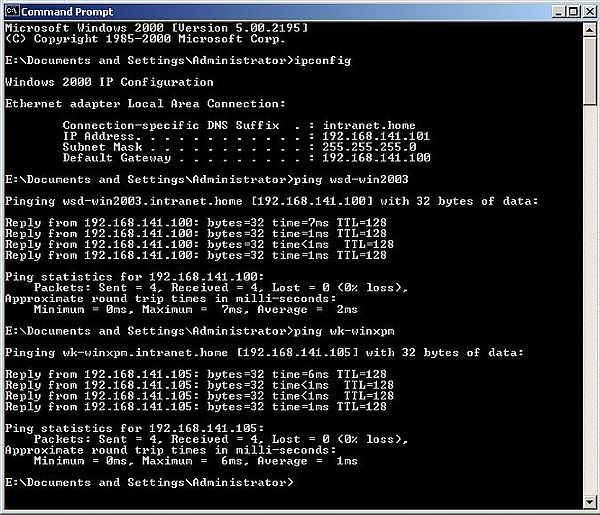
Let's check if our network connection is ok, and if DNS is working. Open Windows Command Prompt,
and type
ipconfig
The IP address and default gateway displayed should be those that we configured above.
Now, try to ping Windows Server 2003, and the Windows XP workstation, using their DNS names.
ping wsd-win2003
ping wk-winxpm
Connection to both machines should be possible (depending on the firewall on Windows XP, you'll have to allow ICMP), and the DNS names should be correctly resolved.
 |
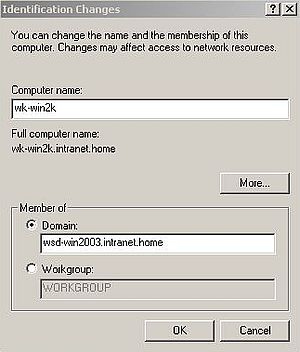
To change the network type of the Windows 2000 machine, right-click My Computer and from the context menu choose Properties. In the opening Systems Properties window, select the Network Identification tab. To modify the network identification properties, push the Properties button. This opens the Identification Changes window. The name of the computer should be wk-win2k. You may want to change the full computer name to wk-win2k.intranet.home. To do so, push the More button, and make the changes in the opening window. In the Identification Changes window, type in the domain name: wsd-win2003.intranet.home. Then, change the network type (computer membership) from "Workgroup" to "Domain" by selecting the corresponding radio button.
 |
While configuring Windows 2000 as a domain member, a login dialog box asking for user name and password should pop up. Enter the credentials configured in Active Directory (user name = "Ali"; password = whatever you set it to). A message box with the text "Welcome to the wsd-win2003.intranet.home domain" shows that your settings are correct and connection to Active Directory works as it should.
The screenshot below shows the "allow or deny" dialog box issued by Sygate Personal Firewall, when my Windows 2000 tried to connect to Active Directory.
 |
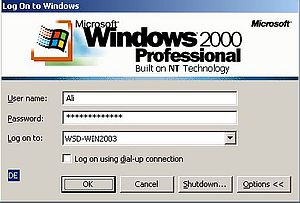
To make the changes become active, you'll have to reboot the computer. When starting up, you'll have to push CTRL+ALT+DEL in order to display the login screen. On the login screen, push the Options button. Besides the user and password input fields, a Log on to combobox is now shown. You have 2 possibilities to log in: 1. login to the Windows 2000 workstation as you did before (using the user name and password set on Windows 2000); 2. login to the WSD-WIN2003 domain (using the user name and password set in Active Directory).
 |
To access the network resources, double-click the My Network Places icon on the desktop (or open it from File Explorer). In the My Network Places window, double-click the Entire Network icon. And finally, in the Entire Network window, open the link to view the entire contents.
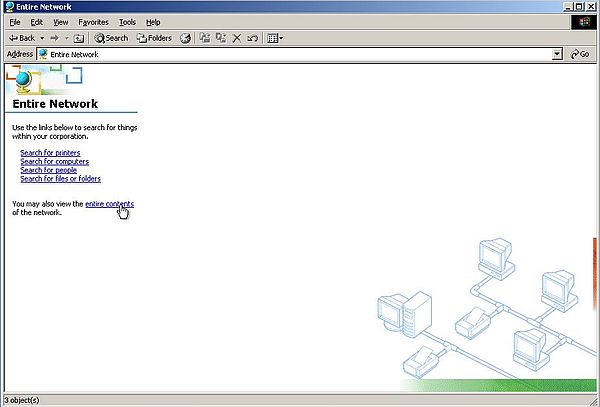 |
Note: You should not use the other links in this window. When I tried to open Search for computers, the installer for Microsoft Office 2000 Professional was started, and the system hang, because the installer couldn't find a source for this product (?).
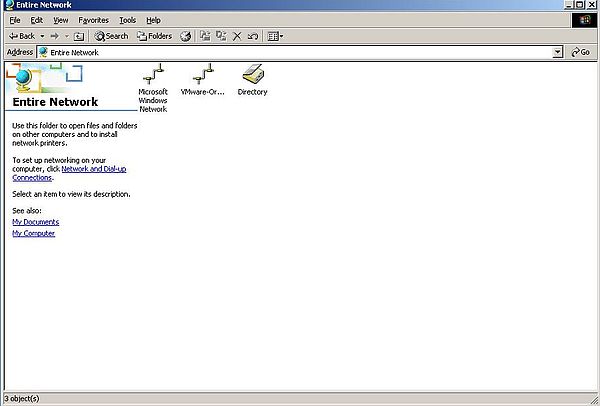
You'll find 3 items as entire network contents: Microsoft Windows Network, a VMware network in relationship with shared folders, and Directory (screenshot on the left). If you open Microsoft Windows Network, you'll see a network icon named Wsd-win2003; that's our Windows Server 2003 domain (screenshot on the right).
|
![Windows Server 2003: Login from Windows 2000 - The Windows Server 2003 domain [1] Windows Server 2003: Login from Windows 2000 - The Windows Server 2003 domain [1]](../screenshots/win2003_clients18b.jpg)
|
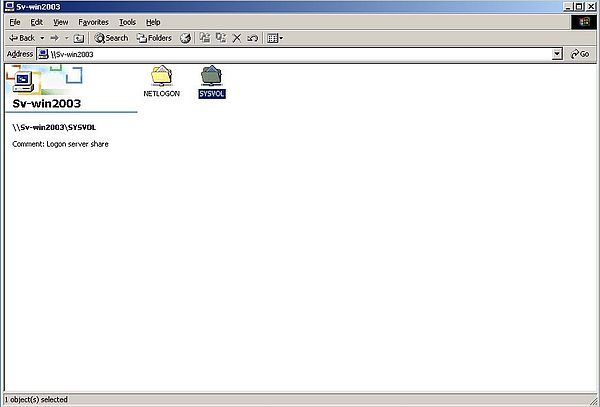
When double-clicking the Wsd-win2003 icon, you should see the 3 computers: Sv-win2003 (Windows Server 2003), Wk-win2k (this Windows 2000 Pro workstation), and Wk-winxpm (the Windows XP Media Center Edition workstation) (screenshot on the left). Double-clicking the server icon will show the resources that are shared on the domain; you'll find, in particular, the SYSVOL folder (screenshot on the right).
![Windows Server 2003: Login from Windows 2000 - The Windows Server 2003 domain [2] Windows Server 2003: Login from Windows 2000 - The Windows Server 2003 domain [2]](../screenshots/win2003_clients19a.jpg)
|
|
Note: When I navigated the network structure down to Sv-win2003, and went back to Wsd-win2003, the 2 workstations were no longer displayed. Maybe that this is "normal", because the only shared resources are those available on the server (?).
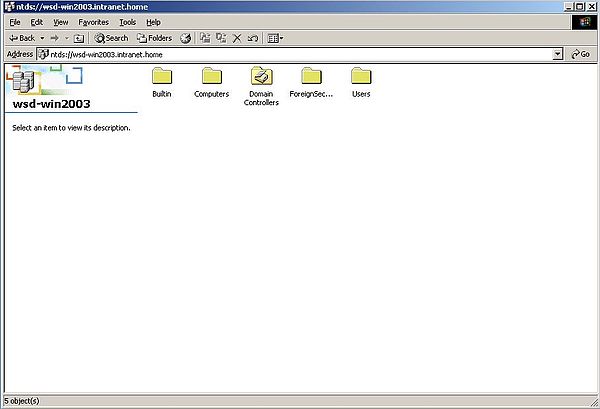
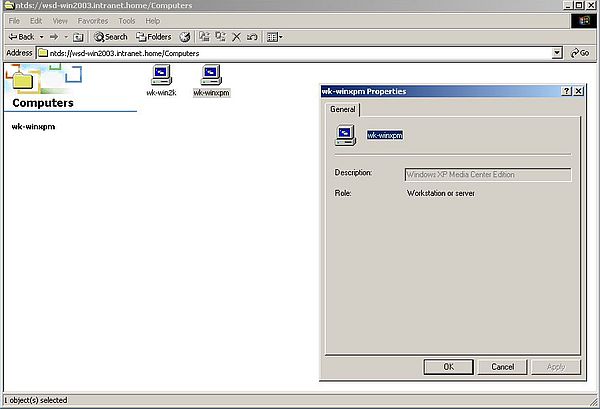
When, in the entire network contents window, you double-click the Directory icon, content of "Directory" is displayed as an Active Directory icon named "wsd-win2003" (no screenshot). Double-clicking this icon gives you access to the Active Directory items, in particular Users and Computers (screenshot on the left). When double-clicking the Computers icon, the computers that are registered with Active Directory are shown (screenshot on the right).
|
|
Setting up a DNS forwarder.
To access another computer on the local network (or the Internet), it is not mandatory to have access to a DNS server. Provided that you know the IP address of the other computer. This is normally not the case on the Internet, and on the local network, too, it's lots more convenient to access other computers by a DNS name. The role of the DNS server consists in resolving (translating) the DNS name into an IP address, and thus making the connection to the other machine possible.
In the second part of my Setting up Windows Server 2003 tutorial (Promotion of the first Domain Controller), I show how to set up a local DNS server. It's this DNS server that Windows XP and Windows 2000 send their DNS requests to. And we've seen in this part of the tutorial that, for example, the resolution of "wsd-win2003" and "wk-winxpm" is correctly done on the Windows 2000 workstation (cf. ping examples further up in the text).
However, if we try to ping a computer located "outside the domain", such for example wk-win10 (IP = 192.168.40.1), the ping utility answers with the message Ping request could not find host wk-win10.
 |
On the other hand, pinging wk-win10 from Windows Server 2003 works fine. This is due do the configuration of the external network card of the server (cf. second part of the tutorial): The ping utility sends its request to the DNS server on the IPFire machine (IP address of the blue interface = 192.168.41.254), and it's thanks to that DNS server that the name "wk-win10" can be resolved into IP = 192.168.40.1.
To solve the DNS issue on the domain workstations, we'll set up a DNS forwarder on Windows Server 2003. A DNS forwarder is a server, configured on a given DNS server, and that is able to resolve DNS queries that cannot be answered by that DNS server. Thus, if Windows XP asks for the IP of "wk-win10", the DNS server on Windows Server 2003, that has no knowledge of this, sends the request to the forwarder, and this way the resolution of the name can be done.
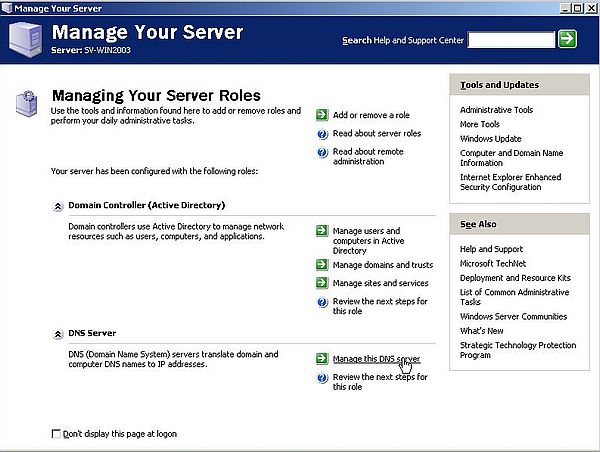
To configure the DNS forwarder on the Windows 2003 DNS server, we can use the link Mange the DNS Server of the Manage Your Server window.
 |
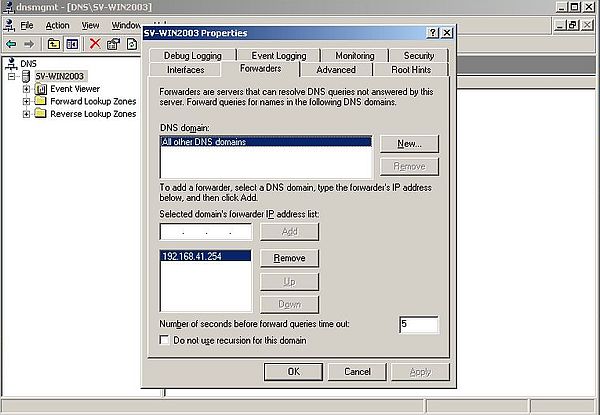
In the DNS Server window, right-click the server (SV-WIN2003), and from the popping up context menu, choose Properties, then in the SV-WIN2003 Properties window, open the Forwarders tab. The forwarder should be used for all requests concerning resources "outside the Windows Server 2003 domain", thus the default indicated as "DNS domain" = "All other DNS domains" is what we want. All we have to configure is to indicate the IP of the forwarder. The forwarder is, of course, the DNS server on IPFire, and the IP to indicated here has to be the IP of the blue interface of the firewall-router machine: 192.168.41.254.
 |
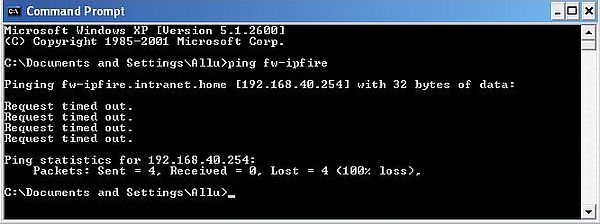
If now, we try to ping a computer "outside the domain" using a DNS name, this name should be resolved into an IP address. The screenshot below shows, how I pinged the green interface of IPFire. You can see that the DNS name "fw-ipfire" has been correctly resolved to IP = 192.168.40.254. The ping actually never reached that machine (that's why all 4 requests were timed out). In fact, the domain workstations have no connection to any machine "outside the domain", thus, there is no direct possibility to connect to any other machine than Windows Server 2003. The solution to this situation is Internet Connection Sharing, that will be discussed in part 6 of the tutorial.
 |
If you find this text helpful, please, support me and this website by signing my guestbook.