| 1. |
Setting up a local website using Microsoft IIS. |
| |
Internet Information Server (IIS) consists of several applications in relationship with Internet publishing; in some sense you can say that it is the Microsoft
HTTP/FTP/SMTP server solution for Windows. IIS is included with most Windows releases (at least the professional edition), but is not installed by default. This
tutorial is about the installation and configuration of IIS 8.5 on Windows 8.1 Pro, 64-bit (German language).
Installation of a newer release of IIS on Windows 10/11 should be similar (at least, I suppose so...).
|
| |
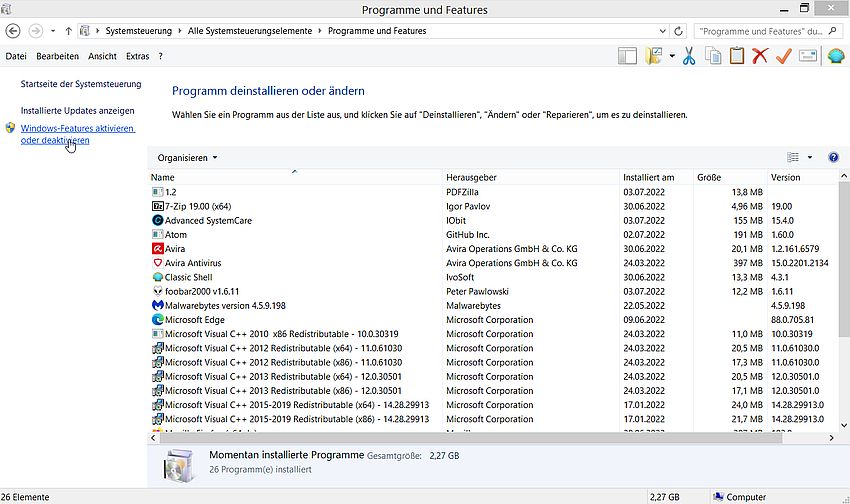
To install IIS, run Control Panel (German: "Systemsteuerung"), and open Programs and Features (German:
"Programme und Features"). In the left pane of the Programs and Features window, click the link Turn Windows
Features on or off (German: "Windows Features aktivieren oder deaktivieren").
|
| |
|
| |
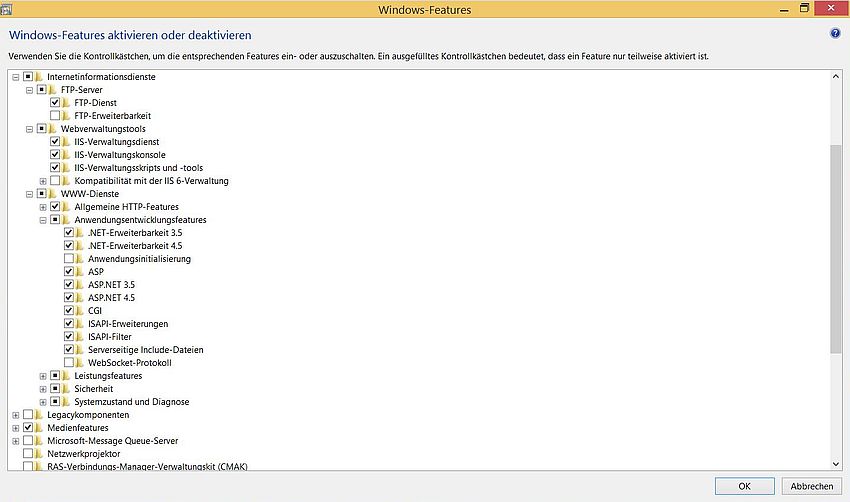
Locate the item Internet Information Services (German: "Internetinformationsdienste"), and check its sub-items as needed or wanted. In
the category "World Wide Web Services" (German: "WWW-Dienste"), be sure that all components of the sub-category "Common HTTP Features" (German: "Allgemeine HTTP
Features") are checked (this actually is our web server). In the sub-category "Application Development Features" (German: "Anwendungsentwicklungsfeatures"), check
those that you intend to use. If you want to install an FTP server, check "FTP Service" (German: "FTP-Dienst") in category "FTP Server" (German: "FTP-Server"). Do
not forget the items of the category "Web Management Tools" (German: "Webverwaltungstools"): except for the compatibility with IIS 6, you should install all available
components.
|
| |
|
| |
Not sure about this, but I think that the item Internet Information Services Hostable Webcore (German: "Hostfähiger Webkern für
Internetinformationsdienste") has also to be selected for installation (?).
|
| |
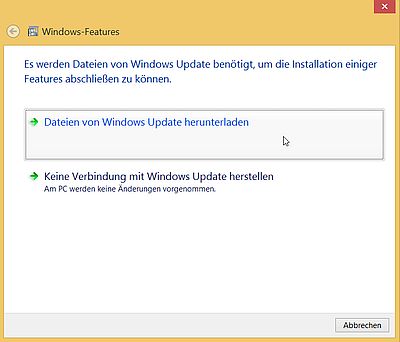
Click the OK button to start installation. A window with the message "Searching for required components" (German: "Erforderliche Dateien
werden gesucht") pops up. Another window pops up, telling you that there are files from Windows Update that are needed. Select the option Download
files from Windows Update (German: "Dateien von Windows Update herunterladen"). I suppose that an active Internet connection is required to do so (not totally
sure about that; it's possible that these files have to be copied to your harddisk when installing Windows) (?).
|
| |
|
| |
The slected features are now installed. In the case of success, the installer tells you that the changes, that you asked to make, have been completed (German: "Die
angeforderten Änderungen wurden abgeschlossen"). The installer does not ask to reboot the computer. Probably not necessary, I did it anyway...
|
| |
After installation is terminated, you'll find the launcher for IIS Manager in Control Panel > Administrative Tools
(German: "Systemsteuerung > Verwaltung"). For your own convenience, you should place a copy of the shortcut on your desktop.
|
| |
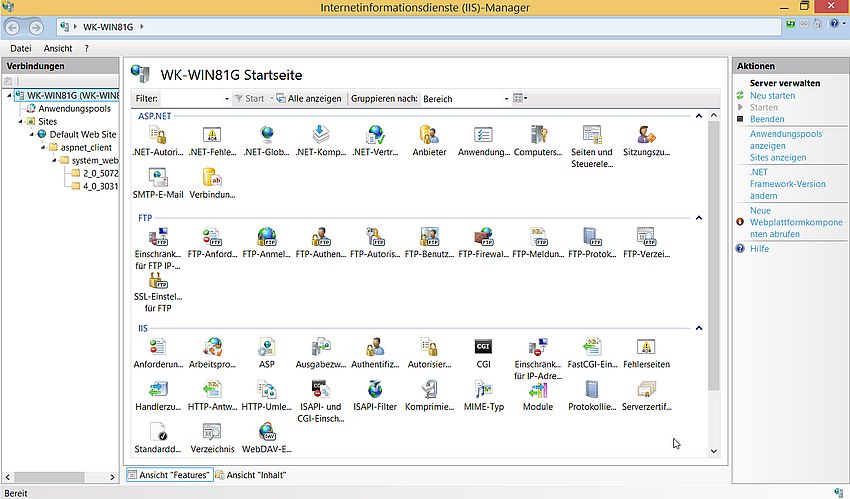
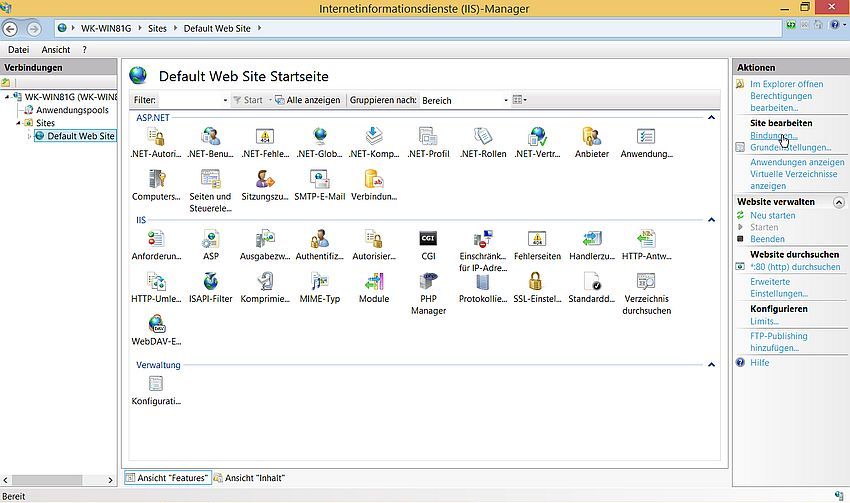
The screenshot below shows the Start Page of IIS manager on my Windows 8.1. In the left pane, you can see the
Connections (German: "Verbindungen") available. Just one, which on my system is called wk-win81g, that is the
Windows name of my computer. After installation, there is one single site available; it's called Default Web Site. In the right pane, you
can easily execute somme common Actions (German: "Aktionen"), in particular start, restart and stop the server. Finally, in the middle pane,
we have a rather important number of icons, that are used to configure some given settings of IIS.
|
| |
|
| |
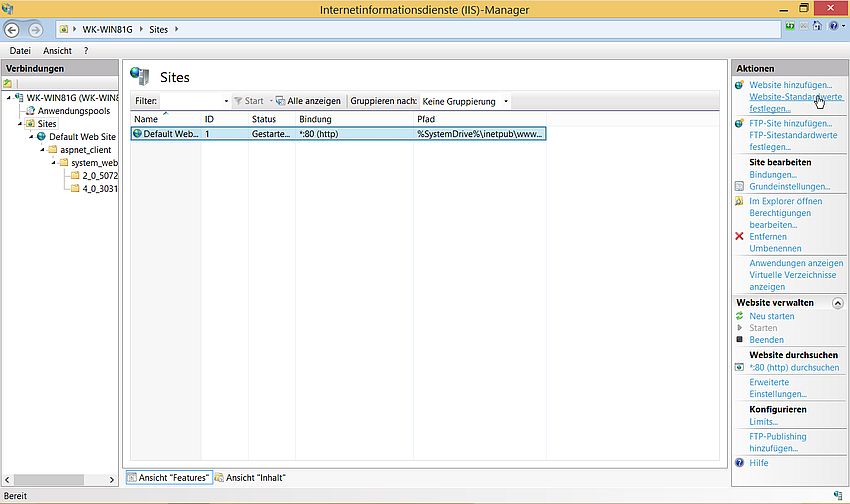
If we select Sites in the left pane, the properties of our Default Web Site are displayed. We can see on the
screenshot below that the site is started. After initial installation, there is a single server running: a HTTP server (web server using the
insecure HTTP protocol), listening on standard port 80 of all available interfaces, in my case the loopback interface (localhost =
127.0.0.1) and the Ethernet interface (wk-win81g = 192.168.40.102). This page also shows (only partially on the screenshot) the path to the Document
root (corresponding to "htdocs" on Apache): %SystemDrive%\inetpub\wwwroot.
|
| |
|
| |
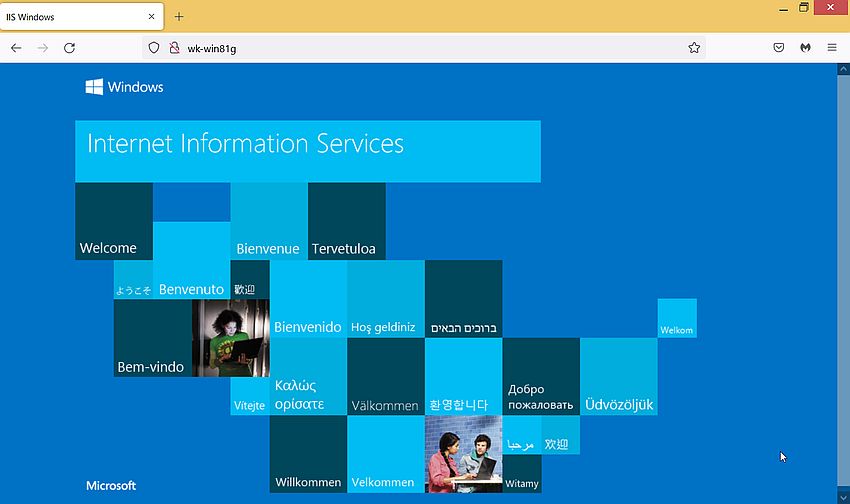
Time to test access to our web server. This can be done by entering localhost in the address bar of the web browser. An alternative is to
use the computer name, in my case: http://wk-win81g. The screenshot shows the IIS 8.5 homepage.
|
| |
|
| |
The question is now: Where does the page displayed in the web browser comes from? Where is the corresponding file located and what is its name? As the URL specified
in the browser address field doesn't contain a directory name, the file must be located in the web server's Document root. This is what on
Apache is the "htdocs" directory; on IIS the path to this directory is C:\inetpub\wwwroot (with Windows being installed on the C: drive). If
we have a look in that folder, we find 2 files: a PNG image file and a file called iisstart.htm. This latter one corresponds to Apache's
index.html and is served by default if no filename is specified in a URL.
|
| |
Let's write some simple HTML file ourselves:
<html>
<head>
<title>Hello World</title>
</head>
<body>
<h1 align="center"> H E L L O W O R L D !</h1>
</body>
</html>
|
| |
Save this file as "hello.html" into the folder C:\inetpub\wwwroot. Then start your web browser and enter localhost/hello.html in its
address bar. Note, that the screenshot below has been taken on my Windows 10, when I accessed hello.html on the IIS web server on Windows 8.1 over the local network
using Firefox.
|
| |
|
| |
Note: The folder C:\inetpub\wwwroot is protected, and with most text editors, you will not be able to save a
file to there. The work-around is to save the file into your personal Documents folder (that's actually what you will be asked to do) and then copy it to the IIS
Document root using Windows File Explorer. Alternative: With the IIS FTP server activated and configured to access the Document root in
read-write mode, if your text editor includes an FTP client, you can use this one to directly save the file to the wanted location on the web server.
|
| |
Setting up HTTPS access.
|
| |
Setting up HTTPS on IIS requires 2 steps:
- Create a server certificate
- Add the new server to Default Web Site.
|
| |
To create a self-signed server certificate, select the wk-win81g connection in the left pane. Then, in the middle pane, choose
Server certificates (German: "Serverzertifikate") from the IIS group (cf. the screenshot of the IIS start page
further up in the text).
|
| |
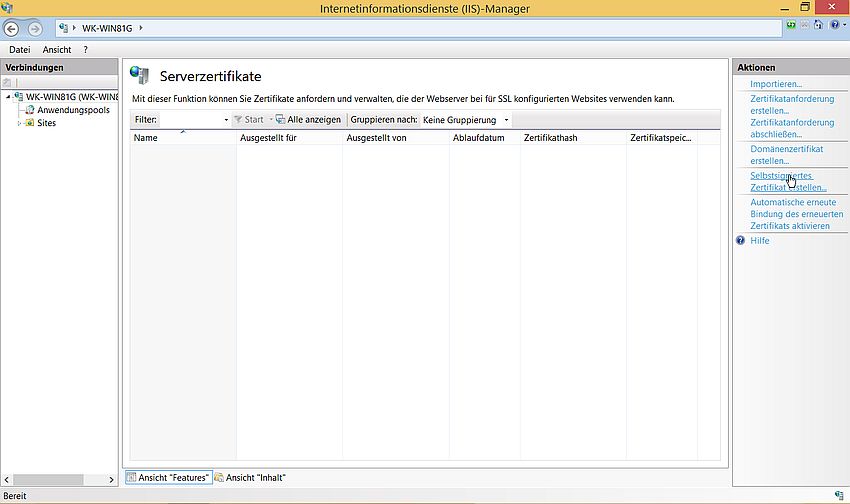
The Server certificates page is displayed in the middle pane (no certificates present at this stage). From the available actions in the
right pane, choose Create self-signed certificate (German: "Selbstsigniertes Zertifikat erstellen").
|
| |
|
| |
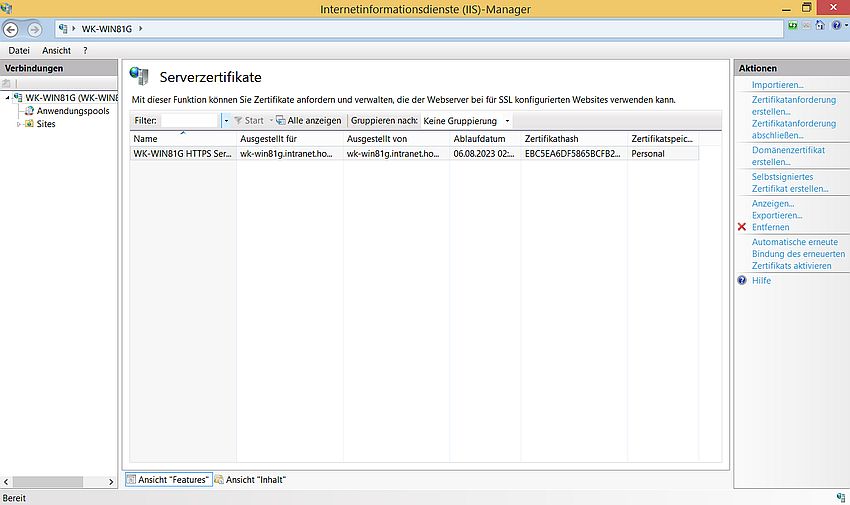
The only information that you have to enter is the certificate display name (German: "Anzeigename") and the certificate store (German: "Zertifikatspeicher"), that
you may let at its default value "personal" (German: "persönlich"). The new certificate is added to the list on the Server certificates
page. Both columns "Issued To" (German: "Ausgestellt für") and "Issued From" (German: "Ausgestellt von") are set to the full qualified name of the computer where IIS
is running on; in my case: wk-win81g.intranet.home. The expiration date (German: "Ablaufdatum") is set to the actual date plus 1 year.
|
| |
|
| |
To create a HTTPS server, select Default Web Site in the left pane. Then, in the right pane, choose
Edit site > Bindings... (German: "Site bearbeiten > Bindungen...").
|
| |
|
| |
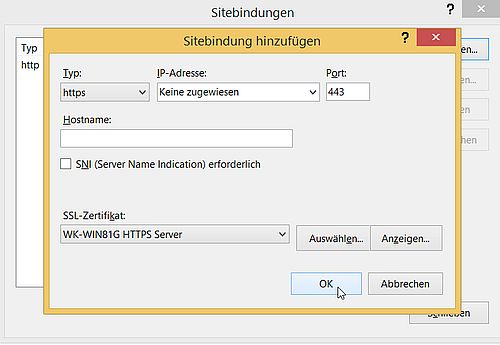
This opens the Site Bindings (German: "Sitebindungen") window (with the "http" server listening on port 80 listed). Click the
Add (German: "Hinzufügen") button to add the new server.
|
| |
In the opening Add Sitebinding (German: "Sitebindung hinzufügen") window, choose https as server type,
let it listen on all interfaces (select "None assigned"; German: "Keine zugewiesen" as IP address) on standard port 443. Be sure
to indicate the SSL certificate that we created before!
|
| |
|
| |
The new server will be added to the list of site bindings.
|
| |
To access the IIS website using HTTPS, add the following URL in your web browser address (remember that "wk-win81g" is the name of my computer):
https://wk-win81g.
|
| |
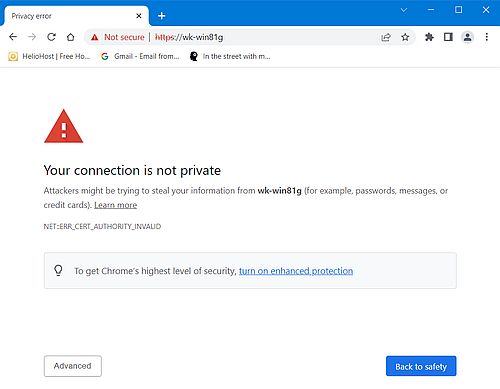
Modern web browsers don't like self-signed certificates and issue a warning that there could be a risk when navigating to such a website. On our local network, we
can safely ignore the warning (if this happens on the Internet, going back would be the better choice). The screenshot below shows the warning when I accessed IIS
from my Windows 10 laptop using Google Chrome.
|
| |
|
| |
To continue to the site, click the Advanced button, and you'll get the possibility to go to the site. In Chrome, click the now showing
up link Proceed to wk-win81g (unsafe).
|
