Installing Apache on Debian based Linux distributions.
| 1. Installing Apache. | ||
|---|---|---|
| "On Windows, everything is simple, Linux is complicated", the cliche tells us. In a certain sense, this is (mostly) true. And not only for mainstream users... Setting up Apache on Windows is not really a big deal. Doing so on Linux (at least on Debian based systems), requires some serious configuration work to do (if you intend to run a "real world" webserver on a Debian based Linux, I would recommend to use Ubuntu Server and install Hestia CP, that does the major part of the configuration for you). This tutorial is about setting up Apache on Peppermint OS Devuan 11. I suppose that it applies as such to (most) other Debian based distributions. | ||
|
The installation of Apache is easy: Just run the following two commands in a terminal: sudo apt update sudo apt install apache2 |
||
|
Apache is normally automatically started after installation, and also configured to start each time that the operating system starts up. Normally, we could check this
using the systemctl command (that may also be used to start and stop Apache), however, systemctl is
not available on Peppermint OS. Trying to install systemd failed with the message that there is no
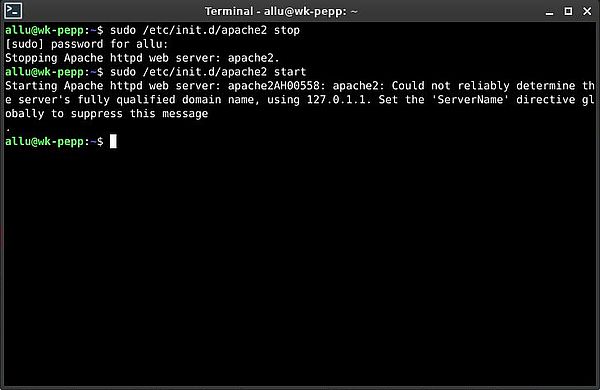
installation candidate for this package. Anyway, Apache can be started/stopped/restarted using the Apache executable itself: sudo /etc/init.d/apache2 start sudo /etc/init.d/apache2 stop sudo /etc/init.d/apache2 restart |
||
|
||
| You can safely ignore the warning concerning the domain name. If it really bothers you, do as suggested and include a ServerName directive in the main Apache configuration file. | ||
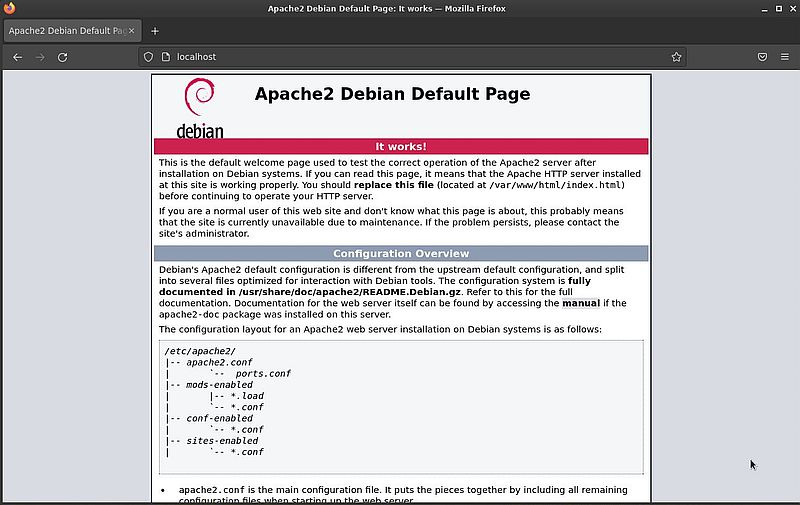
| To check if everything works as it should, open your web browser and type localhost in the address field. You should see the Apache default page as shown on the screenshot. | ||
|
||
Notes:
|
||
| 2. Configuring HTTP. | ||
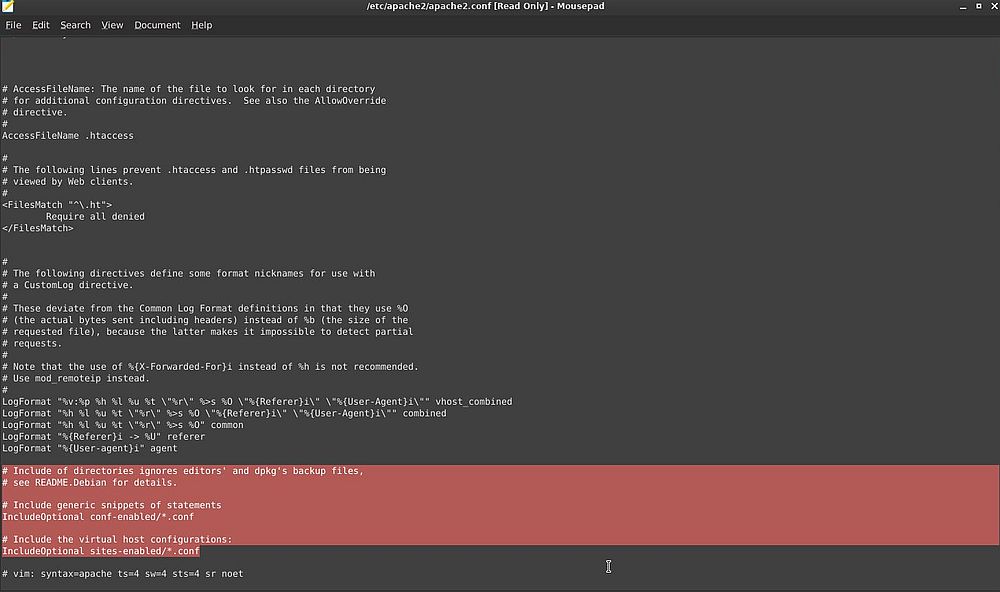
| Configuring Apache is made rather complicated because the configuration settings are split into several files. The main configuration file /etc/apache2/apache2.conf does not contain a lot, and in particular does not contain the settings for the default host (on Windows, you find the settings for localhost on port 80 in httpd.conf; other virtual hosts are defined in a supplementary configuration file). On the screenshot below, you can see that there are two directories from where all files with extension .conf are included into the Apache configuration: /etc/apache2/sites-enabled and /etc/apache2/conf-enabled. | ||
|
||
| The directory /etc/apache2/sites-enabled contains one file for each site (i.e. each virtual host). The directory /etc/apache2/conf-enabled contains one file for each specific feature; e.g. configuration of CGI scripting. | ||
| However, these directories do not contain the configuration files themselves, but a link to configuration files located in the directories /etc/apache2/sites-available and /etc/apache2/conf-available. This means, that you have to create the configuration files for your sites in the directory /etc/apache2/sites-available, and then, in order to enable them, create a link in /etc/apache2/sites-enabled (resp. remove this link, if you want to disable a site). The advantage of this configuration structure, that may appear bizarre at first sight, is obvious: You can have plenty of different configurations in your /etc/apache2/sites-available directory; all you have to do to use/not to use one or the other is to enable/disable it in /etc/apache2/sites-enabled (what can easily be done using commands provided with the Apache installation files). | ||
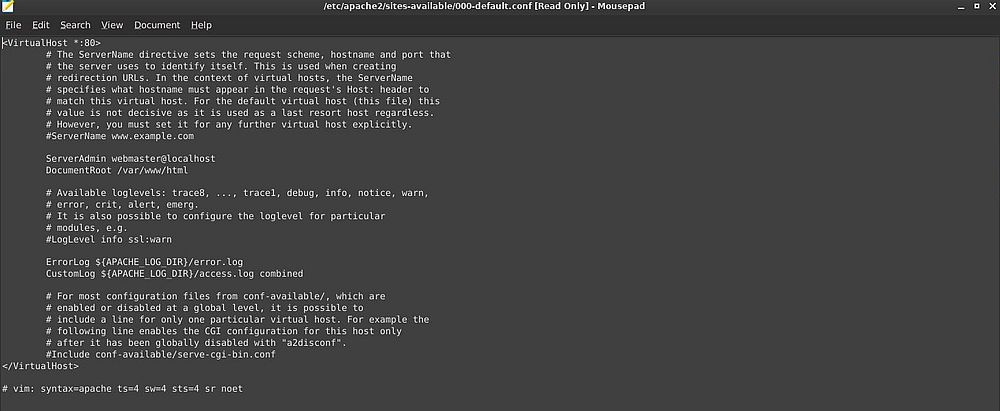
| The configuration of the default site (localhost, port 80) is contained in the file /etc/apache2/sites-available/000-default.conf. | ||
|
||
There are three important settings in this file:
|
||
| Note: If you look at the content of /var/www/html, you'll find the HTML document served when we tried tried out Apache after installation. | ||
| I guess that we wouldn't do anything wrong by using this file for our website, simply replacing the content of /var/www/html by our own files. Good practice however consists in creating a new configuration file, that we name using the full qualified DNS name of the computer, in my case wk-pepp.local (this name will also be used as name for the webserver). We will also use a different document root, here again using a name based on the computer name: I chose /var/www/wk-pepp.local/public-html. Using the subdirectory public-html gives us the possibility to define other subdirectories, such, for example, cgi-bin, a private directory (with authentication access only), or a directory used by statistics software. | ||
|
The easiest way to create our configuration file is to use the default configuration file as template; so let's make a copy: cd /etc/apache2/sites-available sudo cp 000-default.conf wk-pepp.local.conf Then we can edit this file using, for example, the "nano" text editor. sudo nano wk-pepp.local.conf |
||
|
Here are the modifications that I made to the original configuration file. First I set a hostname (plus, optionally, the one or the other
alias): ServerName wk-pepp.local ServerAlias wk-pepp ServerAlias www.wk-pepp Then I changed the document root: DocumentRoot /var/www/wk-pepp.local/public-html |
||
| Note: To save the file in "nano", push CTRL+X, enter "Y" when asked if you want to save the file, and to save the file with its actual name in the actual directory, hit ENTER (if you get a "permission denied" error, it's because you didn't run "nano" as super-user, i.e. because you forgot to prefix the command with "sudo"). | ||
|
Now, let's create the new document root: sudo mkdir /var/www/wk-pepp.local sudo mkdir /var/www/wk-pepp.local/public-html and place some simple index.html file in there. <html> <head> <title>Apache webserver on WK-PEPP</title> </head> <body> <h1 align="center">Welcome to WK-PEPP</h1> </body> </html> |
||
|
Two important steps that remain to do. First, we have to enable the new site. This is done using the command: sudo a2ensite wk-pepp.local Second, we have to disable the default site. This is done using the command: sudo a2dissite 000-default |
||
| After having made these changes, we'll need to restart Apache. The service command, suggested to do this, is not available on Peppermint OS. Just let's do it using Apache itself: sudo /etc/init.d/apache2 restart | ||
| Ready to test our new website. Entering http://wk-pepp/ in your web browser's address field should display the HTML of our index.html file (that we have placed into the /var/www/wk-pepp.local/public-html directory). | ||
|
||
| Note: Using the URL http://wk-pepp/ only works if this actually is the computer's name. Using http://www.wk-pepp/ does not work, as the operating system doesn't know anything about the Apache server aliases. In the case, where Peppermint OS is part of a local network with a DNS server, where the Apache server name and aliases are defined (associated with an IP address), both the server name and the aliases may be used to access our Apache (and this, of course, from all computers on this network). | ||
| 3. Configuring CGI. | ||
| If you have a look in the /etc/apache2/conf-available directory, you find a file called serve-cgi-bin.conf. It's in this file that the settings for CGI scripting are stored. | ||
|
||
| You can see on the screenshot that the default cgi-bin directory is located at /usr/lib/cgi-bin. I guess that this is the commonly used location for the cgi-bin directory on Linux (?), and I didn't change it. A reasonable alternative would be the /var/www/wk-pepp.local/cgi-bin directory (that we would have to create if we wanted to use it). | ||
| As the sites related configuration settings, the special configuration settings, defined in /etc/apache2/conf-available have to be enabled by placing a link of the file into /etc/apache2/conf-enabled (unless you prefer a site-specific CGI configuration and include the configuration file in /etc/apache2/conf-available in your site configuration file). Checking the /etc/apache2/conf-enabled directory, you'll see that the CGI related link is already there, i.e. the CGI configuration in serve-cgi-bin.conf is enabled by default. | ||
|
CGI does, however, not yet work, because the Apache CGI module is not loaded by default, and if we want to run CGI scripts,
we'll have to enable the module called cgid. On Debian based systems, Apache module configuration works the same way as configuration of
sites and special settings. There is a directory called /etc/apache2/mods-available, containing the Apache modules, enabled or not, and a
directory called /etc/apache2/mods-enabled, that contains links to the modules that are actually enabled. The module
cgid is not part of them, thus we have to enable the cgid module. sudo a2enmod cgid Don't forget to restart Apache when done... |
||
|
To test Perl CGI, I created a simple Perl script called "hello.pl, and placed it into the /usr/lib/cgi-bin directory. #!/usr/bin/perl use strict; use warnings; print "Content-type: text/html\n\n"; print "<html>"; print "<head><title>Perl CGI test</title></head>"; print "<body><h1>Hello from Perl!</h1></body>"; print "</html>"; | ||
| To run the script, type the following in the address bar of your web browser: http://wk-pepp/cgi-bin/hello.pl. | ||
|
||
| Note: If you get an Internal server error message with one of your Perl scripts, the reason may be that you used CGI.pm, that is no longer part of the Perl core on most operating systems (cf. my article Perl web programming: Extracting form data by parsing the HTTP request message). | ||
| 4. Generating a SSL certificate. | ||
|
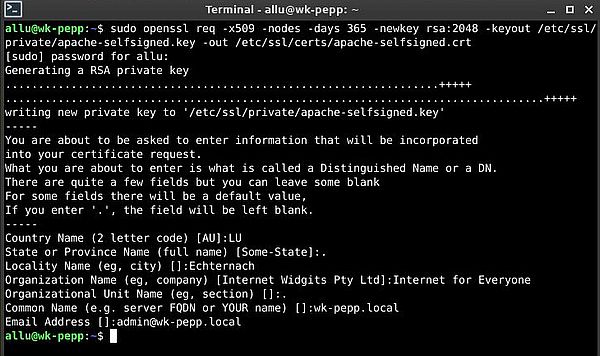
In order to be able to use HTTPS, we need a SSL certificate. On a local network, there is no real issue to create a self-signed certificate.
This is actually easier on Linux than on Windows, because OpenSSL is installed, and all we have to do is to run a command like the following: sudo openssl req -x509 -nodes -days 365 -newkey rsa:2048 -keyout /etc/ssl/private/apache-selfsigned.key -out /etc/ssl/certs/apache-selfsigned.crt |
||
|
||
| This commands does all in one: Generation of a private key (that resides on the server and is used to encrypt the content), called "apache-selfsigned.key" and placed into the directory /etc/ssl/private, and generation of a a certificate (.crt file) for the domain that the webserver belongs to; the certificate file is called "apache-selfsigned.crt", and is placed into the directory /etc/ssl/certs. To enter the certificate information, type the text for custom values, hit ENTER to accept the proposed default, or enter a dot (.) to indicate an empty value. On a local server the values entered are not really important, except that the common name has to be set to the webserver name ("wk-pepp.local", in our case). | ||
| If you are interested in the details of the command described above, please, have a look at the article How To Create a Self-Signed SSL Certificate for Apache in Ubuntu 22.04 at digitalocean.com. | ||
| 5. Configuring HTTPS. | ||
|
The configuration of HTTPS is similar to the one of HTTP. We'll create a new site configuration file in /etc/apache2/sites-available,
calling it for example wk-pepp.local-ssl.conf. As before, we can use the default SSL configuration as a template, so, let's copy that
file: cd /etc/apache2/sites-available sudo cp default-ssl.conf wk-pepp.local-ssl.conf and in order to modify it, open it in nano: sudo nano wk-pepp.local-ssl.conf |
||
|
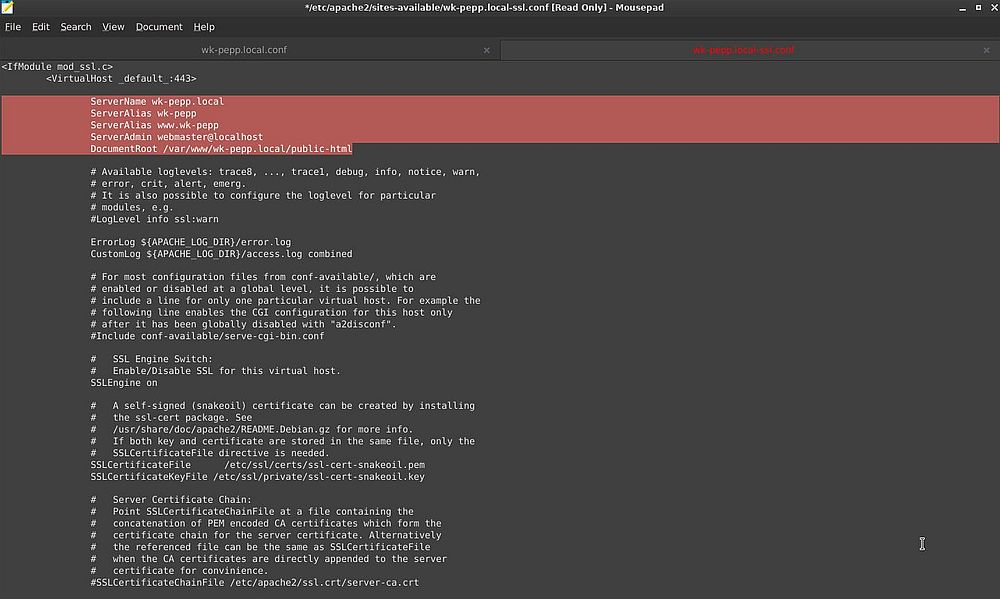
Here are the modifications that I made to the original configuration file. First I set a hostname (plus, optionally, the one or the other
alias) and changed the Apache document root (the values of all these settings are actually the same as for HTTP): ServerName wk-pepp.local ServerAlias wk-pepp ServerAlias www.wk-pepp DocumentRoot /var/www/wk-pepp.local/public-html Then I changed the certificate related settings: SSLCertificateFile /etc/ssl/certs/apache-selfsigned.crt SSLCertificateKeyFile /etc/ssl/private/apache-selfsigned.key |
||
| The screenshot shows (a part of) the SSL configuration file, after I set hostname and document root to the adequate values for our server. Note (first line of the file) that the SSL virtual host is running on default HTTPS port 443. | ||
|
||
|
As before, we'll have to enable the new configuration file: sudo a2ensite wk-pepp.local-ssl There is no need to disable the old SSL configuration file, because it was not enabled... |
||
|
There is a further step to do: We have to enable the SSL module: sudo a2enmod ssl |
||
| And, of course, we'll have to restart Apache to make the changes become active. | ||
| Now we are finally ready to test our HTTPS configuration. In the web browser's address field, enter: https://localhost. As you can see on the screenshot below, we don't immediately get to the site. All modern web browsers consider self-signed certificates as a security risk (and if you encounter this situation on the Internet, you should consider this yourself, too), and issue a warning when trying to access such a site. To get to the site, push the Advanced... button, and you'll get the possibility to Accept the risk and continue. | ||
|
||
| And to terminate this tutorial, here is a screenshot showing HTTPS access to my webserver on Peppermint OS (IP address = 192.168.141.121) form a Windows 2000 machine, using the Pale Moon web browser. | ||
|
||
If you find this text helpful, please, support me and this website by signing my guestbook.
