| 4. FTP access to the Apache website directories. |
| |
In my tutorial Web/Database environment on macOS: Apache webserver basics, I showed how
to run and configure the Apache 2 webserver on macOS 11 BigSur. This tutorial explains how to install the FileZilla FTP
server and configure it in order to be able to upload files to the macOS website from another computer on the local network. The tutorial should apply to newer
versions of macOS, too.
|
| |
FileZilla Server can be downloaded from the FileZilla project website. The download file is a macOS package (.pkg), thus, easy
installation by simply double-clicking this file. The version, that I actually use is FileZilla Server 1.10.3; the tutorial should apply to
future versions, too.
|
| |
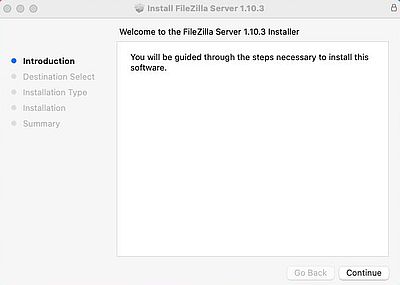
The screenshot shows the Welcome window of the setup program.
|
| |
|
| |
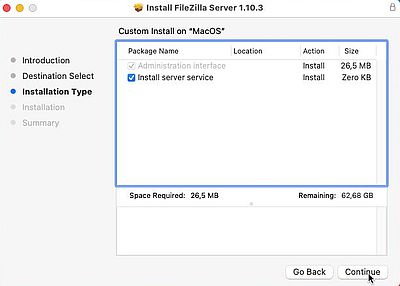
The installation is straight forward. Just make sure that the checkbox Install server service is selected.
|
| |
|
| |
Note: I'm new to macOS, so this note may be inappropriate. In fact, I thought that the installation of software not distributed by
Apple themselves on a macOS system, would always require an explicit permission of the user to do so. This seems not to be the case; FileZilla installed the same way as
would any Apple application. Is there a possibility for other companies to digitally sign their products and hereby make them trustworthy by Apple? May such applications
always be installed, or did I myself configured a related setting without remembering?
|
| |
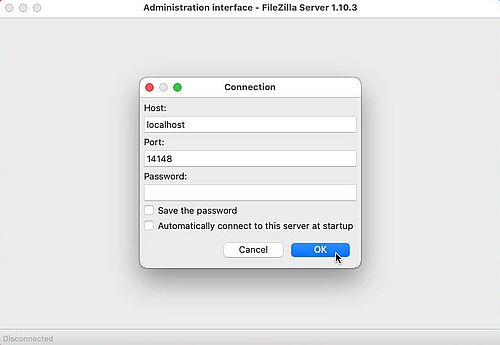
After the installation has been done, you'll find a new launcher called FileZilla Server with your other macOS applications. The launcher
actually starts the FileZilla Server Administration Interface. It starts as a window with nothing than a Connect
button. Pushing this one, opens a dialog box that allows you to login to this (or another) FileZilla server. The default connection is for
localhost (this Mac) on port 14148. There is no user name associated with this connection (or, is it the account
of the actual macOS user?); the password field has to be left empty (at this stage).
|
| |
|
| |
The first time, that you connect to FileZilla Server, you'll get the warning that the server certificate fingerprint is not known, and you'll have to
confirm that you trust this server.
|
| |
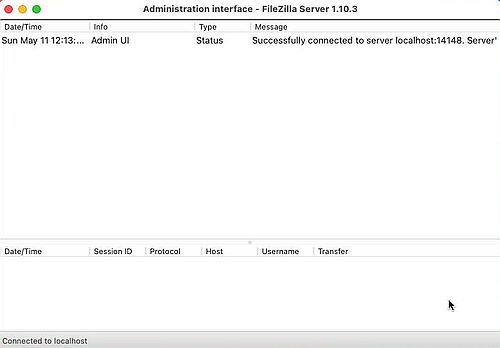
The screenshot shows the startup window of the FileZilla Server Administration Interface.
|
| |
|
| |
To set up your local FileZilla Server, from the macOS menu bar, choose Server > Configure.... There are lots of options available, but
don't worry, for most of them the default values are all fine.
|
| |
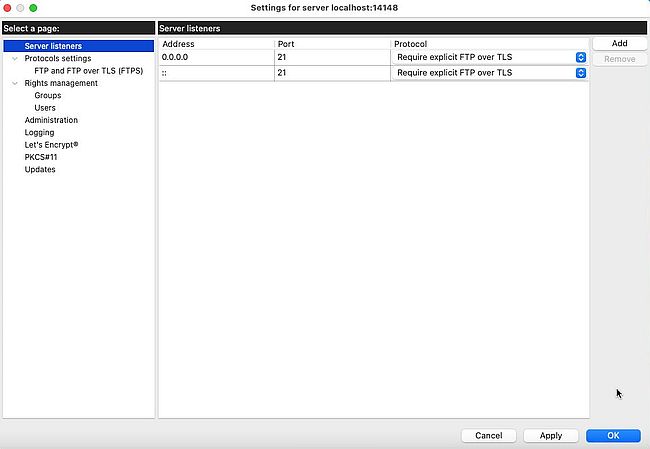
The screenshot shows the opening window of the FileZilla Server configuration. As you can see, FileZilla Server listens on port 21 on all
available network interfaces. The protocol to be used when connecting to the server is set to Require explicit FTP over TLS. This means that
the connection will be encrypted, the TLS credentials used by default being a self-signed X.509 certificate (using a "real" certificate via
Let's Encrypt® is, of course, possible.
|
| |
|
| |
I failed to set an administrator password. Maybe that I missed something, but not only it did not work, but made the administration interface
unresponsive. As I don't know enough about macOS to kill a hanging application, I tried to reboot, what did not work because the interface was still running.
Finally, I restarted the VMware virtual machine (that's power-off/power-on on a physical machine). Continuing without password (not really needed, anyway).
|
| |
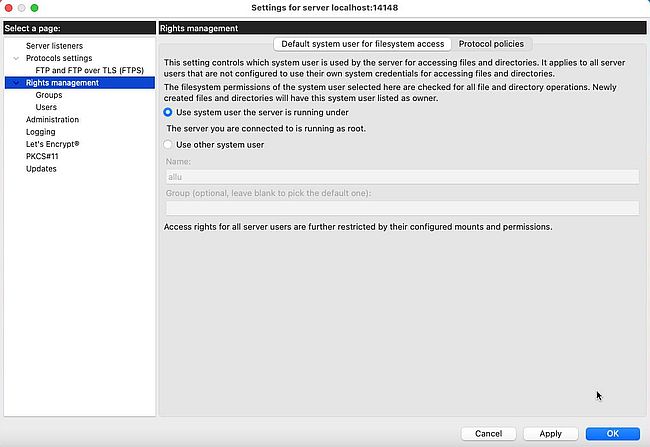
FTP users and directories are configured by selecting the Rights management items in the left pane of the administration interface. First,
we have to set the default system user for filesystem access, i.e. the macOS user that will be used by the server when accessing files and
directories. The default setting "Use system user the server is running under" should be fine (I think?).
|
| |
|
| |
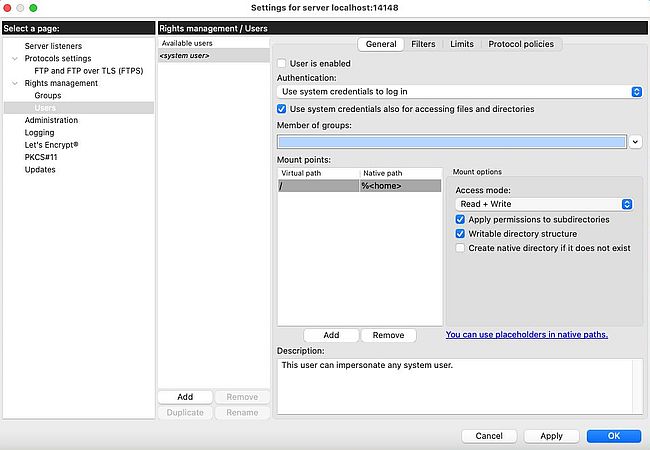
Directory configuration on the FileZilla FTP server is done on a user basis. By default, the system user (our macOS user) is part of the
list of available users. Also by default, this user is not enabled, and I let them disabled, creating a custom user for accessing the
FileZilla Server (cf. further down in the text).
|
| |
|
| |
In my (simple) configuration of the FileZilla server directory structure, the FTP root directory should have two subdirectories. The first one (I call it "www")
corresponds to the Apache website, allowing to upload files to the website on the macOS machine. This directory should be read-write accessible by a
custom user, that I call "allu". The second directory (I call it "public") is an anonymously accessible download directory; "allu" should have the rights to
also upload files to there.
|
| |
With the Apache website directory on macOS being /Library/WebServer, I created the directory /Library/FTPServer as root of the
FileZilla directory structure. In this directory, I created the subdirectory public, the anonymously accessible download directory.
|
| |
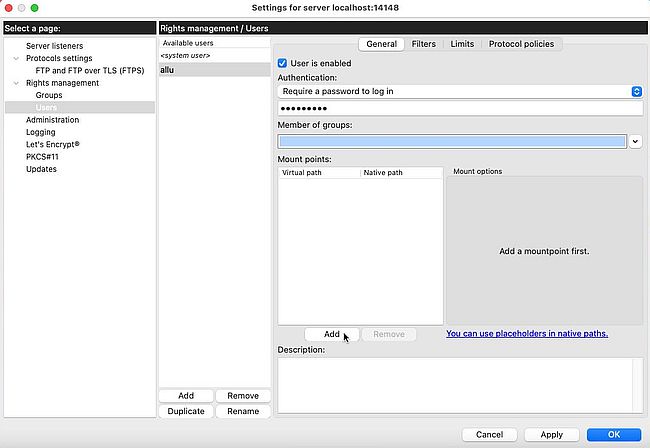
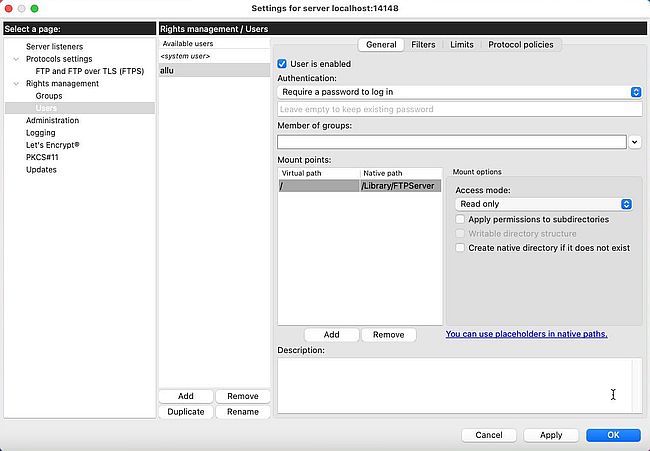
To create the custom user "allu", select Rights management > Users in the left pane. In the opening
Rights management/Users pane, click the Add button in the left sub-pane to add a new user; set the user name.
Then, in the right sub-pane, select "Require a password to log in" from the drop-down list, and enter the password for the new user. Make sure that the checkbox
near User is enabled is selected! You can then use the Add button in the right sub-pane to create the FTP server
mountpoints.
|
| |
|
| |
The first mountpoint to be added is the FileZilla root directory. In the server directory structure (virtual paths) this corresponds to /.
in the local directory structure (native paths), this corresponds to /Library/FTPServer (my choice form above). I chose to set the permissions
of this mountpoint to read-only, and not to apply the permissions to the subdirectories. This means that "allu"
can view the content of the root directory, but cannot create any subdirectory, or upload any file to there (nor can he delete or rename a file or directory in the root
directory). As the "read" permission is not automatically inherited by the root's subdirectories, "allu" will not have the permission to enter any subdirectory unless
explicitly allowed by some further mountpoint configuration.
|
| |
|
| |
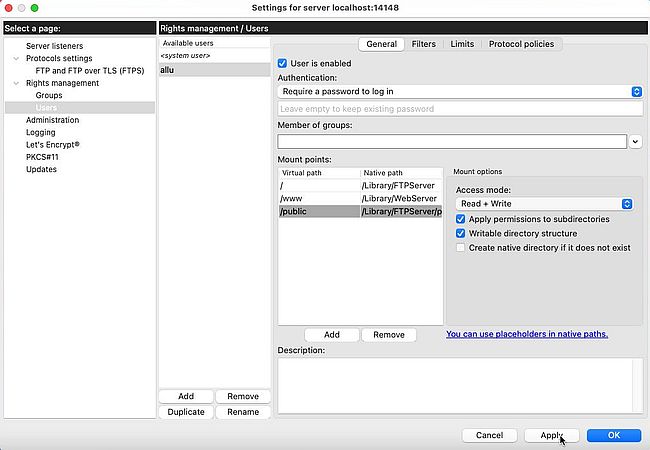
The website subdirectory and the public download subdirectory are added as virtual paths /www and /public
respectively. The corresponding native paths are /Library/WebServer and /Library/FTPServer/public. These two
directories have to be read-write and this permission has also to be applied to their subdirectories.
|
| |
|
| |
Time to test! My macOS BigSur is a VMware Workstation 16 virtual machine, running on a Windows 10 host. The two computers are part of a VMware "hostonly" network,
where there is also an IPFire firewall/router machine. The macOS computer gets its IP address from the DHCP server running on IPFire (and also connects to the Internet
using this machine as gateway). The Windows 10 machine can access the macOS machine using its DNS name ("wk-mac11"), thanks to the DNS server running on IPFire.
|
| |
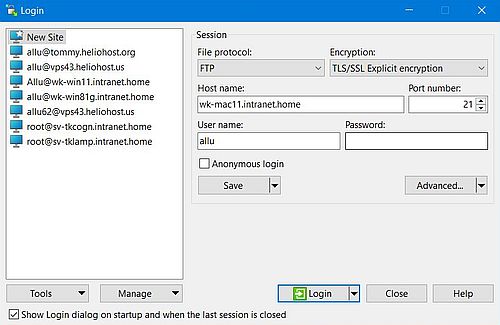
My actual Windows FTP client is WinSCP. The screenshot below shows the creation of a new FTP site in that application. The hostname is the
full qualified DNS name of the macOS machine ("wk-mac11.intranet.home"); the user is the FTP user, created in FileZilla Server before ("allu"). The communication with
the FileZilla Server is done on port 21, using the FTP protocol with TLS/SSL explicit encryption (all these values have been configured on FileZilla Server before).
|
| |
|
| |
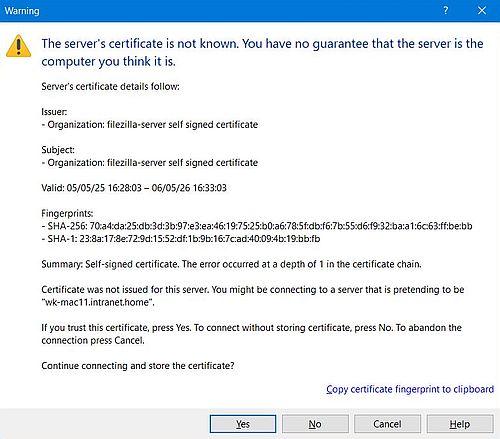
The first time that you try to log in to the macOS FileZilla Server, you'll get a warning that the server's certificate is not known. The
reason is that our certificate is self-signed, instead of being signed by an authority that confirms that the server is the one that you expect it to be. In our case,
we can safely ignore the warning and proceeding with the connection. This decision will be remembered by WinSCP and the next time the connection will be done as to any
regular server.
|
| |
|
| |
Unless that you store the password together with the other connection data, you'll ask for it at connection time. Note, that this has to be the FTP user password, not
the one of your macOS user!
|
| |
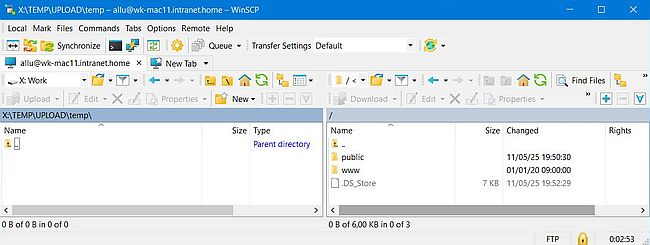
The screenshot below shows the content of the FileZilla Server root directory. As expected, there are two subdirectories called respectively
"www" and "public". However, there is also a file called ".DS_Store". This file, invisible on macOS, and only visible here because my WinSCP is configured to show
hidden files, has been automatically added. I suppose that it was macOS that did this (?). No idea what it is and why it is there...
|
| |
|
| |
You can now test if all works as you want. Both "www" and "public" are read-write for "allu", so you should be able to download and upload files and directories,
to create, rename and delete files and directories. As the FTP server root is read-only for "allu", you should be able to download the file ".DS_Store", but you can't
rename or delete it. No permission either to upload to the root directory. And finally, if on your macOS machine you create a new directory in /Library/FTPServer, you
should not be able to enter this directory by FTP access.
|
| |
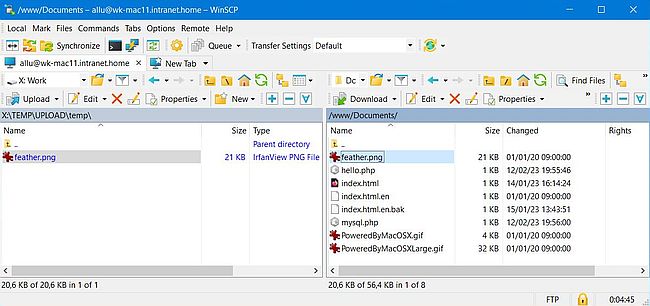
The screenshot below shows the successful upload of a PNG file to the Apache document root directory.
|
| |
|
| |
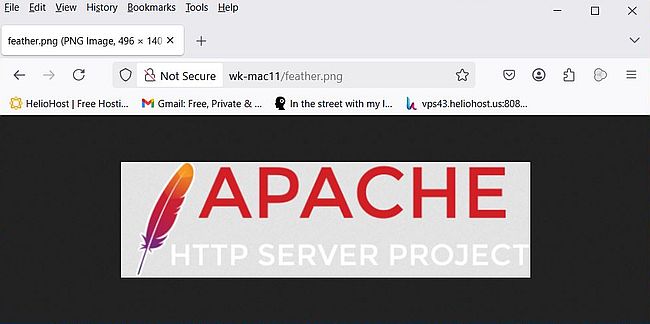
And the display of the uploaded file in Firefox, running on my Windows 10.
|
| |
|
| |
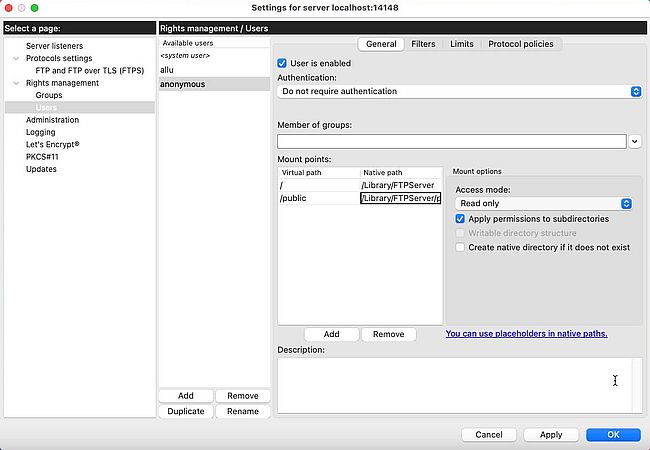
The creation of an anonymous FTP user is done the same way as for "allu". Use "anonymous" as user name, and from the drop down list, choose
Do not require authentication.
|
| |
The FTP root directory for "anonymous" is the same as for "allu" and with the same configuration (read-only, permissions not applied
to subdirectories). The FTP directory structure of "anonymous" is made of a single subdirectory, mounted as /public, and corresponding to
the native directory /Library/FTPServer/public. As a difference with "allu" it has to be "read-only". Do not forget to apply this permission
to its subdirectories (in order to be able to enter those and download files from there).
|
| |
|
| |
When you access FileZilla Server anonymously, the remote site will be shown as the FTP root containing the single subdirectory "public" (plus the file ".DS_Store").
The Apache website directory will not be visible in the FTP client, thus cannot be accessed using an anonymous connection.
|
| |
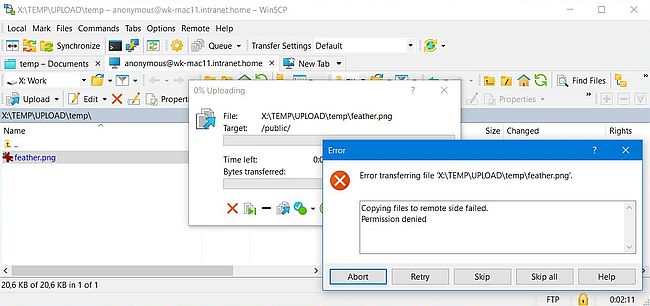
The screenshot below shows the anonymous FTP user trying to upload a file to the public download directory. Permission denied error message,
of cause, as the anonymous user has just read-only access (to download files from the server...).
|
| |
|
| |
Installing FileZilla.
|
| |
FileZilla, i.e. the FileZilla client, can be downloaded from the FileZilla Project website. The download file is a tar.bz2 file. Open it using the Archive utility; this extracts
its content to the Downloads directory. The extracted file actually is the FileZilla client application, thus move it to your macOS
Applications.
|
| |
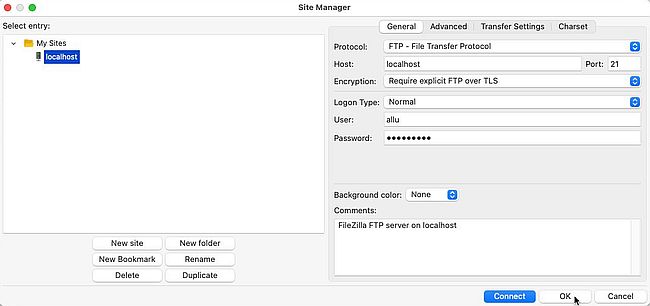
Use File > Site Manager... from the application menu bar to create the connection for "allu". Set Host = "localhost". All other settings
are the same as before, when we created the connection for "allu" in WinSCP.
|
| |
|
| |
No idea if this is a bug, or what else could be the reason, but the port is not saved with the other connection settings, and you'll have to
enter it manually each time that you connect to FileZilla Server!
|
| |
Similarly as with WinSCP before, when connecting for the first time, you'll get a warning saying that the hostname does not match the
certificate. Nothing to worry about on our local FileZilla Server. If you encounter such problem when accessing an FTP server on the Internet, better to abort the
connection...
|
| |
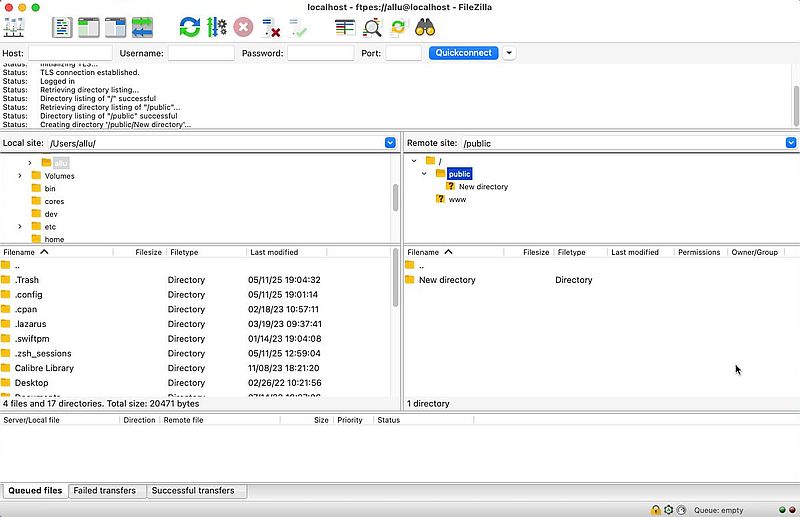
The screenshot shows the FileZilla Server directory structure with the two subdirectories "www" and "public" (plus the file ".DS_Store"), as well as the successful
creation of a new directory in "public".
|
| |
|
