Installing a Windows-Linux dual boot (third party bootloader).
This tutorial is about the BIOS boot of an old version of Microsoft Windows and some Linux distribution, installed side by side on the same computer harddisk. Old version of Windows, because the newer versions only support UEFI boot; here Windows Vista (64-bit) is used. The Linux distribution must support BIOS boot, too, of course (this is probably not the case of all actual Linux systems); here Slackware 15 (64-bit) is used.
In two previous tutorials, I showed how to install a Windows and Linux dual boot using the Linux bootloader, and how to install a Windows and Linux dual boot using the Windows NT bootloader. This second way to proceed does only work up to Windows XP; Windows Vista and following do not support a boot menu feature (that's Microsoft!). Booting Vista using the Slackware bootloader might be possible (not really sure about that?), but here we'll doing it differently: Boot of the two OS, using a third party bootloader, in this case the freeware application EasyBCD.
Here are the steps necessary to install a Windows Vista and Slackware 15 dual boot using the EasyBCD bootloader:
- Install Windows Vista in the usual way (installation on a primary partition that uses the entire disk). The Windows NT bootloader will be written to the MBR (what will allow Windows Vista to boot from the harddisk).
- Install AOMEI Partition Assistant to create the Linux partitions.
- Install EasyBCD. Configure the EasyBCD boot menu and write the EasyBCD bootloader into the MBR (where it will replace the Windows NT bootloader).
- Install Slackware 15 onto the ext4 partition created before. Be sure to install LILO into the Linux partition "superblock", not into the MBR!
- Boot into Windows Vista and configure the EasyBCD boot menu, adding an entry for Slackware.
1. Installation of Windows Vista.
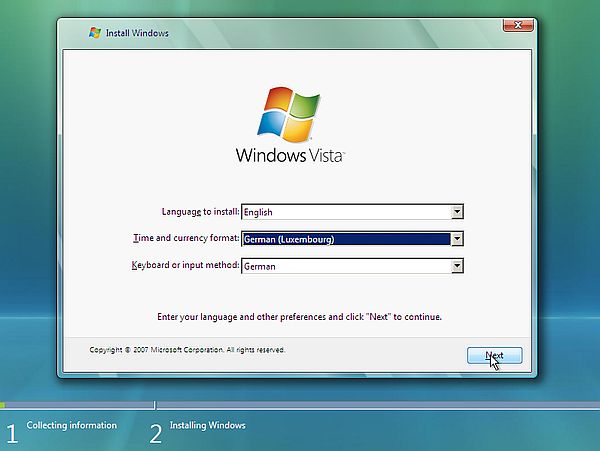
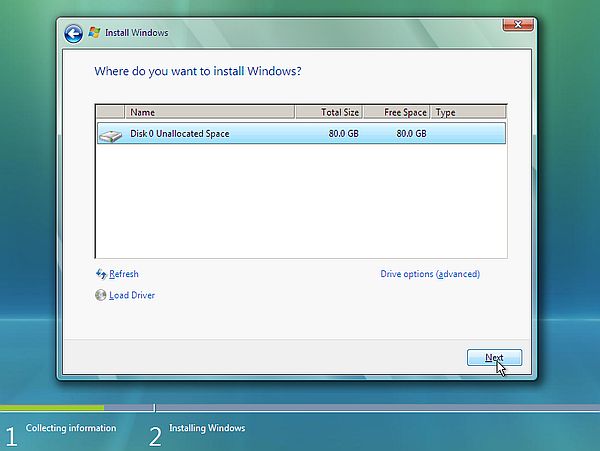
I actually use Windows Vista Ultimate 64-bit SP2. The screenshot on the left shows the first screen of the installer program. With Windows XP, Microsoft made it easy to install a second operating system side-by-side with Windows. Unfortunately, they changed their policy up from Windows Vista. As you can see on the screenshot on the right, the only possibility, that the user has, is to use the entire disk for Vista (no possibility to create any partitions, as it was the case with XP).
|
|
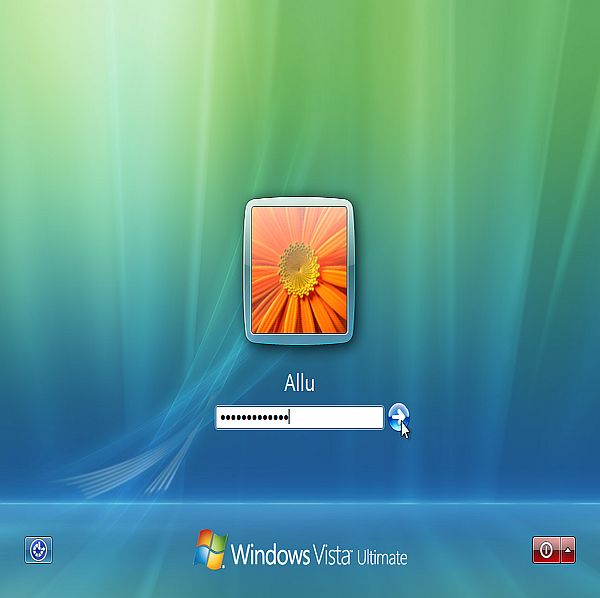
Proceed with the installation. When terminated, you are able to boot from the harddisk: Windows Vista is loaded and the Windows Vista login screen is displayed.
|
2. Creating the Linux partitions.
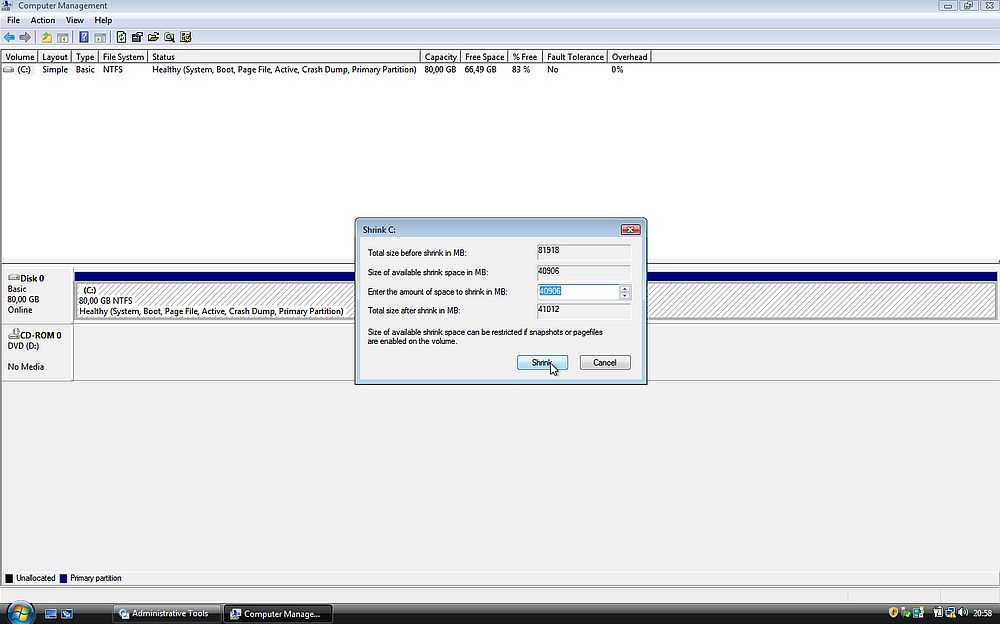
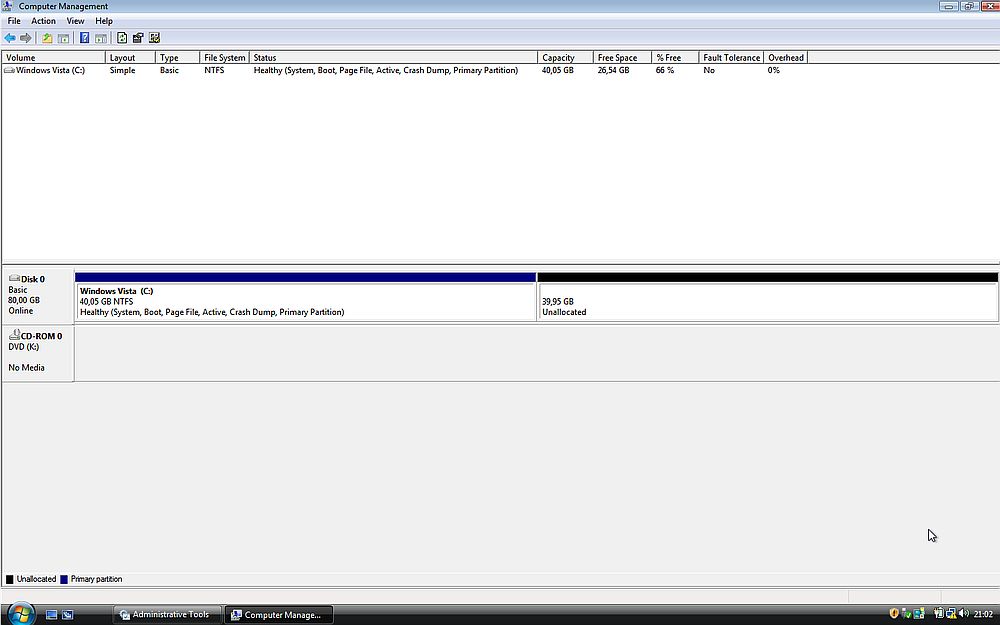
As the Windows Vista partition occupies the entire disk, we have to create some space for Slackware. Open Control Panel > Administrative Tools > Computer Management > Disk Management. In the graphical representation of the disks, right-click the C: partition, and from the context menu showing up, choose to shrink the volume. A dialog box is displayed, and you can enter the amount of disk space to be shrunk (in MB). On my 80 GB harddisk, I chose to shrink the C: partition by 40 GB, thus creating a free space of some 40 GB for Slackware (and 40 GB remaining for Vista).
|
The screenshot below shows the new partition layout (I also set a volume label for the C: drive, and changed the drive letter of the DVD).
|
Creating the Linux partitions before starting the installation of Slackware is (probably) the best way to proceed. To do so, we need a partitioning tool; I installed AOMEI Partition Assistant Standard Edition (freeware), that you can download from the AOMEI website. The screenshot below shows the partition layout at this stage, and how I started to create a new partition in the non allocated space.
![AOMEI Partition Assistant: Creating a new Linux partition [1] AOMEI Partition Assistant: Creating a new Linux partition [1]](../screenshots/winlin_dualboot3f.jpg)
|
In the Create Partition window, select a size of 4 GB less than the space available (36 GB in my case), and EXT4 as filesystem.
![AOMEI Partition Assistant: Creating a new Linux partition [2] AOMEI Partition Assistant: Creating a new Linux partition [2]](../screenshots/winlin_dualboot3g.jpg)
|
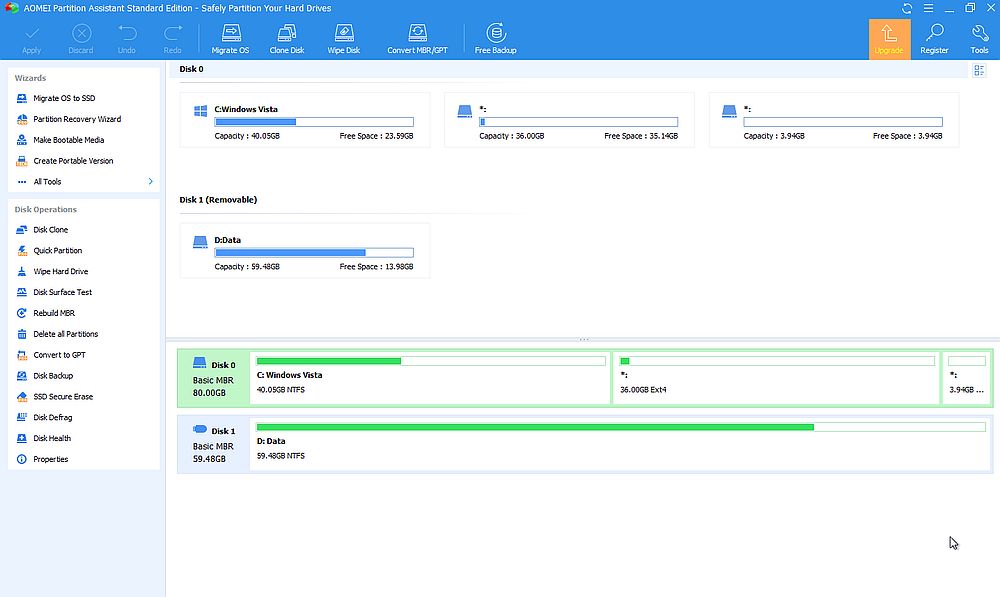
The 4 GB of space, that I left at the end of the disk, are for a Linux swap partition. A little bit surprisingly, AOMEI Partition Assistant does support this file system; so I created the new partition, letting it unformatted. The screenshot shows the partition layout after the creation of the two partitions for Slackware.
|
3. Installing the EasyBCD bootloader.
We can now install the EasyBCD boot manager. The Community Edition of this software is free for personal, non-commercial use; you can download it from the Neosmart Technologies (the vendor of the software) website.
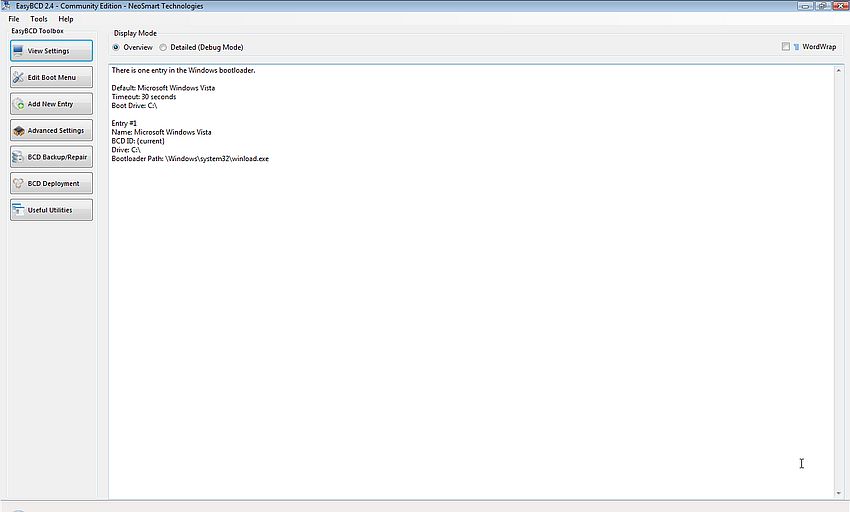
The screenshot shows the original settings of the boot manager after installation. There is one OS, appearing in the boot menu as "Microsoft Windows Vista".
|
I renamed the boot menu item to "Windows Vista". I then added partition 2 (Linux 36 GB), naming the boot menu entry "Slackware Linux". Finally, I set the timeout value (time before the default OS is booted) to 20 seconds.
Note: Adding the Linux partition here is (probably) nonsense. First, this is not necessary at this stage, and second when, after having installed Slackware, I tried to boot the Linux OS (from the second entry in the boot menu), I got a VMware player unrecoverable error, the error message saying that the VM has tried to execute an invalid part of memory. I suppose that creating the boot entry before the Linux OS is actually installed, does not copy the code necessary to boot Linux, simply because it is not available (?). Anyway, just do not add the Linux entry to EasyBCD (so, for the moment, we have a boot menu with the only entry "Windows Vista").
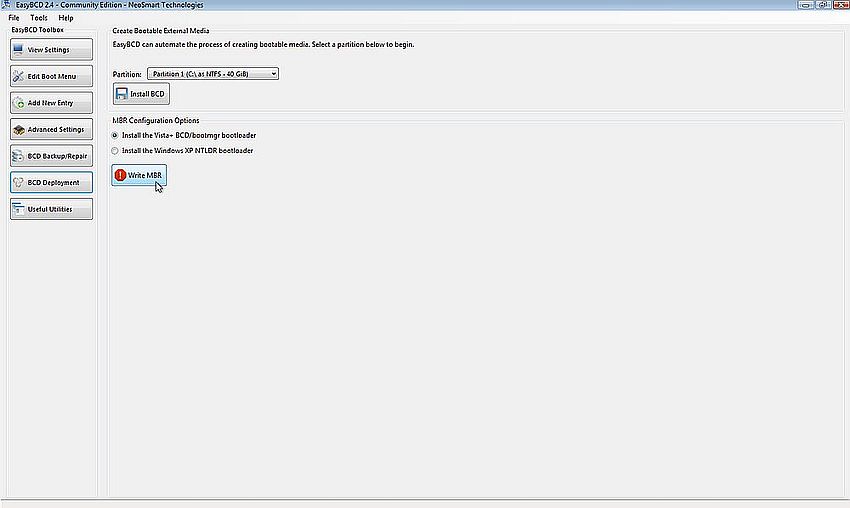
EasyBCD is now configured, and we'll have to write the EasyBCD bootloader into the MBR. From the EasyBCD Toolbox, choose BCD Deployment. The upper part of the corresponding page is to write BCD onto an external media, such for example a floppy diskette. The lower part concerns the installation of the new bootloader into the MBR. Attention: Writing to the MBR destroys all of its actual content! In other words, if you should have made a mistake in the configuration settings, you risk that your computer will no boot anymore. You can avoid this possible problem by 1. backing up the actual (Windows Vista) MBR, and 2. testing your settings by writing BCD to an external media and trying if you can boot the computer with the settings as configured.
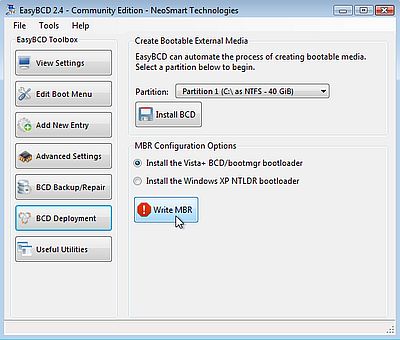
Concerning the MBR Configuration Options, be sure that Install the Vista+ BCD/bootmgr bootloader is checked. Push the Write MBR button. When rebooting your computer, this one should now start up displaying the EasyBCD boot menu. For more information about the deployment of BCD, have a look at the article Updating the MBR and Bootsector at the Neosmart Technologies website.
|
4. Installing Slackware 15.
In order to be able to boot from the Slackware DVD, you'll have to change the BIOS boot sequence: 1. DVD-drive; 2. harddisk-drive; 3. removable media.
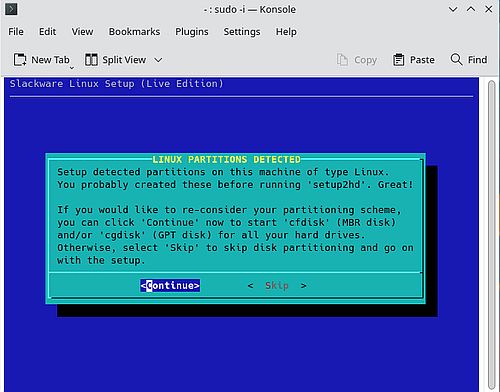
Boot into the Slackware Live DVD, and launch the Slackware installer by clicking the corresponding icon on the desktop. A notice pops up saying that a Linux partition has been detected (the one that we created using AOMEI before). Two options now: If you push the Skip button, partitions will be let as they are and Slackware will be installed onto the EXT4 partition; if you push the Continue button, the partitioning tool will be launched and you can make modifications to the actual partition layout. It's this second possibility that we will use here.
|
The partitioning tool starts up with asking you to select the harddisk that should be (re)partitioned. Only one available: /dev/sda.
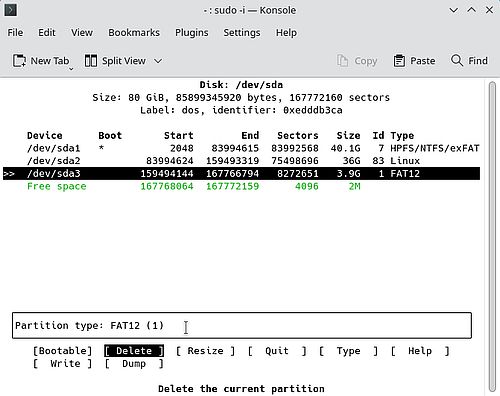
The partition layout of /dev/sda is displayed. There are 3 partitions: /dev/sda1 = the bootable NTFS partition, where Windows Vista is installed; /dev/sda2 = the ext4 partition, where Slackware will be installed; /dev/sda3 = the partition that we intend to use as Linux swap.
|
As you can see on the screenshot, I decided to delete (and then recreate) the third partition. To recreate it, select the free space that appears after the deletion, and select New from the command bar. On the following screens, enter the partition size (3.9 GB = all space available), and the partition type (primary).
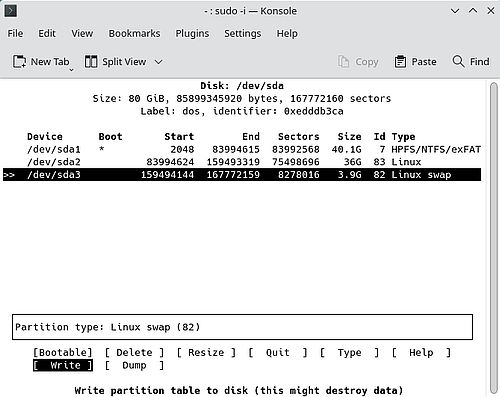
By default, the partition would be formatted using the ext4 filesystem. To change this, select it and select Type (= filesystem type) from the command bar (screenshot on the left). From the list of available filesystems, choose Linux swap (screenshot on the right).
![Installation of Slackware 15: Creating a swap partition [1] Installation of Slackware 15: Creating a swap partition [1]](../screenshots/winlin_dualboot3m.jpg)
|
![Installation of Slackware 15: Creating a swap partition [2] Installation of Slackware 15: Creating a swap partition [2]](../screenshots/winlin_dualboot3n.jpg)
|
The screenshot below shows the final partition layout. Select Write from the command bar to write the new partition table to the harddisk (you'll have to confirm this crucial action, before it is actually done).
|
You can now select Quit from the command bar in order to exit the partitioning tool.
Slackware Linux Setup is now started. This is rather long, with lots of information to be entered by the user. I will describe here only those settings that concern the partition mount points and the installation of LILO (as a difference with other modern Linux distributions, Slackware continues to use LILO, and not GRUB2, as bootloader).
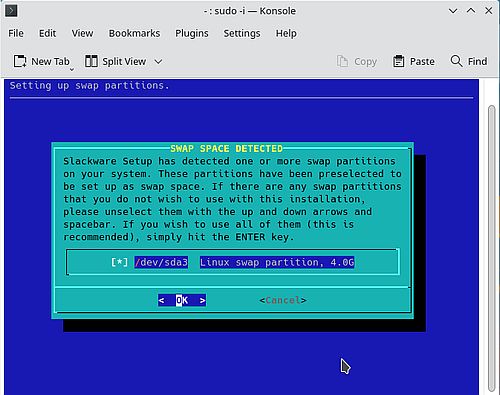
The setup program detects the swap partition that we previously created as device /dev/sda3, and all we have to do is to accept it to be used as swap for the new Slackware installation.
|
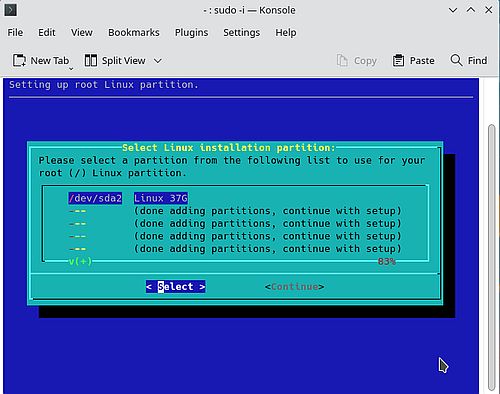
We have then to select the Linux root partition, that will be mounted as /. Obvious, that this has to be our Linux partition /dev/sda2. We should choose to (re)format this partition using the ext4 filesystem.
|
Finally, the setup program detects the Windows Vista partition. From the list of partitions to be added to /etc/fstab, choose (the only one available) /dev/sda1 (screenshot on the left). The default security settings for this partition are to give root read-write access, other users no access; accept this setting or adapt it to your needs (no screenshot). To be able to access the partition, we have to specify a mount point; I chose /vista (screenshot on the right).
![Installation of Slackware 15: Partition setup - Windows Vista partition [1] Installation of Slackware 15: Partition setup - Windows Vista partition [1]](../screenshots/winlin_dualboot3r.jpg)
|
![Installation of Slackware 15: Partition setup - Windows Vista partition [2] Installation of Slackware 15: Partition setup - Windows Vista partition [2]](../screenshots/winlin_dualboot3s.jpg)
|
We arrive now at the crucial point of the setup process: the installation of LILO. Do not try to install LILO automatically, but choose to use an expert lilo.conf setup menu (screenshot on the left). On the following screens (no screenshots), choose to start LILO configuration with a new LILO header, not to add any optional boot parameters, to use the standard LILO console (no need to set a specific frame buffer console here). And the important point: As LILO target, do not select the MBR, but the superblock of /dev/sda2 (screenshot on the right). As LILO timeout (no screenshot), you should choose not to wait, but to straight boot into the first OS.
![Installation of Slackware 15: Installation of the LILO bootloader [1] Installation of Slackware 15: Installation of the LILO bootloader [1]](../screenshots/winlin_dualboot3t.jpg)
|
![Installation of Slackware 15: Installation of the LILO bootloader [2] Installation of Slackware 15: Installation of the LILO bootloader [2]](../screenshots/winlin_dualboot3u.jpg)
|
The setup program needs some further information to create lilo.conf. Choose to add a Linux partition to the LILO config (screenshot on the left), and select /dev/sda2 to be that partition (screenshot on the right). Give the partition a name (no screenshot); I chose "Slackware".
![Installation of Slackware 15: Installation of the LILO bootloader [3] Installation of Slackware 15: Installation of the LILO bootloader [3]](../screenshots/winlin_dualboot3v.jpg)
|
![Installation of Slackware 15: Installation of the LILO bootloader [4] Installation of Slackware 15: Installation of the LILO bootloader [4]](../screenshots/winlin_dualboot3w.jpg)
|
As LILO has been installed into the partition superblock and not the MBR, there is no way to boot Slackware by itself. Thus, to be able to run this OS, we'll have to configure EasyBCD to boot Slackware.
5. Adding Slackware to the EasyBCD boot menu.
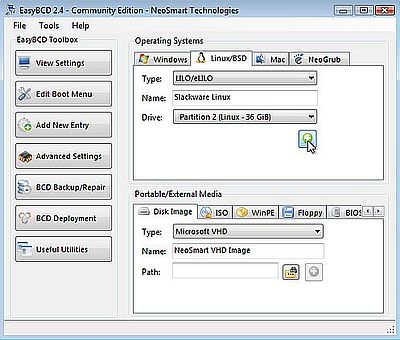
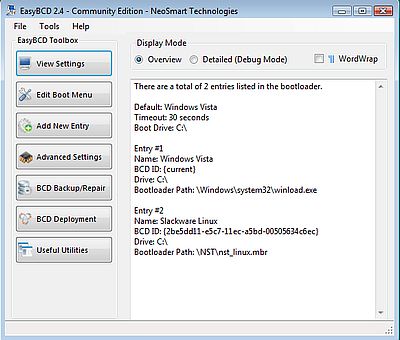
You should now boot into BIOS Setup and set the harddisk as first boot device. Then, boot normally. The EasyBCD boot menu shows up. Choose to run Windows Vista. In Vista, run EasyBCD. From the toolbox, choose to add a new entry. Choose Linux/BSD as operating system, and fill in the OS information as follows (screenshot on the left):
- Type = LILO/eLILO
- Name = Slackware Linux
- Drive = Partition 2 (Linux - 36 GiB)
|
|
To write the newly configured bootloader to the MBR, choose BCD Deployment from the toolbox. Be sure that Install Vista+ BCD/bootmgr bootloader is checked and, and push the Write MBR button. Remember that writing badly configured boot settings to the MBR may result in making the computer unbootable!
|
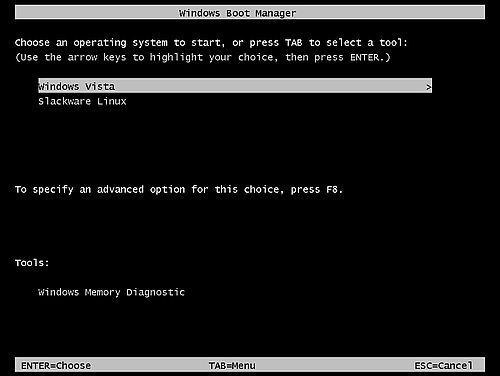
When rebooting, the Windows Vista boot manager starts up, displaying the EasyBCD boot menu, with the choice to either boot Windows Vista, or to boot Slackware Linux.
|
If you find this text helpful, please, support me and this website by signing my guestbook.