Installing Windows 1.x and Windows 2.x on VMware.
Installing old operating systems on a virtual machine is always tricky, partially because most virtualization software does not or only incompletely support these OS. This tutorial is about the installation of the first versions of Microsoft Windows on VMware Workstation 16, running on Windows 10. There is no guaranty that it will work with other versions of VMware, or with Workstation 16 running on a different platform. Concerning the versions of MS-DOS and Windows, that I use, there might be better choices. In most forums, the use of MS-DOS 3.30 is recommended and it works fine for me; on the other side MS-DOS 3.30 is really "primitive", even not a full screen editor included. Concerning Windows 1, it seems that Windows 1.04 [IBM PS/2] is the best choice. The installation diskettes "include drivers for the IBM PS/2 mouse interface, IBM MCGA video (monochrome VGA), IBM VGA video, and IBM 8514/A video. Because these standards were adopted on PC clones, these disks will work on many other computers and emulators" (WinWorld). Especially concerning a correctly working mouse, you might get problems with other versions. My choice for Windows 2 is Windows 2.11. I used the Windows/386 installation diskettes, however, I did not succeed to run the 386 version, that can take advantage of the Virtual 8086 mode of the new Intel 386 processor. But, the variant for the Intel 286, also available on these diskettes, works fine on my system. Working fine includes support for mouse, sound, and CD drive access. Not succeeded to make work a 800x600 VESA driver.
1. Creating the VMware virtual machines.
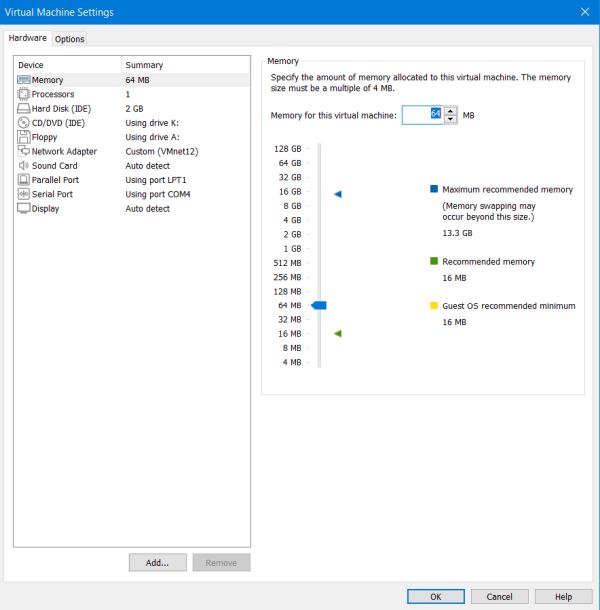
I created identical machines for both Windows versions, choosing Other > MS-DOS as operating system and with the configuration as shown on the screenshot. To note, that I'm not sure if it is possible to use networking on these OS and that I didn't try out LPT and COM ports.
 |
2. Installing DOS 3.30.
Windows 1.x and 2.x (and even Windows 3.x) are not really operating systems, but rather GUI applications, running on DOS. Thus, the first thing to do is to install a DOS operating system. As I said, I choose MS-DOS 3.30. The successful installation of Windows/386 2.11 on MS-DOS 6.22, described in the article Install Windows/386 2.11 in VMware did not work on my system. Installation was fine, Windows 2.11 started up, applications also, but at the next boot, I got the error message "File allocation table bad, drive C" and Windows did not start anymore.
The installation of the first versions of MS-DOS on a harddisk was rather boring, simply because these OS were primarily intended to be run from floppy diskettes. To simplify things, I decided to use the MS-DOS 3.30 with custom installer, discussed at the Windows/386 2.x page of WinWorld. The following paragraphs describe the installation of MS-DOS, using the diskettes from this download. This installation has to be done for both Windows 1.04 and Windows 2.11.
Be sure that the computer is set to boot from the floppy drive. Check if in the BIOS settings the boot sequence is set to 1. removable devices;
2. harddisk; 3. CD drive. After asking for date and time (just hit ENTER to use the actual values on a VM, that synchronizes the time with the host), the system starts
up and you are in DOS command line. Entering
dir /w
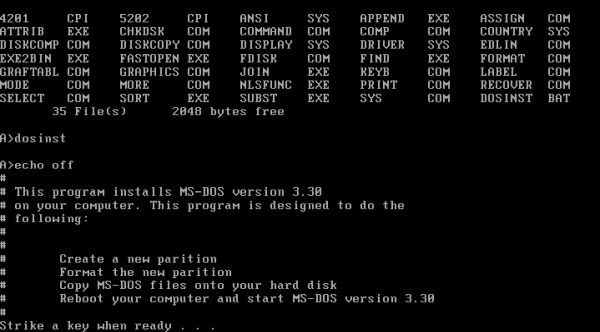
you'll get a column-formatted directory display of the diskette. Run the custom installer batch file by typing
dosinst
 |
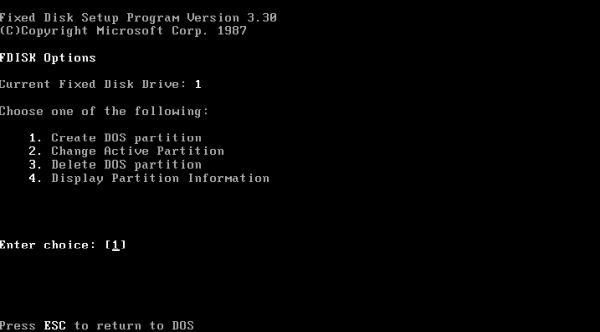
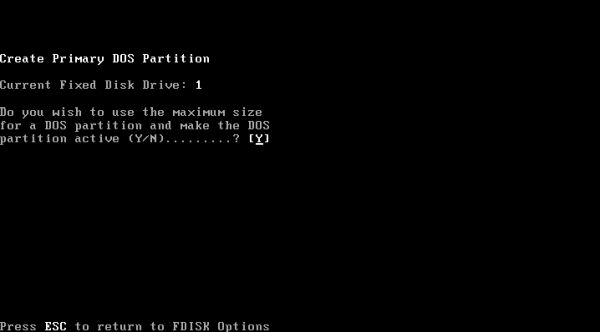
Hit a key (different from ESC) to launch the partitioning tool fdisk. On the first screen, enter 1 to create a DOS partition (screenshot on the left), on the next one, 1 to create a primary partition (no screenshot). And finally, enter Y to use the entire disk for the DOS partition (screenshot on the right).
|
|
After the partition creation, the system reboots. I suppose that fdisk automatically sets the first partition created active. At the command prompt, enter dosinst as before, also hit a key to start fdisk. But, this time, instead of entering 1 to create a new partition, hit the ESC key. Setup continues with the formatting of the partition. You'll have to confirm to do this (screenshot on the left), because if the partition contained any data, it would be destroyed. When done, you are asked to enter a volume label for the C: drive. I named it "SYSTEM" (screenshot on the right).
![Windows 1.x and 2.x installation on VMware: Formatting the new partition [1] Windows 1.x and 2.x installation on VMware: Formatting the new partition [1]](../screenshots/vmware_win1x2x4a.jpg)
|
![Windows 1.x and 2.x installation on VMware: Formatting the new partition [2] Windows 1.x and 2.x installation on VMware: fdisk - Formatting the new partition [2]](../screenshots/vmware_win1x2x4b.jpg)
|
The partition now ready, the setup script starts to copy files to the harddisk. This is a little bit messy, as with only one floppy-drive, diskettes have to be changed several times and it's not always clear, which diskette is referred to. Here, how the script calls the diskettes and which disk is actually meant:
- disk for drive a = disk1;
- disk for drive b = disk2;
- disk with batch file = disk1.
Shut down the machine, boot into BIOS setup and change the boot sequence to: 1. HDD, 2. CD, 3. removable devices. When you now power on the computer, MS-DOS 3.30 will boot from the harddisk.
3. Installing Windows 1.04.
You can download Windows 1.04 from the WinWorld Windows 1.0 webpage. If you want to follow this tutorial, be sure to pick the IBM PS/2 version.
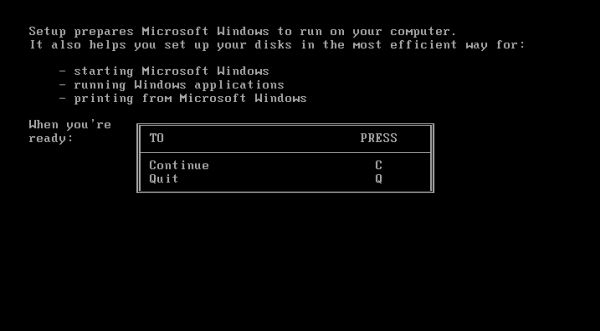
Boot your computer into MS-DOS 3.30 and navigate to the floppy drive (A:). To start the installation process, run the setup executable. To continue press the C key.
 |
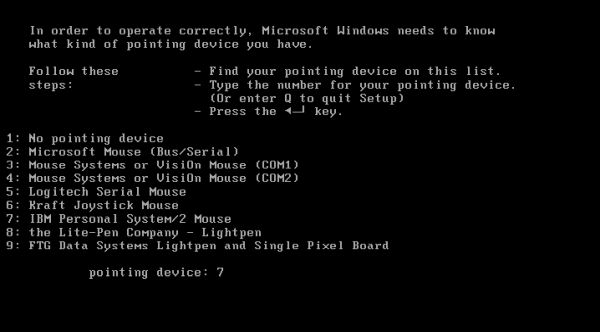
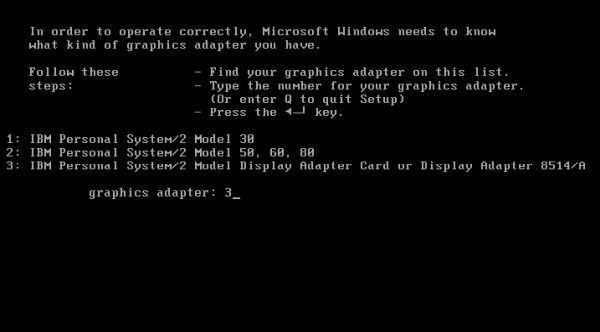
On the next screen, you're asked to enter the directory to where Windows should be installed. The default, C:\WINDOWS is fine; press ENTER to accept your input. After a screen, that tells you what diskettes you need and what information about your system you have to know, you'll have to choose a keyboard layout by entering one of the codes in the proposed list (1 = the standard IBM US keyboard; 26 = West Germany, my choice), then, to choose the pointing device (mandatory to choose 7 = IBM Personal System/2 mouse; screenshot on the left), and finally the graphics adapter (I chose 3 = IBM 8514/A video adapter; screenshot on the right).
|
|
Files are copied to the harddisk, first from the Setup disk, then from the Utilities/Fonts disk (that you must
insert, if asked, of course). No idea, how far it is possible to setup a printer; I chose not to install one (answering N to just continue setup). Files are now copied from the Desktop Applications/Write disk. The setup program then asks
for the diskette with COMMAND.COM. As this file isn't located on any of the Windows 1.04 diskettes, I used the first disk of the Windows 2.11 installation set. Setup
exits here and it's the moment of truth: To launch Windows 1.04, type the following:
C:
CD \WINDOWS
WIN
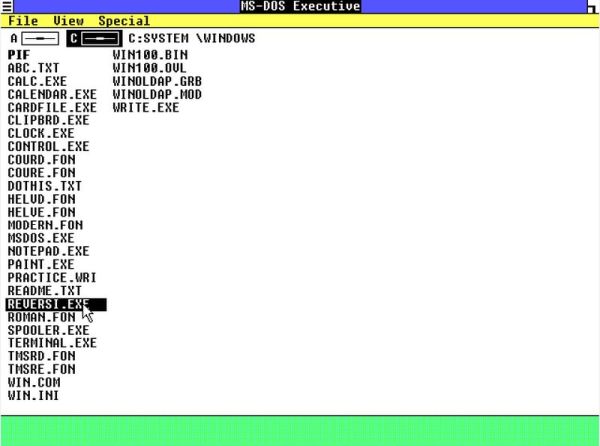 |
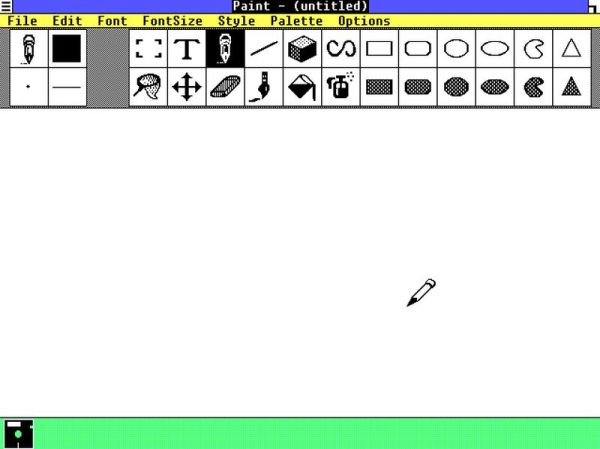
Surprised? Or, perhaps, disappointed? It's not a lot, this first OS from Microsoft. In fact, just a graphical file manager, allowing basic file operations and the execution of GUI applications, like the text editor Notepad, the word processor application Write, the drawing program Paint, a calculator and a calendar application, and some others, the game application on Windows 1.x and 2.x being Reversi (and not Minesweeper, as on the following Windows versions). Also note the program CONTROL.EXE, a rudimentary Control Panel, where you can configure some of the Windows system settings. On the screenshot, the Paint drawing program, just launched.
 |
Note: The normal behavior of a Windows menu is when you click it, it opens and you can point the mouse to the item that you want to select. This does not work on Windows 1.04. You'll have to click the menu, hold down the mouse button, drag the mouse pointer to the item, you want to select, and then click it.
And another tip: Maybe you ask yourself, how to do to properly shut down a Windows 1.x or Windows 2.x system. There is no such functionality available in the Windows GUI. Quit Windows by selecting Special > End Session, what returns you to DOS. Here, you can safely power off the machine.
4. MS-DOS 3.30/Windows 1.x configuration.
As I said at the beginning of this tutorial, MS-DOS 3.30 is rather primitive and we will now add some functionalities, that, partially will also increase the possibilities of Windows 1.04. Here an overview of some basic operations that I did on my virtual machine:
- Setting the path and the prompt.
- Setting the country and the keyboard.
- Installing the memory manager HIMEM.SYS.
- Adding CD support (CD drive will be accessible in Windows).
- Adding sound support (this seems to enable sound in Windows, too).
- Installing a full screen text editor.
- Apart the last one in the list, these operations need the creation of the system files CONFIG.SYS and AUTOEXEC.BAT.
Setting the path and the prompt.
When installing MS-DOS 3.30, there are no CONFIG.SYS and AUTOEXEC.BAT files created. The system settings are the default values for the US version of MS-DOS,
there are no drivers installed, no path is set to the directories that contain the executables and the prompt is not set to indicate the current directory. In
order not to have to enter full path names each time, we run a program, and in order to know in which directory we actually are, the PROMPT
and PATH environment variables have to be set in the AUTOEXEC.BAT file:
PROMPT $p$g
PATH C:\WINDOWS;C:\DOS
Setting the country and the keyboard.
Regional settings may be adapted using the COUNTRY directive in the CONFIG.SYS file. In my case:
COUNTRY=061,850,C:\DOS\COUNTRY.SYS
where country code 061 = International - English and codepage 850 = Multilingual (Latin 1)
If you use a non-US keyboard, you'll have to load the corresponding keyboard layout data. I use the MKEYB.EXE
program, included with FreeDOS1 (copied to the DOS directory), and in order to have a correctly working German keyboard, I added the following line to my
AUTOEXEC.BAT file:
MKEYB GR
To note, that Windows has its own regional settings and its own keyboard driver. Unfortunately for the latter one, because in MS-DOS, my keyboard works 100% correctly,
whereas in Windows 1.04, the AltGr key is not functional. This means that it's not possible to enter characters, that need this key to be pushed
This is in particular true for the backslash (\), what is a major problem, as this character is used as directory separator.
Installing the memory manager HIMEM.SYS.
I'm not sure, how much benefit the memory manager HIMEM.SYS brings to MS-DOS 3.30 or Windows 1.04, but I suppose that in some cases, it
will allow to run larger or more programs. There is no HIMEM.SYS included with MS-DOS 3.30, nor with Windows 1.04. I used the one included with the Windows/386 2.11
installation diskettes and it seems to work correctly. To install the memory manager, copy HIMEM.SYS to your Windows directory and add the following to your CONFIG.SYS
file:
DEVICE=C:\WINDOWS\HIMEM.SYS
Adding CD support.
MS-DOS 3.30 doesn't include any software for CD support. I use the program MSCDEX.EXE and the IDE CD driver
NEC_IDE.SYS included with MS-DOS 6.222. They are fully supported by MS-DOS 3.30 and installing them also provides access to the CD drive
in Windows 1.04. With both files copied to the DOS directory, to enable CD support, add the following to CONFIG.SYS:
DEVICE=C:\DOS\NEC_IDE.SYS /D:MSCD01
and in your AUTOEXEC.BAT add the line:
MSCDEX /D:MSCD01
Adding sound support.
There is no special driver needed to enable sound on a DOS system. All you have to do is adding the following line to CONFIG.SYS:
SET BLASTER=A220 I5 D1 H5 P330
If you are interested in the different parameters, used here, you may want to have a look at this
Sound Blaster Configuration Guide.
When adding the Sound Blaster line to my CONFIG.SYS file, I got an "error in CONFIG.SYS" message. This was before I added the memory manager HIMEM.SYS and after I had
added it, the error was no longer reported. This seems bizarre to me, but possibly HIMEM.SYS is really needed to use Sound Blaster (at least
with the default settings).
I wrote a small Turbo Pascal program to test if sound actually works on a DOS system. This program may be run from within Windows 1.04 (just by double-clicking it) and
it plays the notes just as on DOS. This seems to indicate that by adding the Sound Blaster line to CONFIG.SYS, sound is not only enabled in DOS, but also in Windows.
Possible however, that this is only true for DOS programs and not for real Windows applications. There are only a few applications, that run on Windows 1.x, and I
don't know if there is one that could be used to test this. Concerning my sound test program, you can download it from
here.
Adding a text editor.
MS-DOS does not include a full screen editor, and working with EDLIN.COM is really all but not comfortable. EDIT.COM included with MS-DOS 6.22 does not start, telling that it does not find QBASIC. Norton Editor 2.0 seems
not to work on modern hardware ("divide by zero error"; I suppose due to running the program on a fast CPU). On the other side, Norton Editor 1.5
(maybe its real name is Norton Programming Editor 1.5) works fine on my system. As I do not remember, from where I downloaded it, I decided to
put a copy on my site; you can download it from here.
The Norton editors are somewhat special to work with and you need to familiarize with the shortcuts they use. Two important ones: F3, E = Save actual file and exit,
and F3, Q = Quit without saving.
You can edit a file by using the command EDIT with the help of this simple batch file, that you'll have to name EDIT.BAT and place together with NE.COM in the DOS directory:
@ECHO OFF
NE %1
Another program that may be useful is a utility to display memory usage. I use MEM.EXE from the FreeDOS CDROM. Note, that with the /C parameter, it partially displays "garbage". This program may not be run on Windows. Not (yet) found an application to display memory usage on Windows 1.x or 2.x! If someone knows, thanks to let me know.
Creating CONFIG.SYS and AUTOEXEC.BAT.
As said before all these system settings must be defined in either CONFIG.SYS or AUTOEXEC.BAT, or both, as in the case of CD support. You can create these two files
(in the root directory of drive C:) using NE.COM. Navigate to C:\ and run the command
NE CONFIG.SYS or
NE AUTOEXEC.BAT
If the file does not exist, it is created, otherwise it is edited.
Content of my CONFIG.SYS file:
BUFFERS=10
FILES=20
LASTDRIVE=H
DEVICE=C:\WINDOWS\HIMEM.SYS
COUNTRY=061,850,C:\DOS\COUNTRY.SYS
DEVICE=C:\DOS\NEC_IDE.SYS /D:MSCD01
SET BLASTER=A220 I5 D1 H5 P330
SHELL=C:\COMMAND.COM C:\ /P /E:800
Content of my AUTOEXEC.BAT file (the last line automatically starting Windows 1.04):
@ECHO OFF
PROMPT $p$g
PATH C:\WINDOWS;C:\DOS
SET TEMP=C:\TEMP
SET TMP=C:\TEMP
MKEYB GR
MSCDEX /D:MSCD01
CD WINDOWS
WIN
5. Installing Windows 2.11.
You can download Windows 2.11 from the WinWorld Windows 2.x webpage. If you want to follow this tutorial, be sure to pick the Windows/386 version.
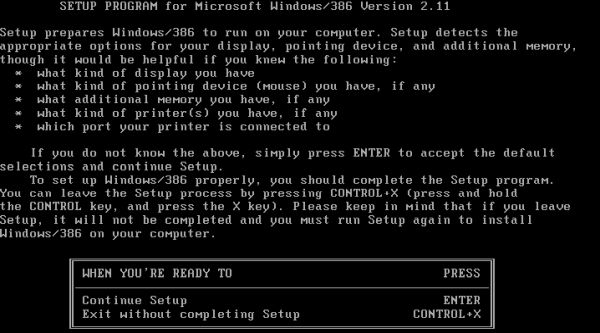
Boot your computer into MS-DOS 3.30 and navigate to the floppy drive (A:). To start the installation process, run the setup executable. To continue press the ENTER key.
 |
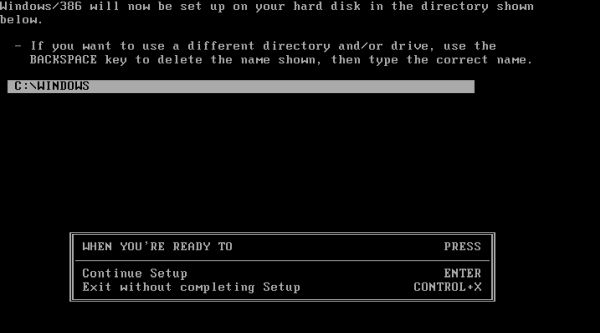
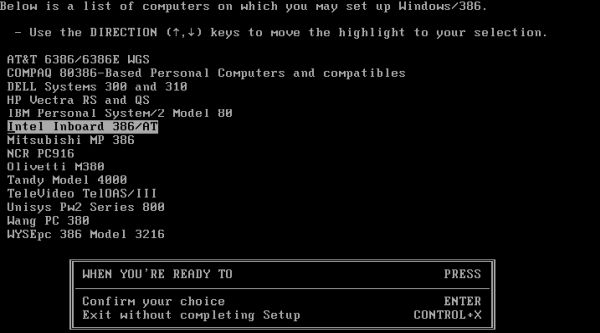
On the next screen, you have to choose the directory, where Windows should be installed to. The default is C:\WIN386. I chose to use the custom directory C:\WINDOWS (screenshot on the left). You then are asked to choose a computer model. I don't think that your choice here is really important. I chose Intel Inboard 386/AT (screenshot on the right).
|
|
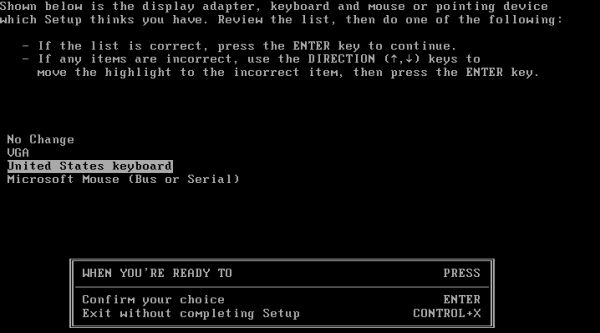
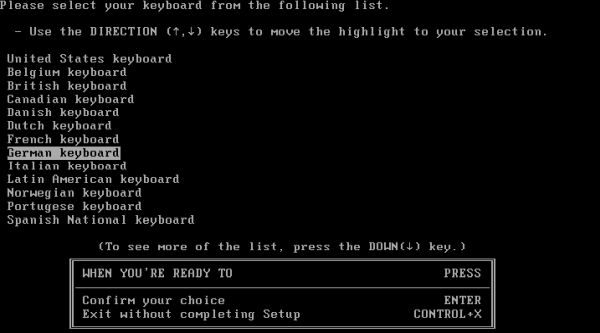
On the next screen, you have to choose display adapter, keyboard layout and mouse type. Use the up and down arrows to select the device that you want to modify and hit ENTER. The screenshot on the left shows the selection of the keyboard device. The defaults display = VGA and mouse = Microsoft Mouse (Bus or Serial) work well. When you hit ENTER a new screen is displayed, showing you a list with the available options. The screenshot on the right shows the choice of the German keyboard. When all changes are done, select No Change and hit ENTER to continue.
|
|
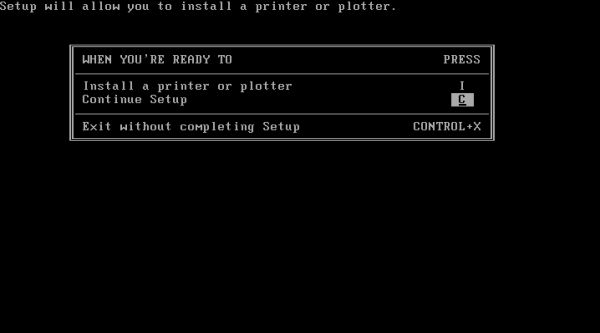
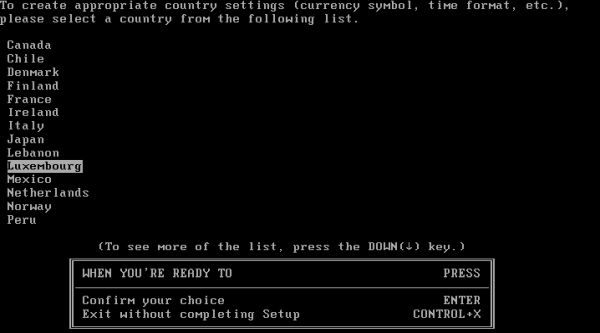
File copy is now started, from the Setup diskette first, then from the Displays diskette (insert it, when you are asked to do it). Then, you are asked if you want to set up a printer or a plotter; answer C to continue without doing so (screenshot on the left). You then have to choose a local (country settings, affecting date and time format, decimal separator, currency symbol, etc); my choice of Luxembourg on the screenshot on the right.
|
|
File copy continues with the Utilities 2 diskette, the Fonts diskette, and finally the Desktop Applications and Write diskette,
When asked if you want to create an AUTOEXEC.BAT file in order to include the Windows directory in the path, answer Y to do so; confirm that AUTOEXEC.BAT should be created on the C: drive.
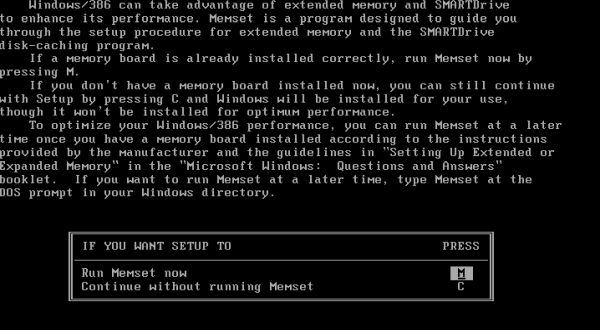
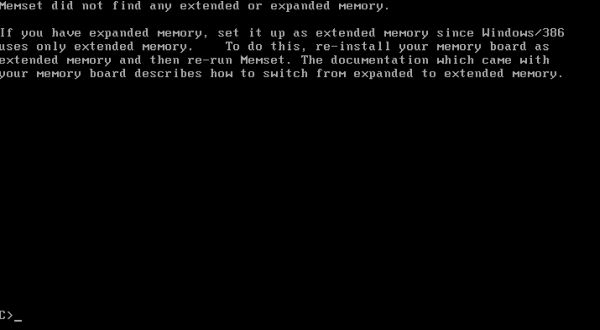
The Windows/386 setup program now informs you that this version of Windows can take advantage of extended memory and that it includes a program called Memset, that helps you set up this feature. Press the M key to run Memset (screenshot on the left). On the following screen you are told that Windows has been successfully installed. If you chose before to run Memset, pressing ENTER now, will run the utility. On my system (and it's not to exclude that you will always have this on VMware), Memset ended with the message "Memset did not find any extended or expanded memory" (screenshot on the right).
|
|
When trying to run Windows/386 by entering win386 (from the C:\Windows directory), I got the error message Not enough memory to load Windows. As shows the Install Windows/386 2.11 in VMware tutorial, you have to install the EMM386 memory manager to solve this problem. I think that it's not possible to do so on MS-DOS 3.30: When I tried (using EMM386 included with DOS 4.10), the system was freezing. And, as I said at the beginning of this document, when using MS-DOS 6.22, all works fine one time, but at the next boot you'll get a corrupted partition table.
On the other side, trying to run Windows/286 by entering win86, I succeeded: Windows 2.11 started properly up and the included applications executed without problems.
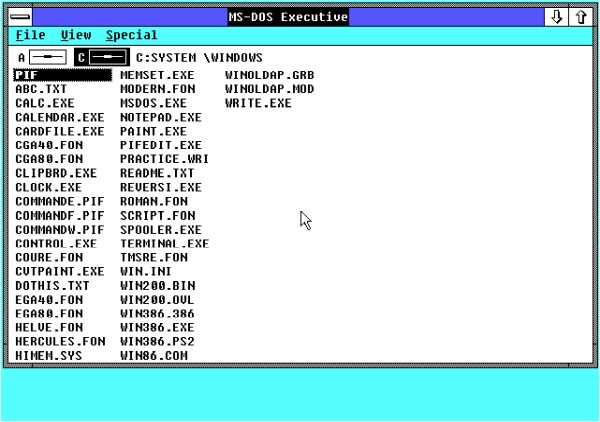 |
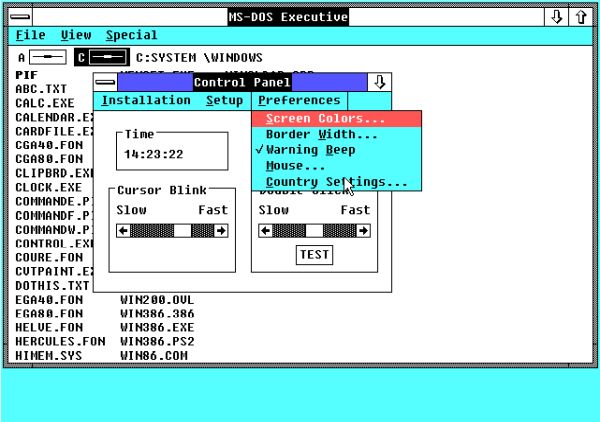
The look of Windows 2.x is very similar to the one of Windows 1.x. In fact, not lots more than a graphical file manager, from which you can run GUI applications and DOS programs. The same applications as on Windows 1.x plus some new ones, and also this rudimentary Control Panel (shown on the screenshot).
 |
6. MS-DOS 3.30/Windows 2.x configuration.
It's essentially the same as for Windows 1.x, except that Windows 2.11 includes a HIMEM.SYS memory manager. I configured 2.11 just as 1.04, copying the same files, retrieved from other OS, to C:\DOS. To note that the Windows/286 executable is called WIN86 (and not WIN) and that if you used the default directory to install Windows, you'll have to make the according changes.
Content of my CONFIG.SYS file:
BUFFERS=10
FILES=20
LASTDRIVE=H
DEVICE=C:\WINDOWS\HIMEM.SYS
COUNTRY=061,850,C:\DOS\COUNTRY.SYS
DEVICE=C:\DOS\NEC_IDE.SYS /D:MSCD01
SET BLASTER=A220 I5 D1 H5 P330
SHELL=C:\COMMAND.COM C:\ /P /E:800
Content of my AUTOEXEC.BAT file (the last line automatically starting Windows/286 2.11):
@ECHO OFF
PROMPT $p$g
PATH C:\WINDOWS;C:\DOS
SET TEMP=C:\TEMP
SET TMP=C:\TEMP
MKEYB GR
MSCDEX /D:MSCD01
CD WINDOWS
WIN86
Note:
Download links for the OS media from which I used software not included with MS-DOS 3.30:
1: The FreeDOS CD may be downloaded from the FreeDOS website.
2: MS-DOS 6.22 may be downloaded from the WinWorld MS-DOS webpage.
If you find this text helpful, please, support me and this website by signing my guestbook.