Creating VMware macOS guests on a Windows host.
Some important notes to start:
- This tutorial is for educational purposes only and not meant to show you how to run macOS software on a Windows PC on a regular base for "real work". In fact, Apple's license for macOS expressly forbids it being installed on anything other than a Mac. Thus, installing macOS on a Windows operating system running on a PC is not allowed by Apple's license!
- As running macOS on a Windows PC is forbidden by Apple's license, the VMware products for Windows do not include a macOS entry in the virtual machines list; you'll have to unlock the VMware software to make these VMs available. This is essentially applying a crack to the VMware product.
- The tutorial presupposes that your PC has an Intel processor. It's not impossible to run a macOS VM on a PC with AMD processor, however supplementary configuration of the VMware virtual machine will be necessary.
- The recent macOS operating systems are very huge in file size and use huge resources to run. Thus, trying to run a macOS VM on Windows will only be meaningful, if you have a high-performance PC.
The tutorial is about installation of macOS Big Sur 11 on VMware Workstation Pro 16. There shouldn't be a problem to use the freeware VMware Player instead of Workstation. Concerning the version of the VMware software, see further down in the text. I suppose, that the tutorial also applies to older and newer versions of macOS, without guarantee, however.
1. Installing and unlocking VMware Workstation.
The first thing, you need, is the VMware software. The major differences between Workstation Pro and Player are that the Player does not include the possibility to make VM snapshots, to clone virtual machines or to reconfigure the virtual networks. You can find more details and the download links at the following VMware website. Install VMware Workstation (or VMware Player) by running the installer application.
Download macOS Unlocker from GitHub. The actual version (mid-2022) is v3.0. It is said to work with VMware Workstation 11-15 and VMware Player 7-15. I used it with Workstation 16 and it worked without any problems. You should have a look at the readme.txt file, included with the download ZIP. You'll find the information concerning the versions of VMware that are actually supported and other useful details concerning the program. There also is a special version for Windows, called auto-unlocker that includes a GUI. Maybe it would be easier to use; can't say, as I didn't try it...
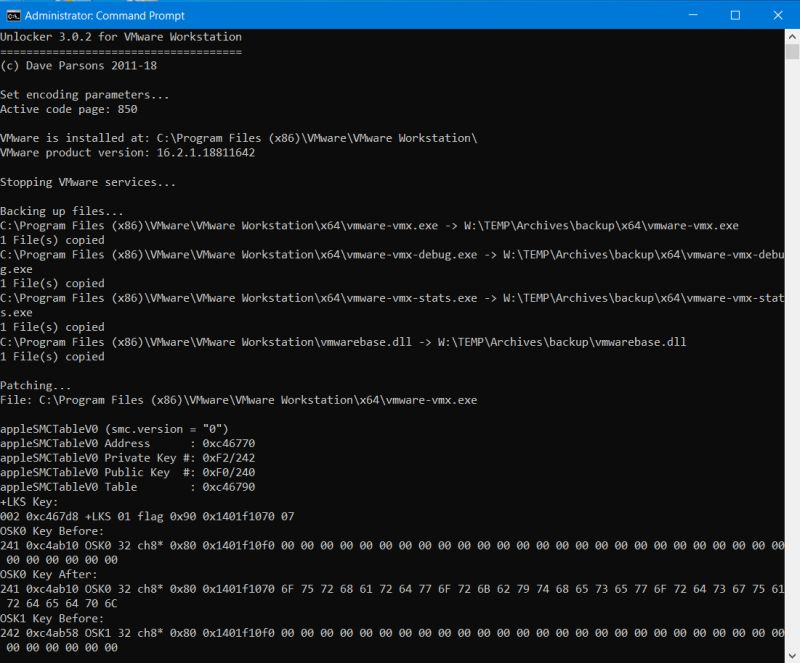
Unzip the download archive to any folder, run Command Prompt as Administrator (right-click the Command Prompt shortcut to choose this option) and cd to the directory with the extracted files. Be sure that VMware Workstation is not running!. No need to worry about the VMware services, on the other hand: they will be stopped by the Unlocker program. In Command Propmpt, run win-install.cmd. This launches a special version for Windows, that includes the mandatory Python 3. Unlocker automatically detects the VMware installation folder, stops the VMware services, backs up the files, that will be modified by the patch (these files will be copied to a subdirectory called backup and you can use win-uninstall.cmd to restore the VMware software to its original code). Then the files, that have to be modified (there are 4 of them), will be patched.
 |
Applying the patches should normally work without problems. On the other side, the update of VMware Tools will be a failure. This is due to the fact that, for some time, VMware doesn't offer any longer the possibility to download the ISO containing the tools for a specific platform. There still is the possibility to download the tools as a bundle from the VMware website. However, there is a simpler way to get VMware Tools for macOS Big Sur: Just download the tools from the WindowsLovers website. The file, called "VM Tools By Windowslovers.com.rar", contains the darwin ISO, that you can mount as CD image (when Big Sur is installed and you are ready to install VMware Tools).
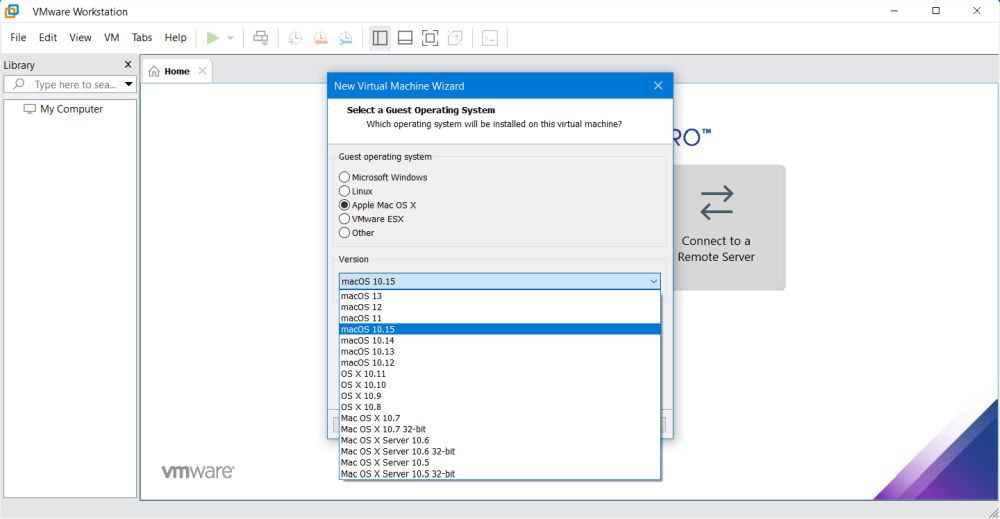
There is a simple way to see if applying the patches worked correctly. Start creating a new virtual machine (Create new virtual machine > Custom (advanced) > Hardware: Workstation 16.2.x > I will install the operating system later). In the guest operating systems list, there is now an item called Apple Mac OS X and several macOS versions (including our macOS 11) may be selected as OS for the virtual machine.
 |
2. Creating the macOS virtual machine.
Create a new custom VM, operating system = Apple Mac OS X > macOS 11. As Big Sur really needs lots of resources, I think that a processor
with 4 cores (instead of 2 by default) and a RAM size of 8 GB (instead of 4 by default) would be appropriate. For the other hardware, choose what you need. Note,
that 3D acceleration is not supported for macOS VMs. Important: In VM Settings > Options > Advanced, set Firmware type
= UEFI (with secure boot UNchecked). Finally, edit the VM .vmx file and add the following at the end of your macOS configuration:
smbios.reflectHost = "TRUE"
hw.model = "MacBookPro14,3"
board-id = "Mac-551B86E5744E2388"
smc.version = "0"
I have no idea if this is mandatory. I read on some website that it has to be done or should be done. I actually did it with my macOS VM and all works fine... The
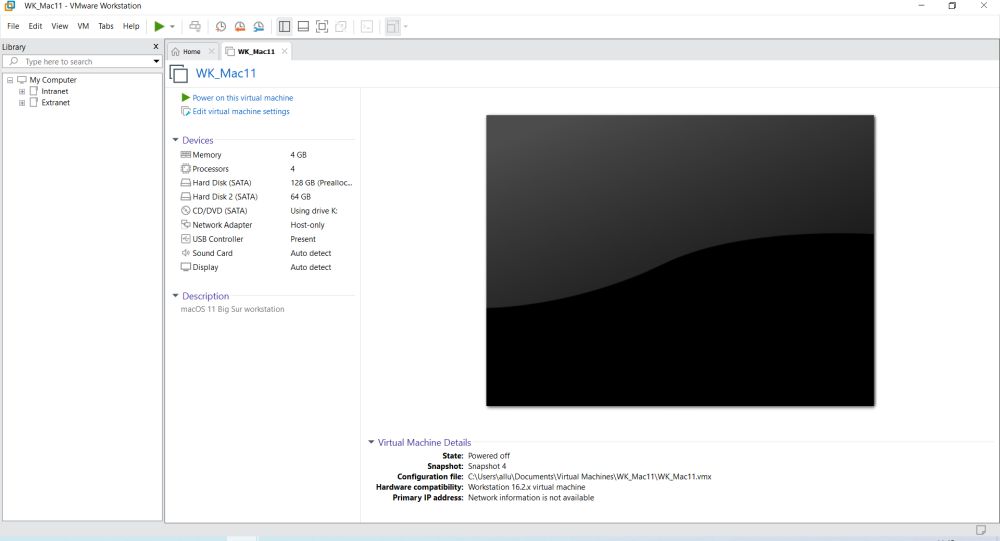
screenshot below shows the hardware of my macOS Big Sur 11 VMware virtual machine.
 |
3. Installing macOS Big Sur 11.
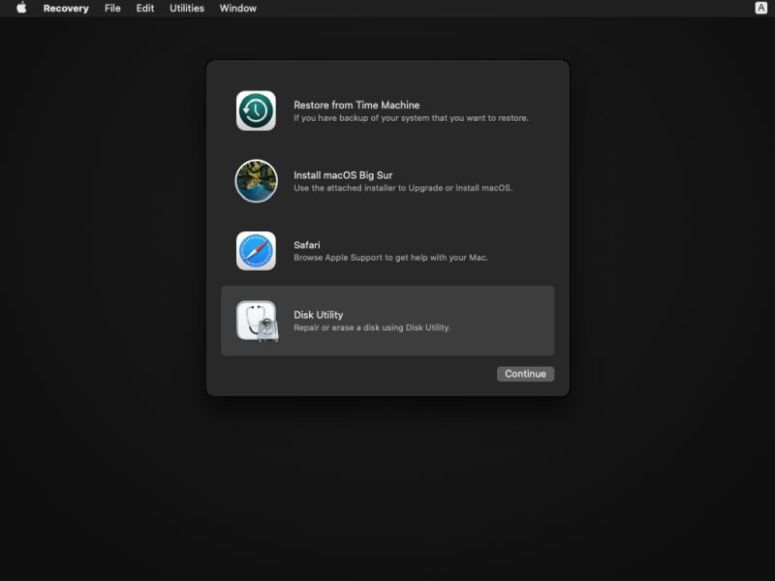
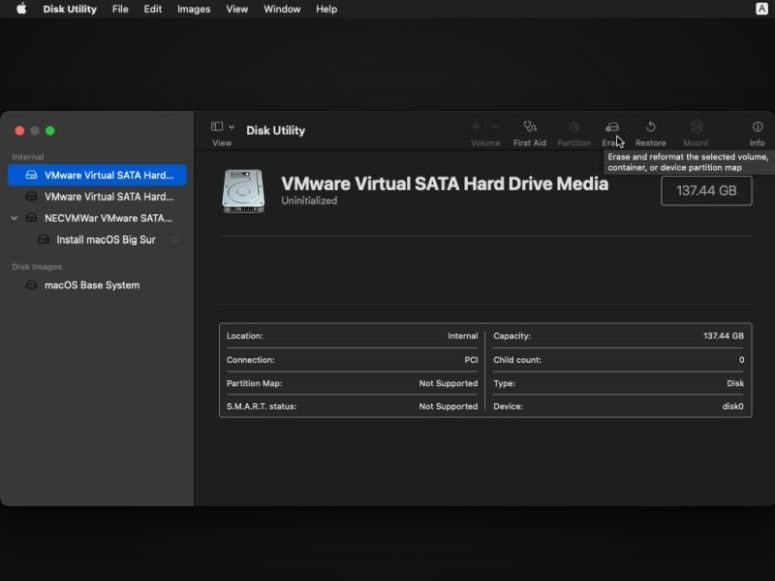
Installation of macOS 11 on VMware is essentially the same than installing the OS on a physical computer. Insert the DVD and boot the machine. After the display of a black screen with an apple, you are asked to choose the installation language. Then, a menu appears, where you can choose what you actually want to do. As my VM has two fixed disks, I chose Disk utility (screenshot on the left) to set them up both here. Choose the first disk and push the Erase button (screenshot on the right).
|
|
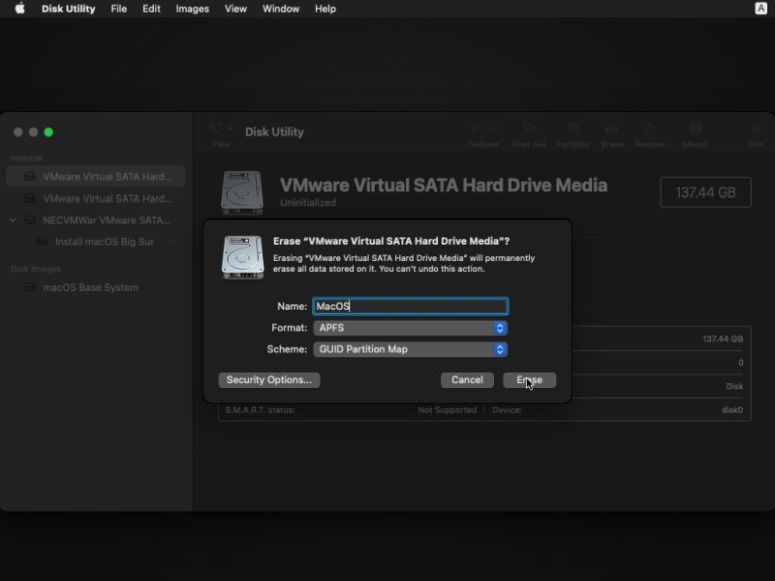
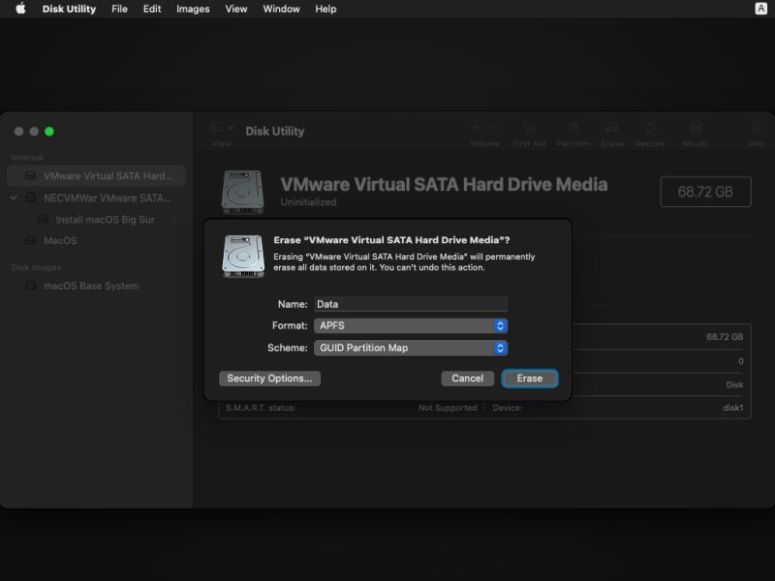
Name the volume MacOS, format it using APFS and as scheme choose Guid partition map, what corresponds to what is more commonly called GTP partition table (screenshot on the left). When done, erase the second disk and name it Data (screenshot on the right). This will create two volumes, labeled MacOS (128GB = whole size of disk 1) and Data (64GB = whole size of disk 2).
|
|
Quit the Disk utility and in the action-menu, choose to install macOS Big Sur 11 . You are asked to accept the license agreement, then you'll have to choose the disk, where to install the new operating system. Choose the MacOS volume (what corresponds to the first, 128GB sized, fixed disk.
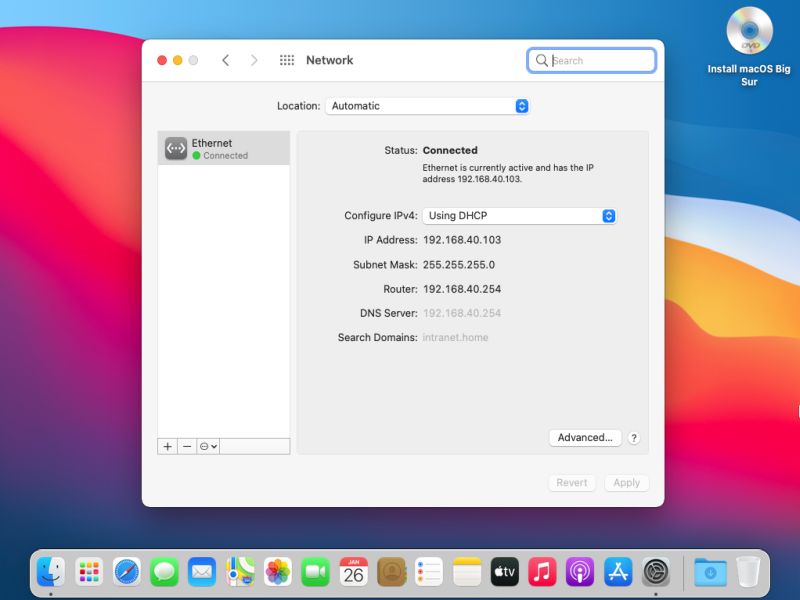
Now the system is installed (several reboots required); on my VMware virtual machine (on an USB disk), this took a long time, probably lots longer than it would have on a physical machine. When all files have been copied, configuration is launched. Here you are asked for everything that's needed to set up your new macOS, incl. language, region and keyboard setup, creation of a user account, and network setup (not really true: host and domain names have to be set manually). The screenshot below shows my Mac immediately after installation with the network information displayed (successful configuration by the DHCP sever on my IPFire virtual machine).
 |
4. Installing VMware Tools.
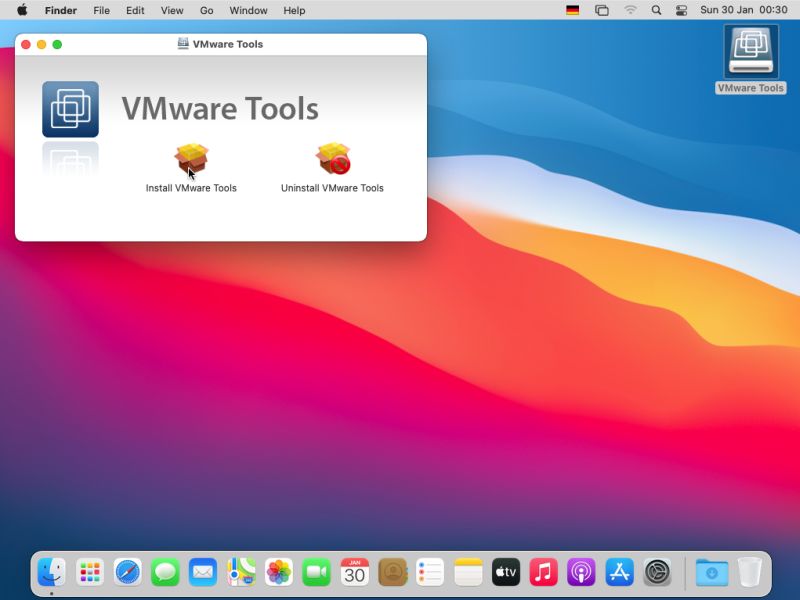
Maybe it's possible to install the tools using this action in the menu of VMware Workstation. I did not try, but did it all manually: insert the darwin CD in the VM's CD drive. A disk icon, labeled "VMware Tools" appears on the macOS desktop. Double-click it to perform the CD autoplay action, which, by default, is to run the CD software. The VMware Tools application starts up; choose Install VMware Tools.
 |
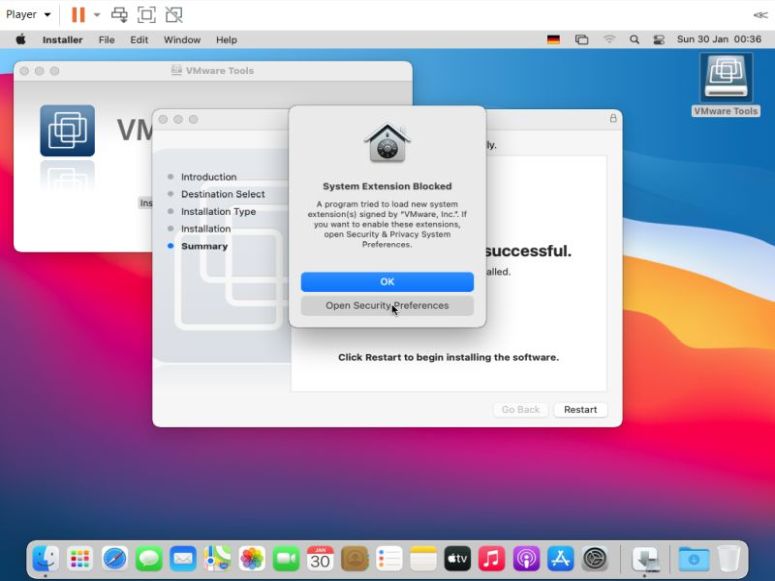
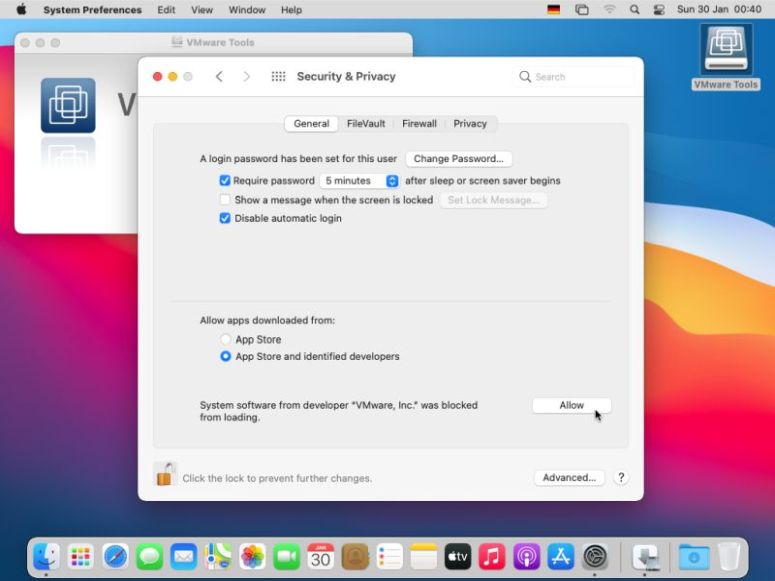
Entering your user password is required to continue. The installation should succeed without problems. However, when finished, a message window pops up, telling that the VMware Inc. system extension has been blocked. This is normal behavior on macOS: any software component, not provided by Apple themselves, is blocked when trying to install it. Enabling this alien software is, however, no issue. The message window contains a button called Open Security Preferences; there, you can allow the extension to the Apple provided system.
|
|
You have to reboot the VM after installation of VMware Tools has finished. No idea if this always happens, or if I made some mistake, but after reboot, the "system extension blocked" message appeared a second time. Repeating the steps described above and rebooting another time, and all was ok. A little disappointment, however: the display settings offer one single resolution (lots of them on Windows and Linux VMs), and this one is rather low: 1024×768. Somewhat small screen, if you want to work in a windowed VM. On the other side, when using full screen mode, the resolution of the macOS VM is set to the one of the host (and back to 1024×768 if you leave full screen).
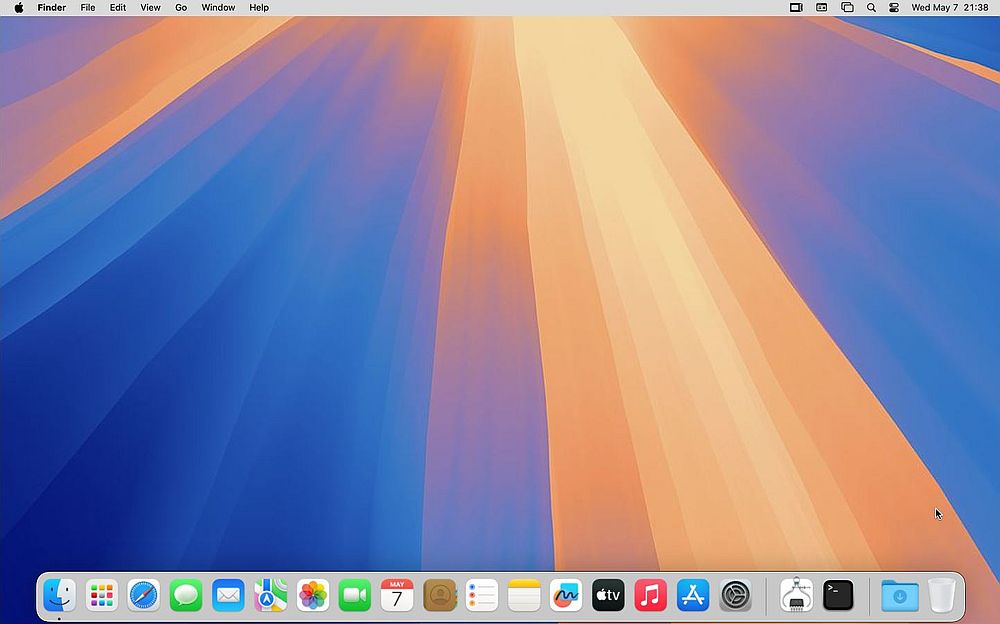
There is, however, a simple work-around to get any screen resolution that you want for the macOS virtual machine running in windowed mode. Change the VM display settings, enabling display scaling by selecting the Stretch mode checkbox; be sure that the radio button Keep aspect ratio stretch is selected. Boot the macOS VM and open Display settings (resolution displayed = 1024×768). Now use the resize handles of the VM window to increase its size. Doing so increases the resolution of the macOS screen (the new resolution being indicated in display settings) and the desktop is accordingly extended. This does not really allow to set the resolution that you want (unless you have the patience to resize until you get it), but you can come very near to what you want, in my case 1441×901 (instead of my usual 1440×900).
The screenshot below shows the resized VM window (and by this, the modified macOS screen resolution) on macOS 15 Sequoia (actually the beta release), that can be installed in a similar way as macOS 11 Big Sur.
 |
If you find this text helpful, please, support me and this website by signing my guestbook.