Setting up a Windows Homegroup.
Traditionally Microsoft Windows operating systems support two kinds of networks:
- Workgroup based networks:
- These are peer to peer networks: No computer has control over the others.
- You must have a user account on a computer in order to log in to it.
- Workgroups are not protected by a password.
- All computers must be on the same local network or subnet.
- Workgroups are normally used at home or within small businesses.
- Domain based networks:
- These are client-server based networks: Servers control security and permissions for all computers on the domain using policies.
- Domain users must provide a password or other credentials each time they access the domain; they do not need a local account on that computer.
- Computers can be on different local networks.
- Domains are typical for medium-sized or large businesses.
In Windows 8, you can use System properties > Computer name to check if your computer is part of a domain or a workgroup. Note, that it's either a workgroup or a domain, not both at the same time!
With Windows 7, Microsoft introduced a third kind of network: Homegroups. Homegroups are also available in Windows 8 and 8.1, as well as in the first releases of Windows 10. The feature has been removed in later versions of Windows 10 and does not exist in Windows 11.
Homegroup characteristics:
- Computers may belong to a homegroup and workgroup at the same time..
- A homegroup is protected with a password, but you only need to type the password once, when joining the homegroup.
- All computers must be on the same local network or subnet.
- The idea behind this new feature was to make it easy to set up network sharing.
- Homegroups are used at home in order to easily share documents, pictures, music, videos, as well as printers with other people on this network.
With default installation, a Windows computer is part of a workgroup called "WORKGROUP"; there is no homegroup configured by default. The reason seems obvious: To access files in a workgroup environment, you need an account on that computer. With a homegroup, any user working on any machine being part of the homegroup can (normally) access all shared files on all homegroup computers without authentication.
Creating a homegroup.
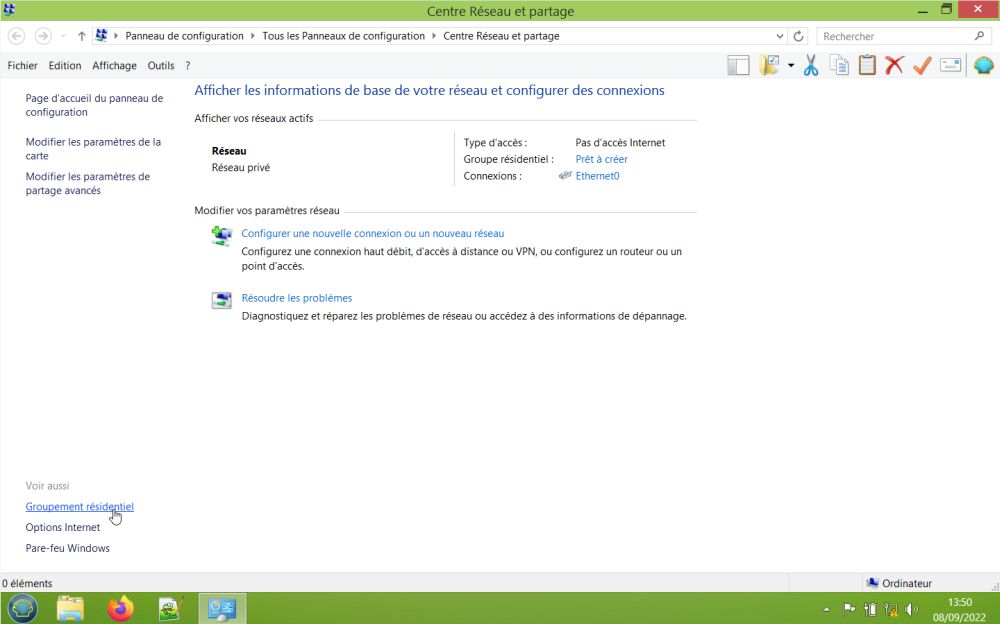
A homegroup is created on one computer and other computers may then join it. I created my homegroup on a Windows 8.1 (French version) using Control Panel; you may also use Settings, if you prefer. If you open Network and Sharing Center [French: "Centre Réseau et partage"], you can see your actual network. If this network is private (what should be the case), you'll find the actual status of the homegroup (French: "groupe résidentiel") for this computer and it should be Ready to be created [French: "Prêt à créer"]. To create the homegroup, click the Homegroup link in the left pane.
 |
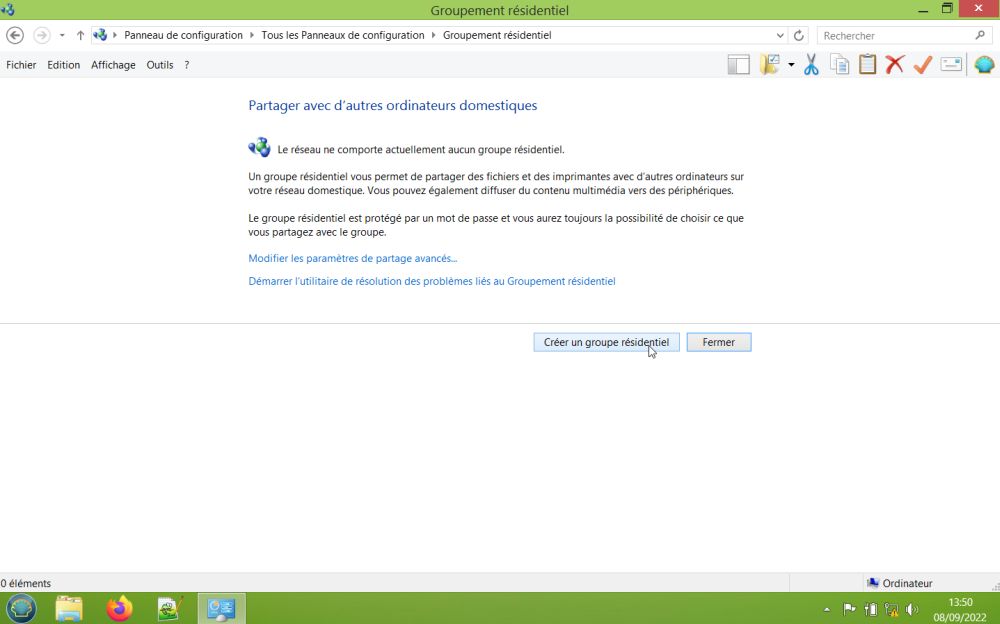
A window opens, where you are told that there isn't actually a homegroup on the network, where you can read some details what a homegroup is, where you have links to change the advanced network settings, or start the network troubleshooter. And a button, labeled Create a homegroup [French: "Créer un groupe résidentiel"]. Push it to start the homegroup creation wizard.
 |
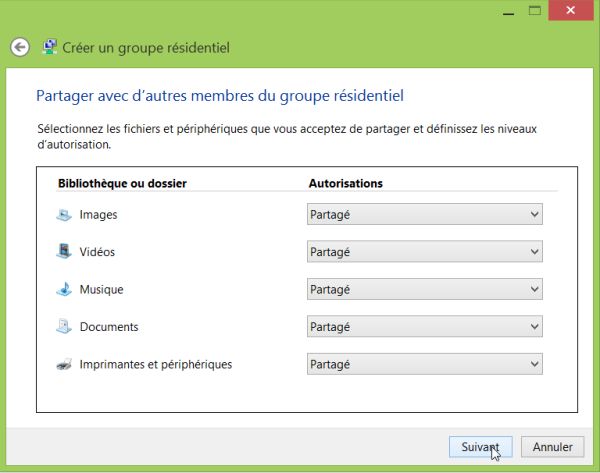
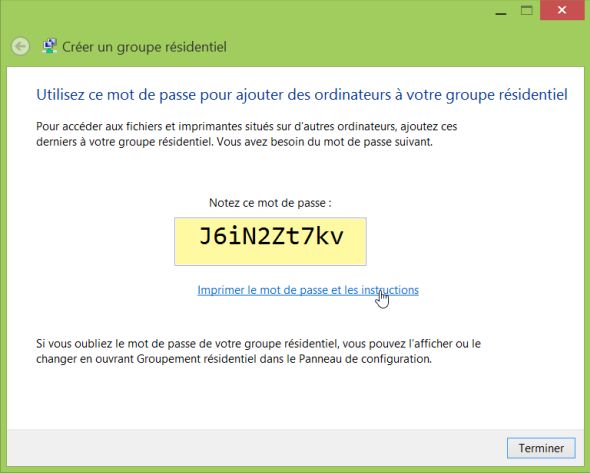
In order to create a (basic) homegroup, only 2 steps are required: 1. Selecting what you want to share with the other homegroup users: Documents, pictures, music, videos, printers. 2. Taking note of the (generated) homegroup password. To note, that these shares actually are the user's (private) libraries. Public libraries may be shared using the corresponding setting in Network and Sharing Center > Advanced Sharing Options (French: "Centre réseau et partage > Paramètres de partage avamcés"). I disabled this feature on my system. Also to note, that music and video files may be streamed on the homegroup network (as well as on the workgroup network). You find the corresponding settings in Network and Sharing Center > Advanced Sharing Options. I disabled this feature on my system, too. The screenshot on the left shows my homegroup shares selection: I chose to share the Documents library (not shared by default and in a real world scenario probably better not to share for privacy reasons); printers are shared by default (I decided later not to share them on my system). The screenshot on the right shows the password window. The password displayed is the one you'll have to use on the other computers to join the homegroup. You can change it later (on any of the homegroup computers), but, be aware that doing so, disconnects the other computers and you'll have to change the password on all of them.
|
|
Joining a homegroup.
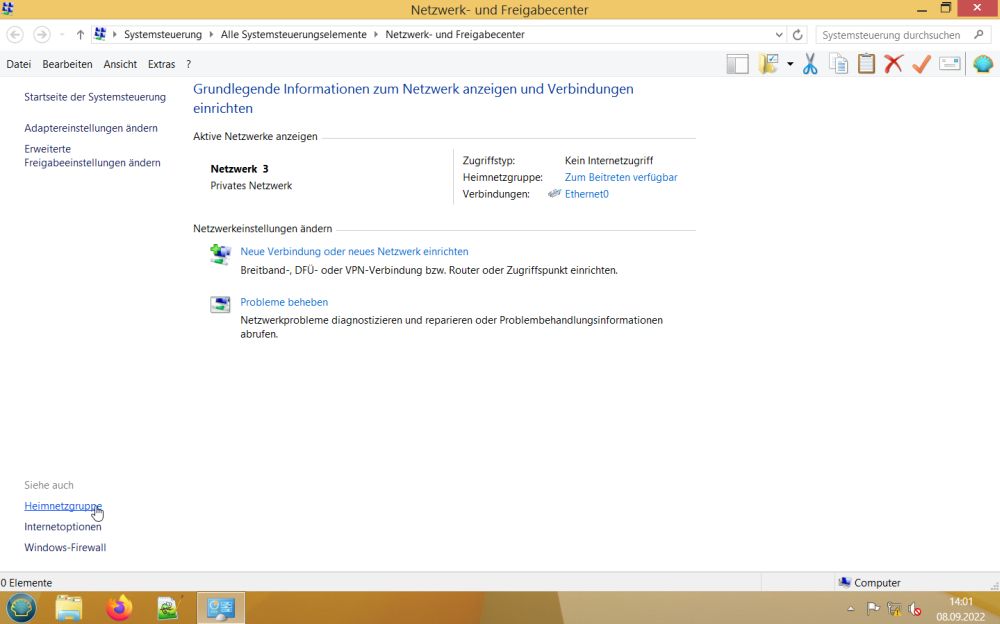
You may only create one homegroup on your network. Thus, with the homegroup created on my French Windows 8.1, I cannot create one on my other Windows 8.1 (a German language version). If you open Network and Sharing Center [German: "Netzwerk- und Freigabecenter], you can see your actual network. If this network is private (what should be the case), you'll find the actual status of the homegroup [German: "Heimnetzgruppe"] for this computer and it's not Ready to be created as before, but Ready to be joined [German: "Zum Beitreten verfügbar"]. To join the homegroup, click the Homegroup link in the left pane.
 |
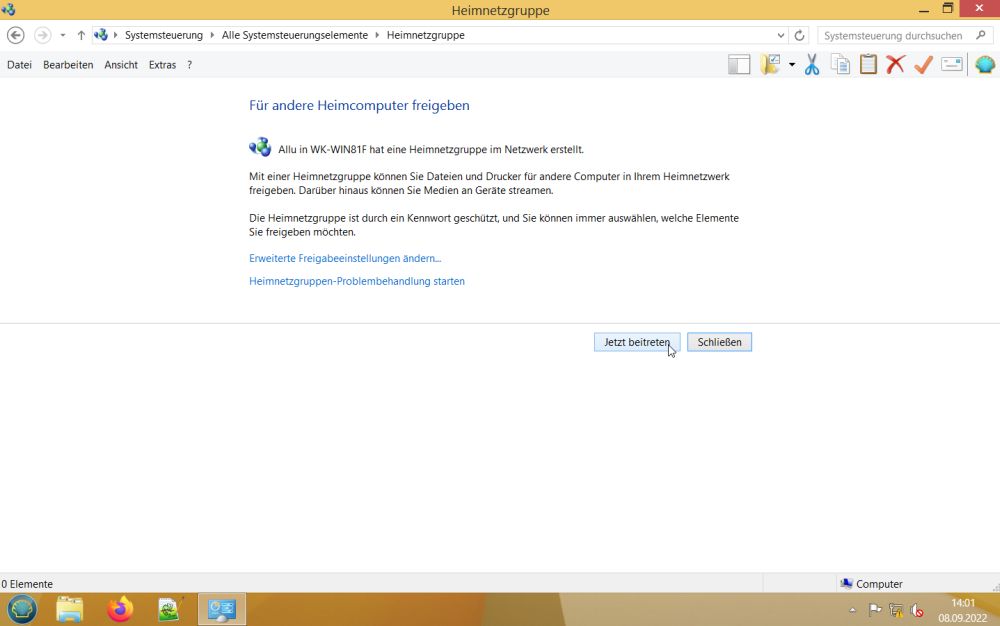
In the opening window with the details what a homegroup is, you are told that a given user on a given computer has created a homegroup and that your computer can now join it. Please, note, that in the message on the screenshot below "Allu" is the user name, I was logged in with, when creating the homegroup, and "WK-WIN81F" is the name of my French Windows 8.1 computer, where the homegroup actually was created. It's the name of the user who creates the homegroup that is used as name of the homegroup itself. To join the homegroup, push the Join now [German: "Jetzt beitreten"] button.
 |
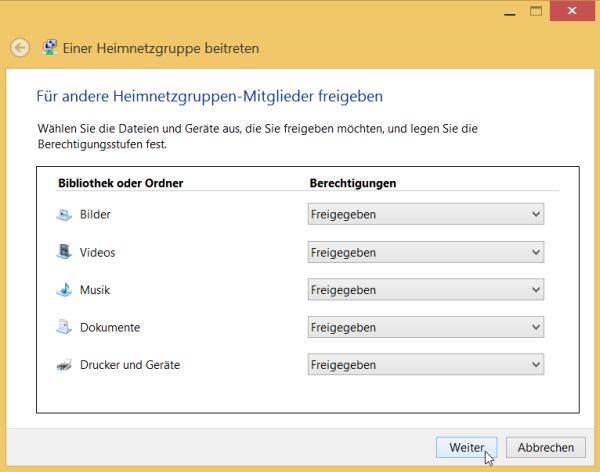
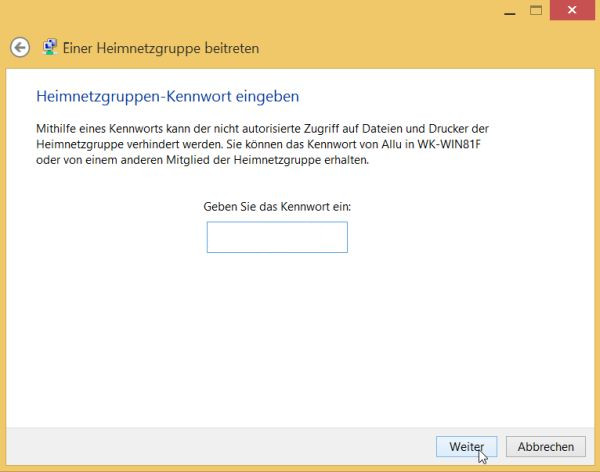
As on the computer, where the homegroup was created, you have to select what you want to share (documents, pictures, music, videos, printers), but as a difference with on that computer, you have to know the homegroup password to be able to join. Note, that joining the homegroup is the only time, where you have to enter this password. After your computer has been joined, the connection to the homegroup is automatic (with Windows starting up).
|
|
If you open File Explorer, you'll find in the left pane (together with "Favorites", "This PC" and "Network") a group item called "Homegroup", and this group shows one item, which has the name of the Windows user who created the homegroup ("Allu" in my case). Opening "Allu", the right pane of File Explorer will show all shares on all homegroup computers (that are actually connected!), in my case: Documents, Pictures, Music and Videos on both my French ("WK-WIN81F") and my German ("WK-WIN81G") Windows 8.1. Note, that the screenshot has been taken on the French Windows 8.1 and that the German names of the standard Windows libraries have been automatically changed to French.
![Windows 8.1: Homegroup shares displayed in File Explorer [1] Windows 8.1: Homegroup shares displayed in File Explorer [1]](../screenshots/win78_homegroup7.jpg) |
Configuring custom shares.
You may not only share the standard Windows user libraries on a homegroup network, but you can share any folder you want. And, as the aim of the homegroup feature is (or more correctly, was) to make sharing as simple as possible, the configuration of custom shares requires just some mouse clicks.
On WK-WIN81F, I have installed Microsoft Visual Studio, not that I really use it, but more to try out programming languages like Visual Basic, C++ and C#, and I chose to share the sources of my programs with the other homegroup users. Visual Studio stores user projects by default in the directory C:\Users\{User-name}\source and it's this folder that we will configure for sharing now. In File Explorer, browse to the parent directory of the folder that you want to share (in this case C:\Users\Allu, "Allu" being my user name). Right-click the "source" folder and from the opening context-menu choose Share with > Homegroup (view) [French: "Partager avec > Groupe résidentiel (affichage)"]. That's really easy, isn't it?
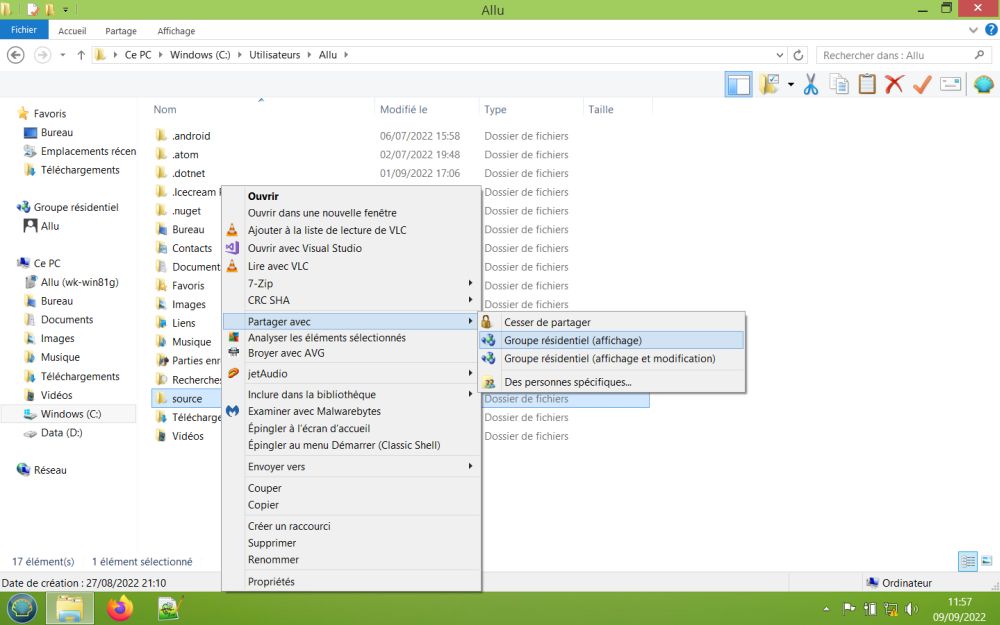 |
The Visual Studio sources are now accessible from all homegroup computers. If you want to stop sharing them, browse to the parent directory of the "source" folder, right-click this folder and choose Share with > Stop sharing [French: "Partager avec > Cesser de partager"] from the context-menu.
Please, note that we just configured a read-only share, i.e. users on the other computers can open the folder's content, but they can't modify or delete any files, nor can they create new files or folders. It's best practice to always configure such shares as read-only, I would say. First, this makes sure that whatever happens, the original files are preserved. Second, deleting a network file is like deleting a file on a removable media (e.g. a flash drive): The file is not moved to the recycle bin, but permanently erased!
On WK-WIN81G, I have installed a local web development environment with ISS and Microsoft SQL Server. Again, I don't really use it, but I want to try out these applications, that I never worked with in the past. I've written several programs to access SQL Server (using PHP and Perl, the Visual Studio languages, and also Lazarus/Free Pascal) and they are stored in the custom directory C:\Users\Allu\Programmieren. To give the other Homegroup users access to the sources, lets share this folder, doing the same way as we did for C:\Users\Allu\sources on WK-WIN81F. The screenshot shows the homegroup "Allu" opened in File Explorer on WK-WIN81G, with the new share "sources" in WK-WIN81F and the new share "Programmieren" in WK-WIN81G.
![Windows 8.1: Homegroup shares displayed in File Explorer [2] Windows 8.1: Homegroup shares displayed in File Explorer [2]](../screenshots/win78_homegroup9.jpg) |
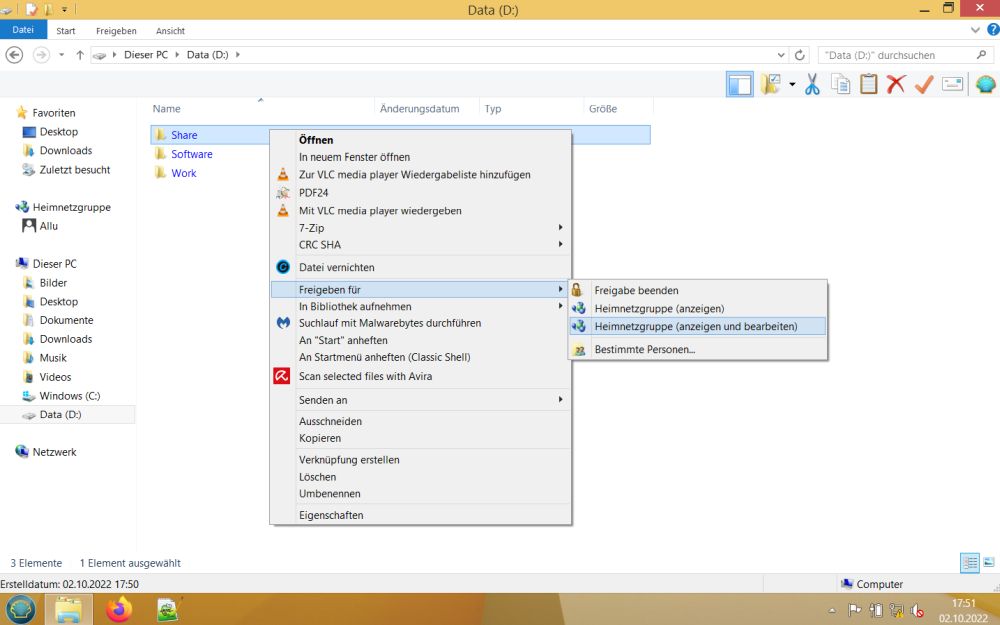
So far, the users on both homegroup computers have access to all programming related files. But, how do they do to put a file (such as a new program to access SQL server developed with Visual Studio on WK-WIN81F) onto the other computer? Right, we have to configure a read-write share, best on both machines. I called this folder "Share" and created it directly under the root of the D: partition (D:\Share). To share it with the homegroup, browse to D: in File Explorer, right-click the "Share" folder and choose Share with > Homegroup (view and edit) [German: "Freigeben für > Heimnetzgruppe (anzeigen und bearbeiten); French: "Partager avec > Groupe résidentiel (affichage et modification)"].
 |
The screenshot shows the homegroup "Allu" in File Explorer on WK-WIN81F after the new shares have been configured on both machines. Why "Share" on WK-WIN81G is displayed as a network drive and not as a regular folder as are all the other shares, including "Share" on WK-WIN81F, no idea. I thought at first that it's related to the fact that the D: partition on WK-WIN81G is actually located on a second harddisk, whereas on WK-WIN81F it's on the same HDD than the C: partition. This seems however not be the explanation, as on Windows 7 (cf. further down in the text), both "Share" are displayed as network drives.
![Windows 8.1: Homegroup shares displayed in File Explorer [3] Windows 8.1: Homegroup shares displayed in File Explorer [3]](../screenshots/win78_homegroup11.jpg) |
Homegroups on Window 7.
Homegroup configuration on a Windows 7 computer is essentially the same as on Windows 8. There are however some differences. First, Windows 7 has no Settings feature as introduced with Windows 8, thus, configuration must be done in Control Panel. Second, the network types on Windows 7 are different from those on Windows 8: not Private and Public, but Home, Work and Public, and the network type may be set during the installation of the OS. Furthermore, configuration settings are somewhat differently organized and the display in File Explorer is also not the same.
To configure a homegroup on Windows 7, open Control Panel > Homegroup. When I did so on my WK-WIN7 machine, I got the message This computer can't connect to a homegroup. The reason is that homegroups may only be created on Home networks and, during installation of my Windows 7, I had set the network type to Work network.
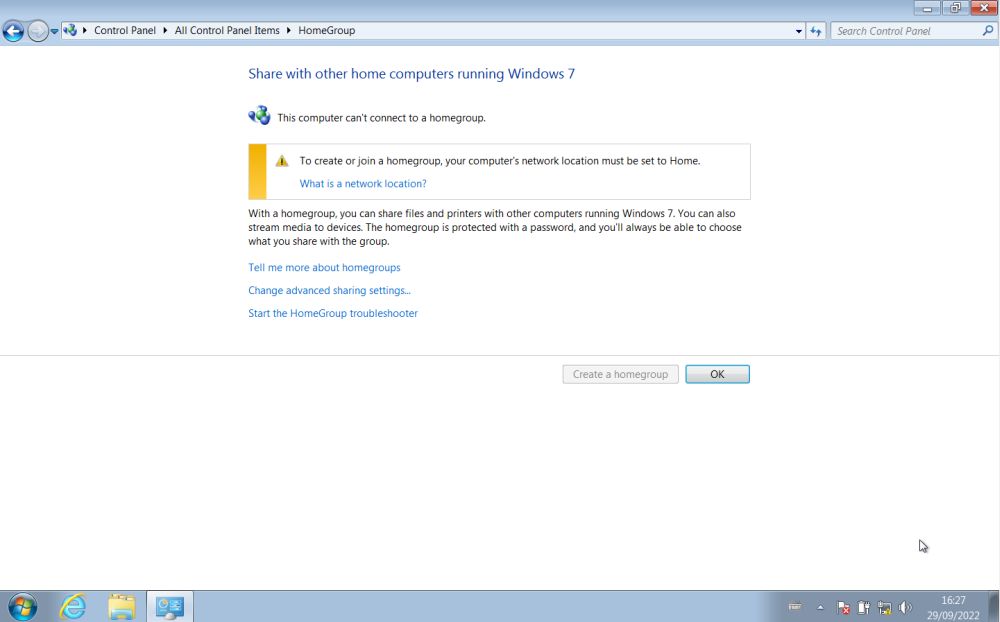 |
Pushing the OK button opens the Select network location window, where we can change our Windows computer's network location to Home network.
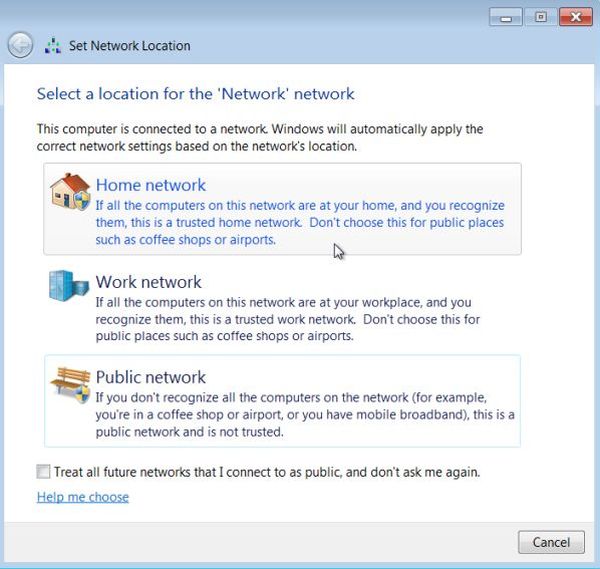 |
Even though the window layout is different, we have now the same situation and the same configuration to do as before on Windows 8.1. If there wasn't any homegroup on the network, we could create one now. As the homegroup already exists, we can now join it, by selecting what we want to share and by entering the homegroup password (no screenshot) set at the beginning of this tutorial on WK-WIN81F.
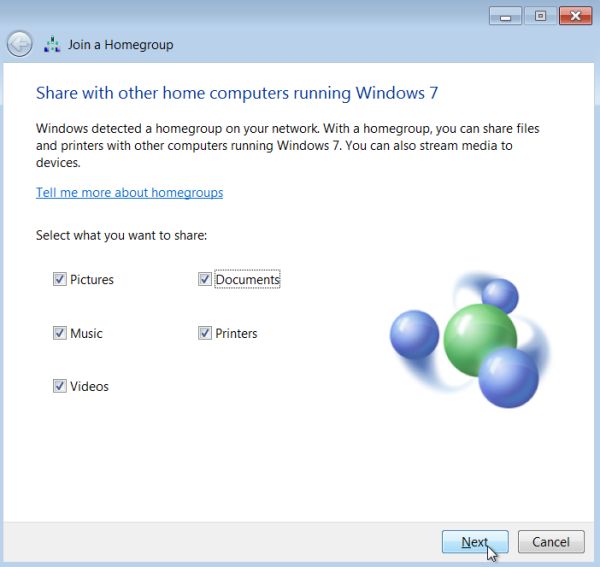 |
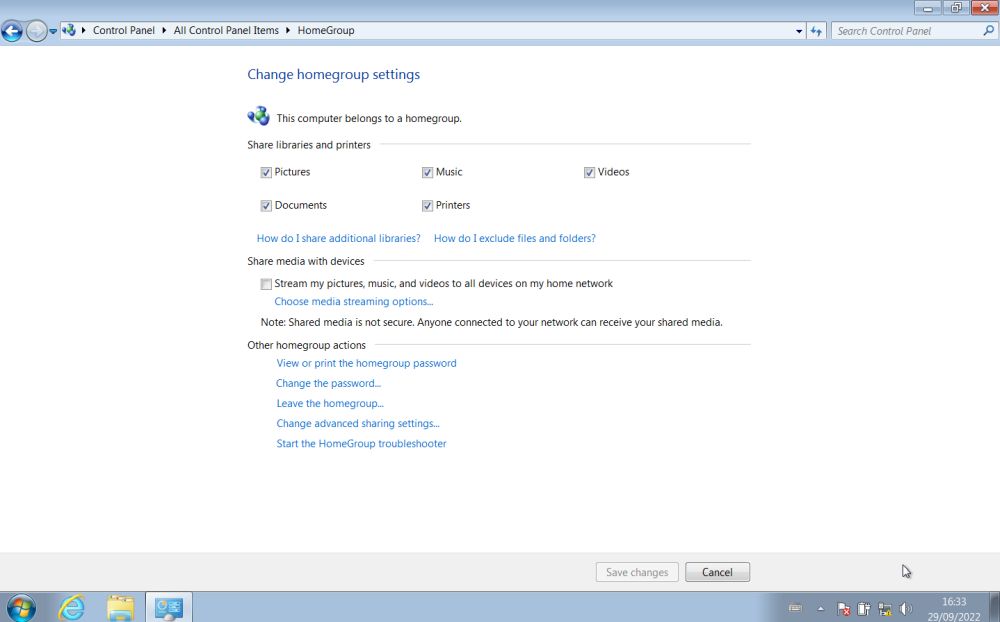
The Homegroup page in Control Panel looks completely different now. Which standard user libraries should be shared and if printers should be shared or not may be selected here. You can also use this page to leave the homegroup, as well as to view or change the homegroup password. Note, that enabling or disabling of media streaming is also configured on this page.
 |
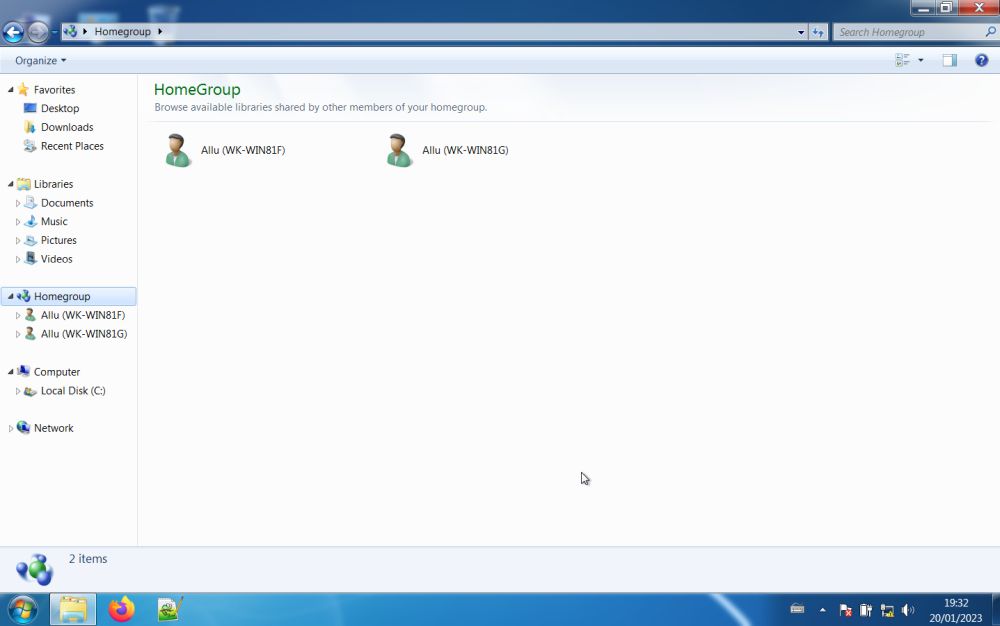
As on Windows 8.1, the homegroup may be accessed in File Explorer. Two differences concerning the way how the homegroup is displayed: First, on Windows 8.1, the Homegroup group contains one item (with the name of the user who created the homegroup as name), containing all shares on all homegroup computers, whereas on Windows 7, it contains separate items for each computer (the names of these items being the name of the user who created the homegroup plus, between brackets, the name of the computer). Second, on Windows 7, the shares on the local computer itself are not displayed (thus, on WK-WIN7, only the two Windows 8.1 computers are shown in our "Allu" homegroup).
 |
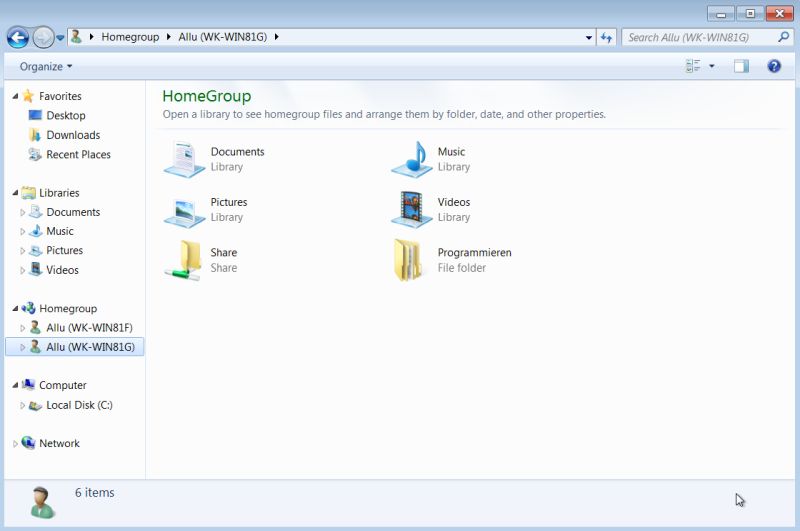
Double-clicking on one of the homegroup computers will show the shares on that computer. The screenshot shows those on WK-WIN81G (with the names of the standard user libraries automatically changed from German to English).
 |
And here what the homegroup shares now look like on the French language Windows 8.1 machine.
![Windows 8.1: Homegroup shares displayed in File Explorer [4] Windows 8.1: Homegroup shares displayed in File Explorer [4]](../screenshots/win78_homegroup18.jpg) |
Share permissions.
Permissions characteristics of a "normal" homegroup configuration:
- All users on all homegroup computers have the same permissions for all shares on all computers.
- The private user libraries are shared read-only, what means that you can open the files (and view, watch or listen to their content), you can also copy them to your local machine, but you cannot modify or delete any of the library files on another computer; also, you can't create a new folder or save your own files to these libraries.
- Custom shares are read-only or writable, depending on the selection made when configuring them: "Share with Homegroup (view)", or "Share with Homegroup (view and edit)".
- I think that you can refine the permission settings of homegroup shares. I did not look up what is possible and how to do it. In fact, I would say that the aim of creating a homegroup network is to create a simple and elementary sharing environment. And if you need something more sophisticated, the better choice is to set up a workgroup based network.
Here some screenshots, showing what happens when a user tries to read resp. write to a read-only resp. read-write share.
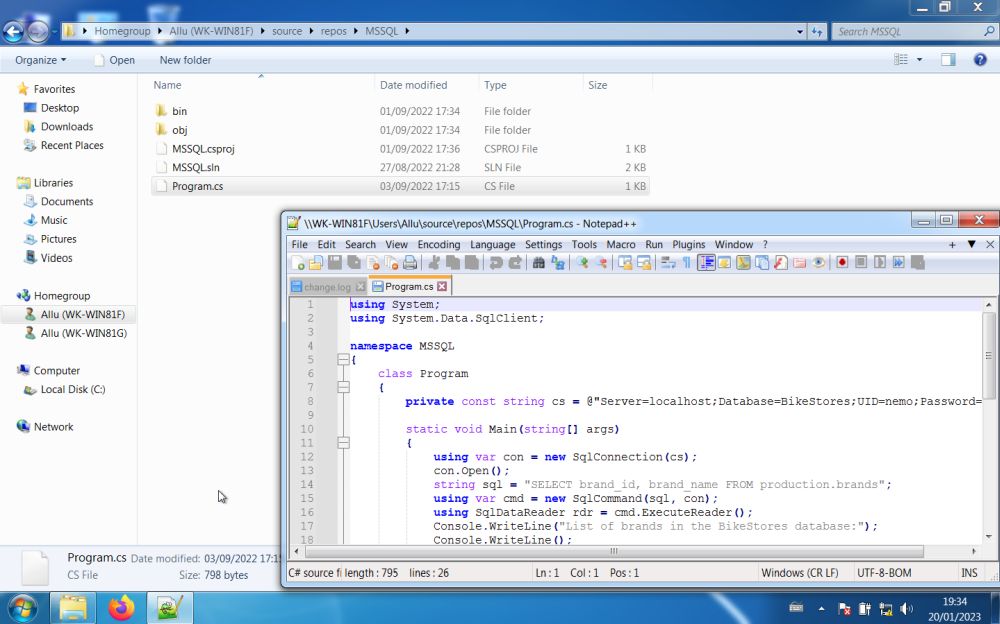
On WK-WIN7, opening a C# source file, located in a subdirectory of the WK-WIN81F shared folder "source". No problem: All files in shared folders are (normally) readable by all homegroup users.
 |
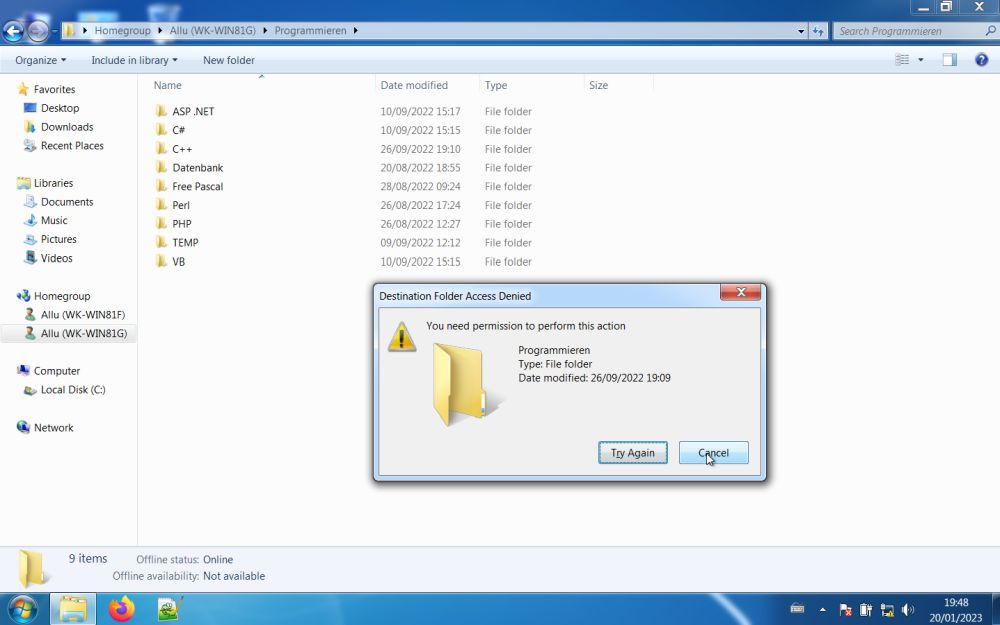
On WK-WIN7, trying to create a new file in the WK-WIN81G shared folder "Programmieren". Access denied: "Programmieren" has been configured as a read-only share, so not possible to modify or delete any existing files, nor to create new ones.
 |
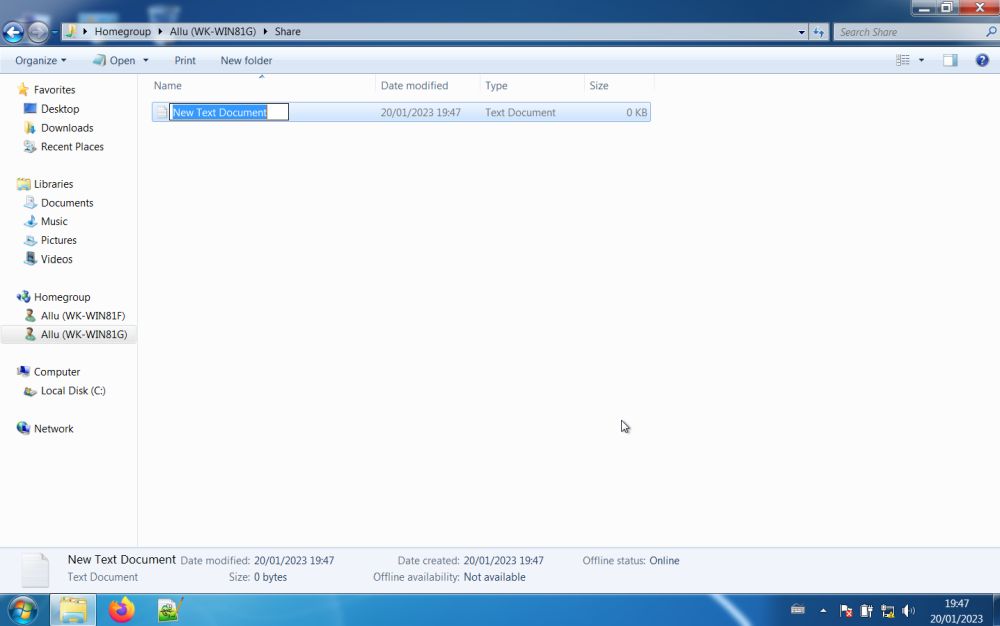
On WK-WIN7, trying to create a new file in the WK-WIN81G shared folder "Share". Success: "Share" has been configured as a read-write share, so all homegroup users have the permission to modify and delete any existing files, as well as to create new ones.
 |
Homegroup connection problems.
Globally, there are 3 kinds of connection problems on a Homegroup based network;
- The network is not available.
- A given computer is not available.
- The shares on a given computer are not available.
Communication within a Homegroup based network is only possible if the participating computers have IP addresses that belong to the same subnet. If you have configured TCP/IP manually and if you have done it correctly, the unavailable network problem can only occur on a physical network if some cables are disconnected resp. if there a WiFi issue, and only on a virtual network if there is something wrong with the networking components of the virtualization software. You probably didn't configure your machines' network settings manually (but let them get their IP from a DHCP server), and in this case, you might get an error message (like on the screenshot), telling you that The Homegroup is not available because you aren't connected to the local network.
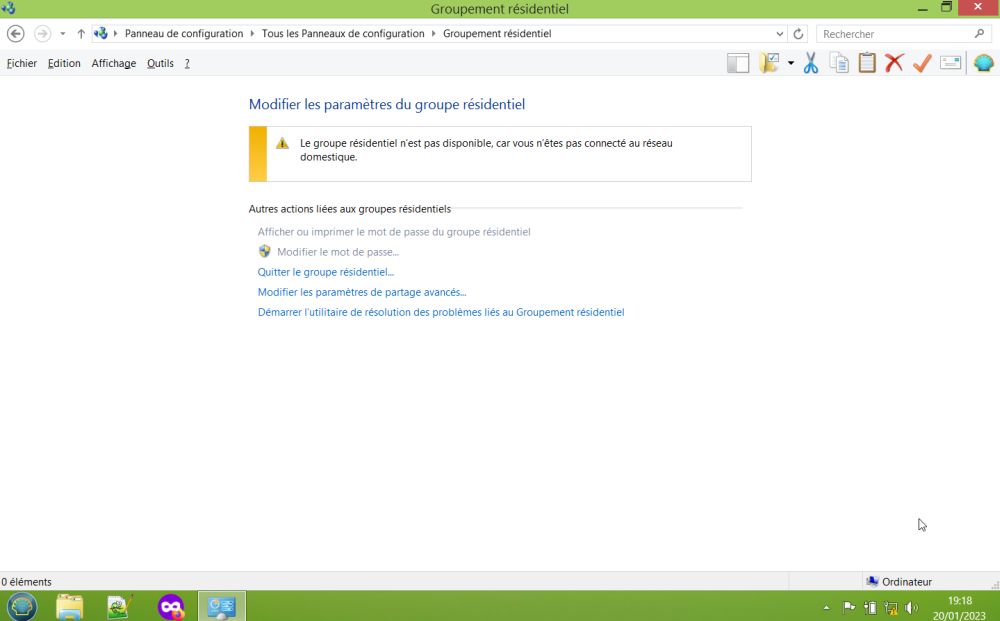 |
I got the message on the screenshot because I had forgotten to start my firewall-router virtual machine, that is responsible to lease IP addresses to the computers of my VMware network via DHCP. In a less complex virtual environment, the DHCP server runs as a part the virtualization software and the problem should not occur. If you get this message on a real network, the reason is probably that the router, that connects your computers among them and to the Internet is turned off or has some issues.
Windows remembers the computers that are part of the homegroup, so, if it isn't possible to connect to one of them, it will anyway be listed in File Explorer, but instead of the display of the shares, there will be a message telling you that This computer is actually not available (screenshot). The most probable reason for this is that that computer is turned off. It may also be that this message is displayed in the case of the "unknown connection problems" discussed in the next paragraph.
![Windows 8.1: Homegroup shares displayed in File Explorer [5] Windows 8.1: Homegroup shares displayed in File Explorer [5]](../screenshots/win78_homegroup21.jpg) |
It sometimes happens that it is not possible to access the shares on one of the computers, and when trying to do so, you get an error telling you that This share is not available.
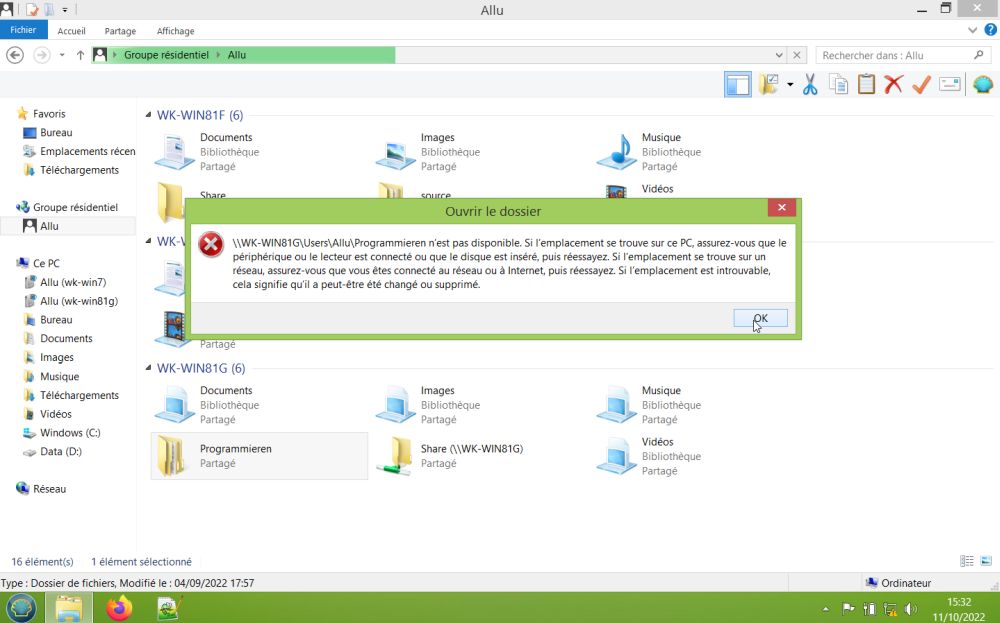 |
This is what I would call an "unknown connection problem". It happened from time to tome on my system. No idea, if this is a possible issue with virtual networks, or if it may happen on physical networks, too. No idea either, when it happens and what could be the reason. I tried to find out what was wrong and if possible to fix it by running the network troubleshooter, but this didn't give me any useful information. So, just another "computer mystery"? Anyway, it's rather easy to fix the issue (at least this worked for me): Disconnect the computer, that the unavailable shares are located on, from the Homegroup and then join the Homegroup again. If this doesn't help, you may try to reboot all machines or if the issue still persists, disconnect all computers from the Homegroup and then, on each of them, joining the Homegroup again.
If you find this text helpful, please, support me and this website by signing my guestbook.