Setting up a Software RAID 1 on a running Linux distribution.
RAID stands for Redundant Array of Inexpensive Disks. It allows you to turn multiple physical hard drives into a single logical hard drive. There are many RAID levels such as RAID 0, RAID 1, RAID 5, RAID 10, etc. To set up RAID, you can either use a hard drive controller (Hardware RAID), or use a piece of software to create it (Software RAID). A hard drive controller is a PCIe card, where you connect your hard drives to. When you boot up the computer, an option to configure the RAID will be displayed. The operating system is then installed on top of the hardware RAID. A software RAID requires that you already have installed an operating system. It's normally used for data storage.
This tutorial is about installing a Software RAID 1, also known as disk mirroring. RAID 1 creates identical copies of data. If you have two hard drives in RAID 1, then data will be written to both drives, that will contain exactly the same data. If one of the RAID 1 hard drives fails, your computer is still running correctly, because you have a complete, intact copy of the data on the other hard drive. You can pull the failed hard drive out while the computer is running, insert a new hard drive and it will automatically rebuild the mirror.
The Linux distribution used in this tutorial is Rocky Linux 9, 64bit, a community enterprise operating system designed to be 100% bug-for-bug compatible with Red Hat Enterprise Linux. The way to proceed should be similar on other Linux systems, even though the commands may be different. Also you'll have to use the disk references that actually apply to your system.
The computer used in the tutorial is a VMware virtual machine with 3 hard drives. The first drive contains the Rocky Linux operating systems,
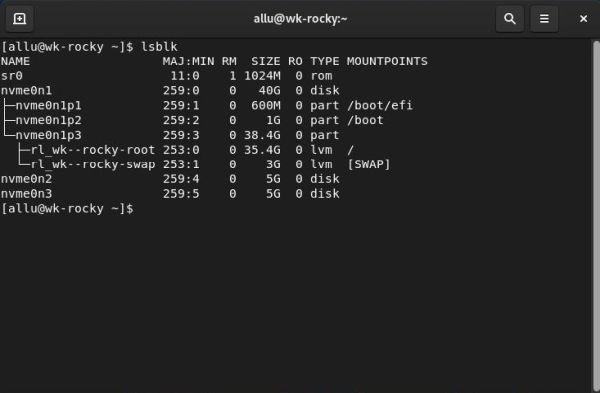
the other two drives (5 GB each) will be used for the Software RAID 1. To display the disks and partitions, use the following command:
lsblk
As you can see on the screenshot, referencing the disks is rather different than what we are used to. Instead of the usual /dev/sda, /dev/sdb, /dev/sdc, we
here have /dev/nvme0n1, /dev/nvme0n2 and /dev/nvme0n3. This is due to the fact that my virtual machine uses "NVMe" as VMware virtual disk type. The disk /dev/nvme0n1
has three partitions, named nvme0n1p1, nvme0n1p2 and nvme0n1p3, the first of them being the EFI boot partition, the third one containing the root partition / and the
swap partition, both being part of an LVM group. The disks /dev/nvme0n2 and /dev/nvme0n3, that will be used for the RAID, are not yet partitioned.
|
Before starting, make sure that mdadm (a command line tool to administer multiple devices such as RAID drives) is installed. In a terminal,
as root, type the command
yum install mdadm
On my system, mdadm 4.2.6 was already installed.
Partitioning the hard drives.
Although it is possible to create the RAID directly using raw disks, it’s always a good idea to avoid that, and, instead, create partitions. In this tutorial, I use
MBR based partitioning; you may use GPT instead, if you want (GPT will be mandatory if your hard disks are larger than 2 TB). So, lets start with
creating a MS-DOS partition table on each of the two disks. This may be done using the partitioning tool parted:
parted /dev/nvme0n2 mklabel msdos
parted /dev/nvme0n3 mklabel msdos
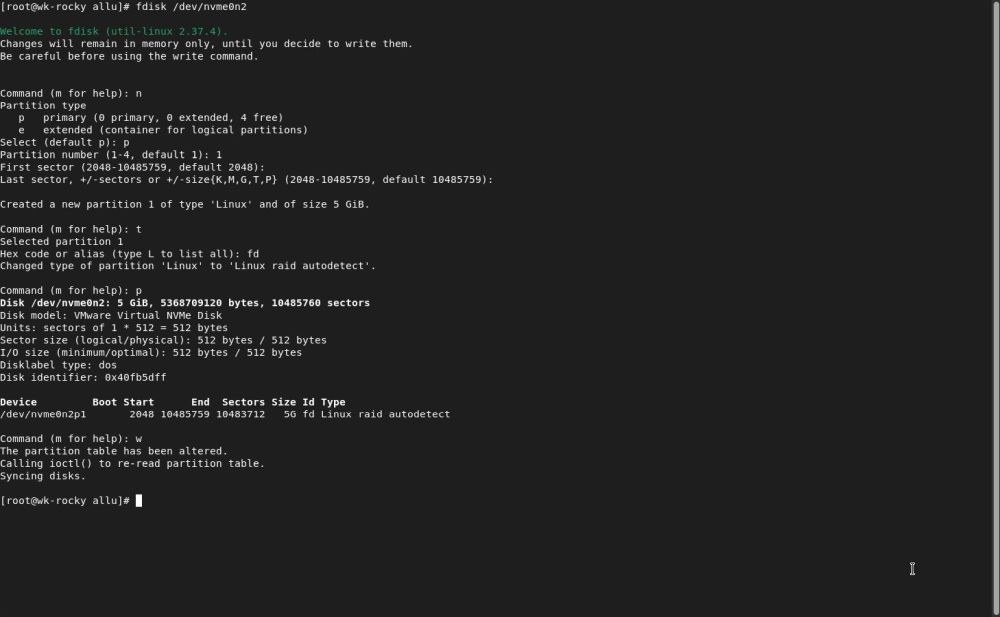
We will now use fdisk to create the partitions, one on each disk, and using the special file system type Linux raid autodetect. Run fdisk and proceed as follows:
- Enter n to create a new partition.
- When asked for the partition type, enter p to create a primary partition.
- When asked for the partition number, enter 1 to use the first entry in the MS-DOS partition table.
- Accept the default values as first and last sector by simply hitting ENTER. This will create a partition using the entire disk.
- By default a partition of filesystem type "Linux" is created. So, we'll have to change the filesystem type. This is done, entering the command t.
- When asked for the filesystem type (partition type), enter the hexadecimal code for "Linux raid autodetect": fd.
- You can use the command p to display the partition layout.
- If the display shows you a partition referenced as /dev/nvme0n2p1 (resp. /dev/nvme0n3p1) with a size equal to the size of your harddisk (here 5 GB for both disks) and a "Linux raid autodetect" filesystem, all is ok and you can write the partition table to the disk, using the command w.
|
Setting up the RAID.
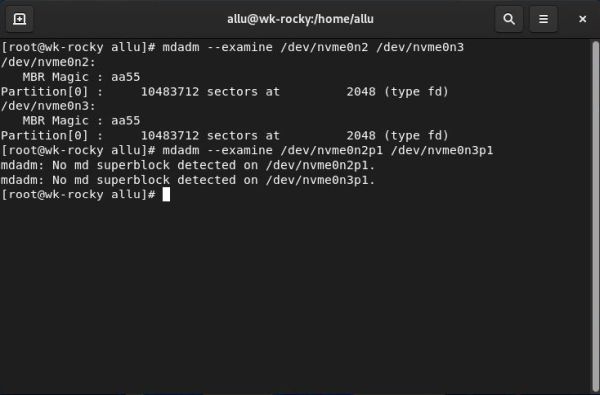
We can use mdadm to examine the hard disks and the partitions. Do it, using the following commands:
mdadm --examine /dev/nvme0n2 /dev/nvme0n3
mdadm --examine /dev/nvme0n2p1 /dev/nvme0n3p1
|
As we can see on the screenshot, on both disks, there is one partition of type "Linux raid autodetect", and on neither of these partitions, a RAID has been set up so far ("no md superblock detected").
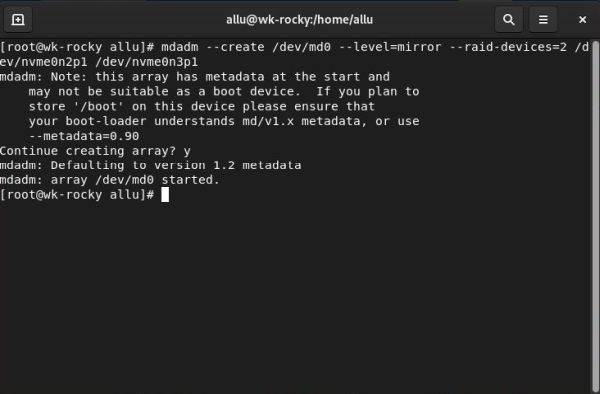
Now, lets create the RAID 1. This is done by creating a logical drive (/dev/md0), indicating which type of RAID
we want to create (a mirror) and which partitions should be used as devices for this RAID (the first partitions of harddisks 2 and 3).
mdadm --create /dev/md0 --level=mirror --raid-devices=2 /dev/nvme0n2p1 /dev/nvme0n3p1
|
Lets have a closer look at our RAID:
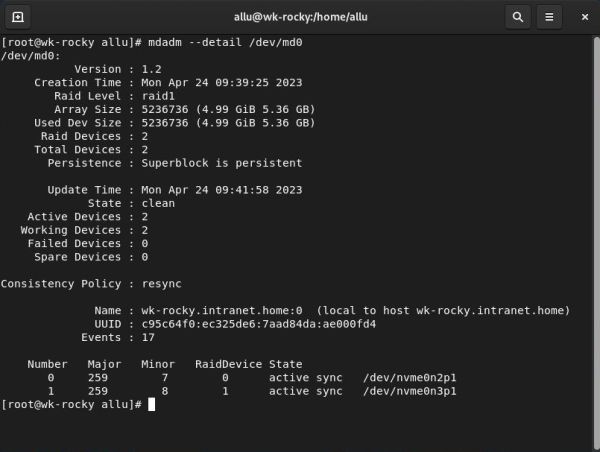
mdadm --detail /dev/md0
|
We can see that the RAID level is RAID 1, that the RAID includes 2 devices that are both active and working, and that these devices actually are the partitions /dev/nvme0n2p1 and /dev/nvme0n3p1.
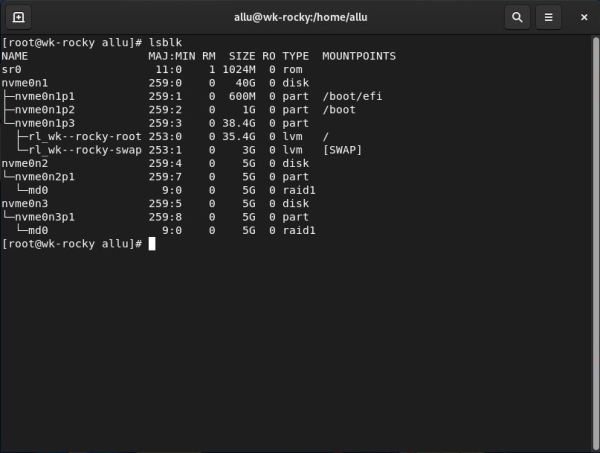
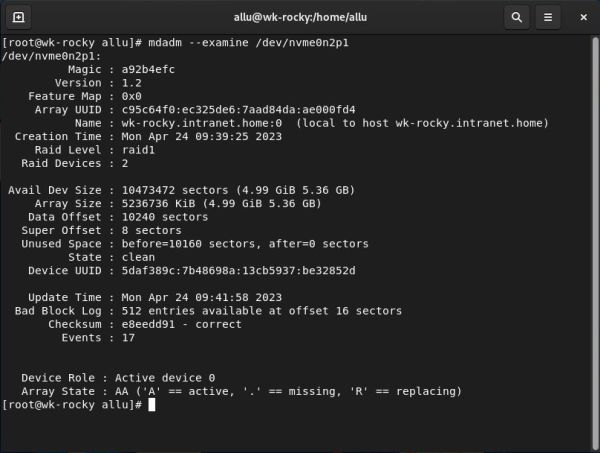
Using lsblk, we can display what the disk and partition layout looks like now (screenshot on the left). Both RAID devices have one partition (/dev/nvme0n2p1 resp. /dev/nvme0n3p1) that are both part of of a RAID 1 (as / and the swap partition are part of an LVM). We can also re-examine the partitions on harddisks 2 and 3 using mdadm --examine (screenshot on the right for /dev/nvme0n2p1). We now have an md superblock and the display shows all physical details about the RAID device (size = 5 GB, sector details) and other information that might be useful for system administrators.
|
|
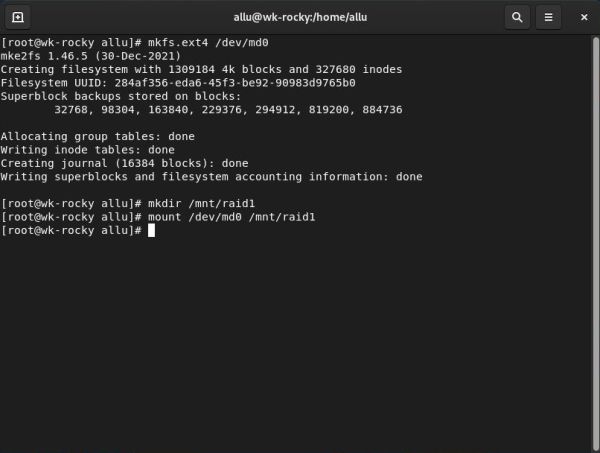
Remains to create a Linux filesystem on the virtual RAID drive. Lets format the device using the ext4 filesystem:
mkfs.ext4 /dev/md0
The RAID device can now be mounted similarly as we mount a hard disk or a removable media:
mkdir /mnt/raid1
mount /dev/md0 /mnt/raid1
where the first command creates the directory where we want to mount the device and the second command actually does the mount.
|
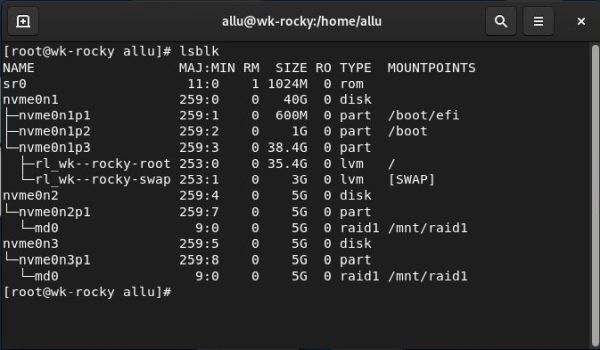
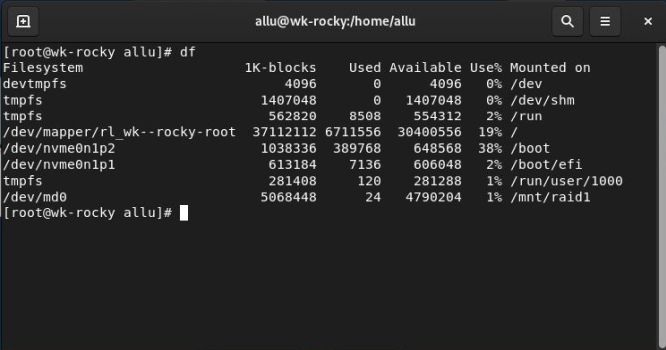
Lets do another lsblk to display the disk and partition layout. We can see on the screenshot on the left that, similarly /dev/nvme0n1p3 is not mounted "directly" but as part of the LVM, /dev/nvme0n2p1 and /dev/nvme0n3p1 are mounted as part of a RAID 1. This display may give us a wrong impression of the space available on the RAID device, as there are 5 GB listed for each mount point. Running the df command to display the space on all drives (screenshot on the right), we can see that the /dev/md0 (mounted at /mnt/raid1) has 5 GB. This is correct for a RAID 1, because, despite the fact that the RAID includes 2 disks with 5 GB each, there are only 5 GB of space available. Simply because the two disks are simultaneously written to, with exactly the same data on /dev/nvme0n2p1 than on /dev/nvme0n3p1.
|
|
Accessing the RAID device.
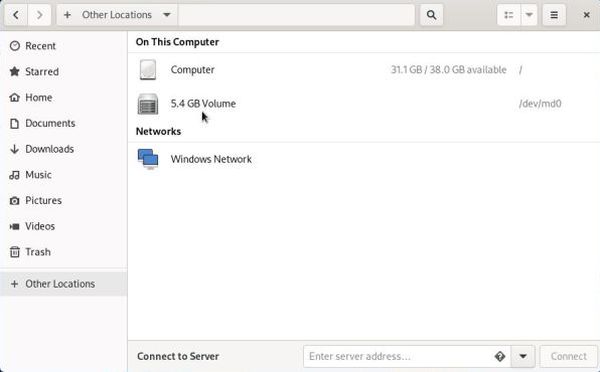
In File Explorer, the RAID device will appear as a server icon labeled "<size> Volume" (in my case: "5.4 GB Volume") in Other locations. Not sure, but it may be that you have to reboot the computer to make appear the icon.
|
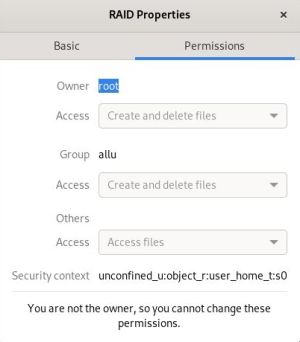
I am a Windows user and my knowledge of Linux operating systems is rather limited. So, if I say that you must be root to access the Volume, and that I did not succeed to change that, does not mean that a "real" Linux user wouldn't find a way to do so. Here, what I did to access the files on my virtual RAID drive (this works fine, but it may be not the best, or even not so good way to do?):
-
Making my standard user "allu" owner of /mnt/raid1:
chown -hR root:allu /mnt/raid1 -
Giving the group "allu" read, write and execution permissions on /mnt/raid1:
chmod g+r+w+x /mnt/raid1 -
Creating a symbolic link (I called it "RAID") of /mnt/raid1 in my home directory:
ln -s /mnt/raid1 /home/allu/RAID
|
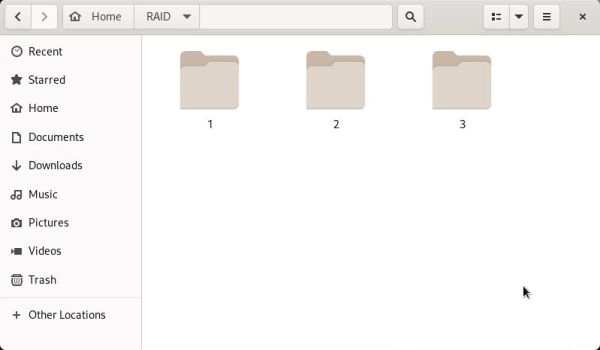
The standard user "allu" can now access the files and folders on the RAID device by opening /home/allu/RAID in File Explorer. The screenshot shows this folder's content after I created 3 subfolders "1", "2" and "3", used for testing my RAID 1 (cf. below).
|
Testing the RAID device.
As I said above, with RAID 1 all data is written simultaneously to both disks, so that one disk is a perfect mirror of the other one. This means, that if one disk is removed, data is still available, just as it was with the two disks present. It also means that, if one disk has been removed and this disk (or another one) is re-added, there has to be a data synchronization between the two disks.
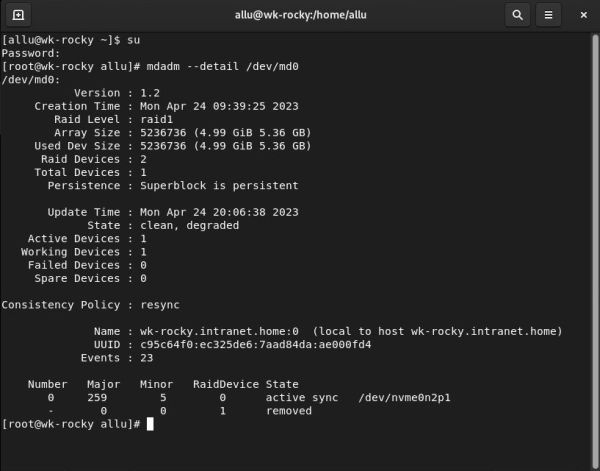
To test our RAID 1, lets start from the situation where the two disks are connected, and we created the three folders "1", "2" and "3" on our virtual RAID 1 volume. Now, lets remove the second RAID disk (/dev/nvme0n3). The screenshot shows the RAID details, after having restarted the computer with only /dev/nvme0n2 connected.
|
We can see on the screenshot, that from a total of 2 RAID devices, there is only one available (active and working), and the device listing at the bottom of the window shows that /dev/nvme0n3 has well been removed.
With /dev/nvme0n3 disconnected, lets create two new folders "4" and "5" on our virtual RAID 1 drive. This means: There actually are the folders "1" to "5" on /dev/nvme0n2, and the folders "1" to "3" on /dev/nvme0n3.
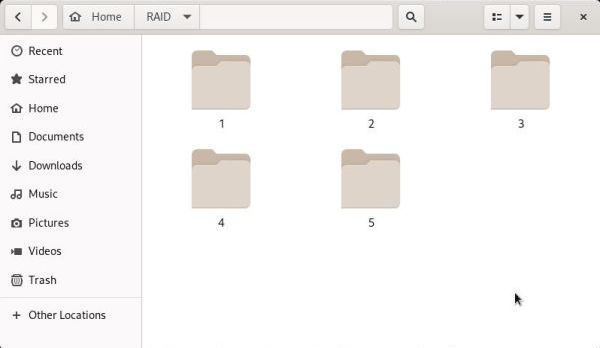
Shutdown the computer (I guess that you can connect/disconnect the disk drives without shutting down the computer, but I always did) and reboot with both RAID disks connected. If our RAID 1 works correctly, the two disks should be synchronized, and the two new folders "4" and "5" should be copied from /dev/nvme0n2 to /dev/nvme0n3. To test this, shutdown the computer, disconnect /dev/nvme0n2 and reboot. With only /dev/nvme0n3 (the disk where we never did create any folders) connected, lets have a look at the content of our virtual RAID 1 drive. It should contain the five folders as shown on the screenshot below.
|
Lets perform another test. With /dev/nvme0n2 disconnected, delete the five folders on the virtual RAID 1 drive. This means: There actually are the folders "1" to "5" on /dev/nvme0n2, and no folders on /dev/nvme0n3.
Shutdown the computer and reboot with both RAID disks connected . The data on the two RAID 1 disks will be synchronized. To verify this, shutdown the computer again, disconnect /dev/nvme0n3 and reboot. With only /dev/nvme0n2 (the disk where we never did delete any folders) connected, lets have a look at the virtual RAID 1 drive. It should be an empty folder.
Whereas the results of the first test are obvious, concerning the second one, you may perhaps wonder why during synchronization, the five folders were deleted on /dev/nvme0n2? Why not, instead, the five folders on /dev/nvme0n2 have been copied to /dev/nvme0n3? The reason for this is that synchronizing the two disks' content actually means performing all create/modify/delete operations that are necessary to get equal disk contents corresponding to the "most recent situation". What I want to say is that, for each folder and file, there will be a comparison of the timestamps and the action that will be performed during synchronization is the one that results in the situation with the most recent timestamp. In our case: the deletion of the five folders on /dev/nvme0n3 has been done after their creation (on /dev/nvme0n2 and copied during the first test synchronization to /dev/nvme0n3). Thus, copying the folders from /dev/nvme0n2 to /dev/nvme0n3 would result in a situation prior to the actual situation on /dev/nvme0n3, and the correct action to be performed during the second test synchronization is well to delete the folders on /dev/nvme0n2.
If you find this text helpful, please, support me and this website by signing my guestbook.