Developing Modula-2 programs on DOS.
In the early 1970s, a programming language previously thought to only be useful for students for an easy start to programming began to be used more and more in the professional realm as well. This language was Pascal, published by Niklaus Wirth in 1970. It was one of the first languages to make use of data types, and, even though it did not easily allow for very large programs, was heavily used in the following years (even today many students still learn it in schools around the world). In the mid- to late 1970s, Wirth began to work on a successor of Pascal: he created Modula. Modula is an acronym, standing for Modular Programming Language; it was never actually released outside of Wirth’s institute in the ETH Zürich, unlike it’s successor Modula-2.
Modula-2 grew out of a practical need for a general, efficiently implementable, systems programming language. Its ancestors are Pascal and Modula. From the latter, it has inherited the name, the important module concept, and a systematic, modern syntax; from Pascal, most of the rest.
This tutorial is about the installation and usage of Logitech Modula-2 3.40 on FreeDOS (the tutorial samples were tested on FreeDOS 1.3 RC5); it should apply to other DOS platforms as well.
You can download the development system (compiler pack + toolkit) from the Logitech Modula-2 3.x page at the WinWorld website. The download archive contains five 5.25" 360kB floppy images, that you can normally use without problems on virtualization software like VMware Workstation (I actually copied the files to 3.5" 1.4MB diskettes).
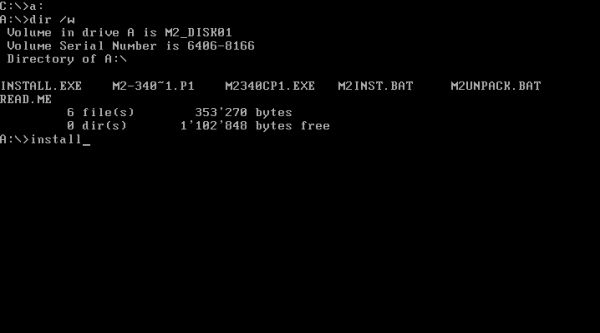
To start installation, insert the diskette labeled "disk01" and run INSTALL.EXE.
|
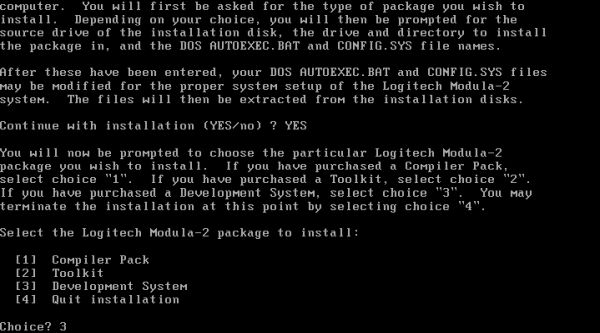
Compiler pack and toolkit could be bought separately, thus also installed independently the one from the other. To install both products, choose Development system (option 3), when asked which package to install.
|
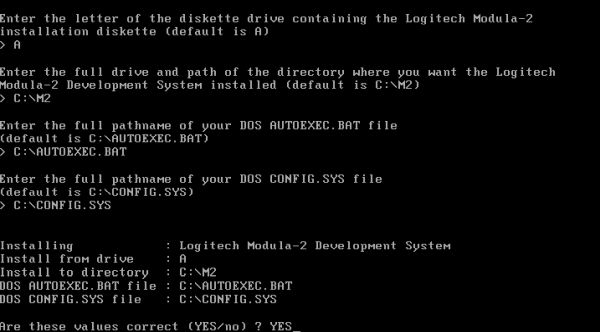
Source drive = A: is correct; destination path = C:\M2 is ok. Concerning the DOS system files, I accepted the MS-DOS defaults CONFIG.SYS and AUTOEXEC.BAT. I later copied the settings in AUTOEXEC.BAT (created by the Modula-2 installer) to my custom batch file M2#.BAT (cf. below). The only directive written to CONFIG.SYS concerned the shell that has to be started with the /E:768 parameter; as in my FDCONFIG.SYS the parameter /E:1024 is set, I did not change that file.
|
Files are now copied to the harddisk; switch the diskettes when you are asked to do so. Note that the copy process starts with asking for "Modula-2 Compiler Pack Disk #1"; this is the diskette labeled "disk01", that is already in the drive.
I will skip compilation and linkage on the command line, and immediately pass to POINT, the editor included with the Logitech Modula-2 distribution. To run it, I created the custom batch file M2#.BAT, placed in my custom C:\FREEDOS\BATCH directory, that is included in the executables path (PATH environment variable). Here is its content:
@echo off
set path=%path0%;C:\M2\M2EXE;C:\M2\POINT
set M2SYM=C:\M2\M2LIB\SYM
set M2OBJ=C:\M2\M2LIB\OBJ
set M2REF=C:\M2\M2LIB\REF
set M2MOD=C:\M2\M2LIB\MOD
set M2LIB=C:\M2\M2LIB\LIB
set M2MAP=C:\M2\M2LIB\MAP
set M2DEF=C:\M2\M2LIB\DEF
set M2OVL=C:\M2\M2EXE
set M2MAK=C:\M2\M2EXE
set M2LBR=C:\M2\M2EXE
set M2TMP=C:\M2\M2TMP
set DEVEL=m2
D:
cd \DEVEL\M2
C:\M2\POINT\pt.exe
This first sets the PATH environment variable, adding the Modula-2 build tools directory and the directory where the POINT editor files are located (please, note that PATH0 is a custom environment variable on my system, set equal to PATH in FDAUTO.BAT; you will probably use PATH instead). Then it sets the environment variables used by the Logitech programs (these lines are actually copied from the AUTOEXEC.BAT file created above). DEVEL is another custom environment variable on my system; just ignore it, or comment it out (delete it). Finally, I set D:\DEVEL\M2, the directory with my Modula-2 sources, as the current directory, and start the POINT (actually called PT.EXE).
The screenshot on the left shows the POINT editor, with the Files menu opened (the mouse works fine, as do the shortcuts with the ALT key). The screenshot on the right shows my Modula-2 sources directory with the file HELLO.MOD selected to be opened.
![Modula-2 on FreeDOS: Opening a source file in POINT editor [1] Modula-2 on FreeDOS: Opening a source file in POINT editor [1]](../screenshots/dos_m2d.jpg)
|
![Modula-2 on FreeDOS: Opening a source file in POINT editor [2] Modula-2 on FreeDOS: Opening a source file in POINT editor [2]](../screenshots/dos_m2e.jpg)
|
The build tools are located in the M2 Assist menu: C = compile, L = link, R = run. The screenshot on the left shows the source code of the program HELLO.MOD, with the M2 Assist menu opened, and the Compile menu item selected. The screenshot on the right shows the compiler output (just hit ENTER to return to the editor).
![Modula-2 on FreeDOS: Compiling a source file in POINT editor [1] Modula-2 on FreeDOS: Compiling a source file in POINT editor [1]](../screenshots/dos_m2f.jpg)
|
![Modula-2 on FreeDOS: Compiling a source file in POINT editor [2] Modula-2 on FreeDOS: Compiling a source file in POINT editor [2]](../screenshots/dos_m2g.jpg)
|
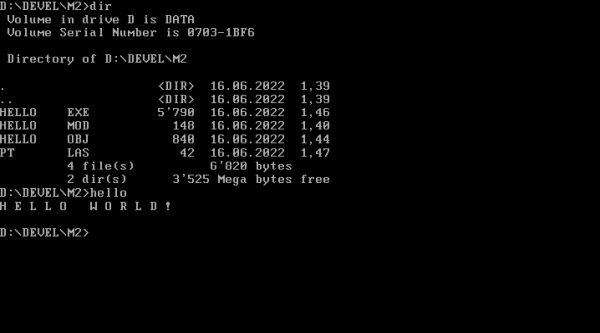
To link the object file created, choose M2 Assist > Link from the menu bar. The linkage results are displayed similarly as for the compilation; hitting ENTER returns to the editor. The screenshot shows the files created by the build (same directory as the source) and the execution of HELLO.EXE (on the command line).
|
Some remarks concerning the Modula-2 programming language.
The main characteristic of Modula-2 is the modular concept. A program is made of a series of individually created modules. The functions defined in these modules are added to the program by making an import. This requires some additional code to write (for a little bit everything you do, you'll have to import some functions). But, the big advantage is obvious: The Modula-2 language can easily be extended, by writing supplementary modules, or customized by modifying existing modules.
Here are some of the main differences between the Modula-2 and the Pascal syntax.
The Pascal program structure
PROGRAM program-name;
BEGIN
...
END.
is replaced by
MODULE program-name;
--- imports ---
BEGIN
...
END program-name.
The big difference with Pascal concerning the syntax is that Modula-2 is case-sensitive! All reserved words have to be upper-case. For all other tokens, the case has to be considered. Declaring a variable "I" and using "i" later-on in the program will yield a compilation error.
The checking of data type compatibility is lots stricter than in Pascal. If a function returns a CARDINAL, you cannot use it in a comparison operation with an INTEGER! Several conversion instructions are available.
Modula-2 comments are of the form (* ... *) and may be nested; { ... } is not supported (neither is the Free Pascal // ...).
Modula-2 characters and string literals may be placed between either single or double quotes. Two single quotes (used as apostrophe in Pascal) are not permitted. Example: The Pascal statement S := 'That''s it!' has to be written as S := "That's it!" in Modula-2.
Pascal functions are called procedures in Modula-2. Functions without arguments must be suffixed by (). Thus, the Pascal declaration FUNCTION function-name: return-data-type has to be written as PROCEDURE function-name(): return-value-type in Modula-2.
In loops, Pascal allows either single statements, or a statement block delimited by BEGIN and END. In Modula-2, single statements are not permitted; that means that each bloc has an explicit terminating token:
UNTIL for the REPEAT statement, and END for the rest. On the other hand, Modula-2 drops
the BEGIN token. Examples:
FOR j := 1 TO stars DO
WriteString("*");
END;
FOR i := 1 TO 5 DO
WriteString(" ***");
WriteLn;
END;
To note, that the END terminating the code of a procedure must include the procedure name (as the final END of the program must include the module
name).
The FOR loop allows the specification of a step. Example: FOR i := 9 TO 1 BY -1 DO (-1 being the only step allowed in Pascal, using the statement FOR i := 9 DOWNTO 1 DO).
Conditional expressions are similar to loops in the sense that they do not allow single statements and the END terminating
token is mandatory. On the other hand, there is no END token before ELSE and ELSIF (these
keywords delimiting by themselves the corresponding bloc). Example:
IF c1 THEN
a := 3;
ELSIF c2 THEN
a := 4;
ELSE
a := 5 ; b := 7;
END;
The GOTO instruction has been removed from Modula-2, whereas the LOOP instruction has been added. This instruction starts an infinite loop, that may be interrupted using the EXIT instruction.
Some simple Modula-2 programs.
Use the following link to download the Modula-2 sources of the tutorial samples.
HELLO.MOD: The "Hello World" program from above.
MODULE Hello;
FROM Terminal IMPORT
WriteString, WriteLn;
BEGIN
WriteString('H E L L O W O R L D !');
WriteLn; WriteLn;
END Hello.
WriteString() prints a string, WriteLn prints an end-of-line.
SQUARES.MOD: Display the squares of the integers from 1 to 20.
MODULE Squares;
FROM InOut IMPORT
WriteCard, WriteString, WriteLn;
VAR
i: [1..20];
BEGIN
WriteString("Number Number Squared"); WriteLn;
WriteString("------------------------"); WriteLn;
FOR i := 1 TO 20 DO
WriteCard(i, 4);
WriteCard(i*i, 14);
WriteLn;
END;
END Squares.
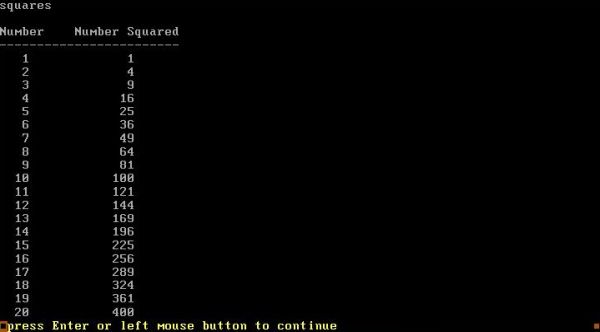
WriteCard() prints a cardinal/integer right-aligned at the position specified as second parameter. Here is a screenshot of the program output:
|
TREE.MOD: A simple tree made of asterisks.
MODULE Tree;
FROM InOut IMPORT
WriteString, WriteLn;
VAR
spaces, stars, i, j: INTEGER;
BEGIN
WriteLn;
spaces := 8; stars := 1;
FOR i := 1 TO 7 DO
FOR j := 1 TO spaces DO
WriteString(" ");
END;
FOR j := 1 TO stars DO
WriteString("*");
END;
WriteLn;
spaces := spaces - 1;
stars := stars + 2;
END;
FOR i := 1 TO 5 DO
WriteString(" ***");
WriteLn;
END;
WriteLn;
END Tree.
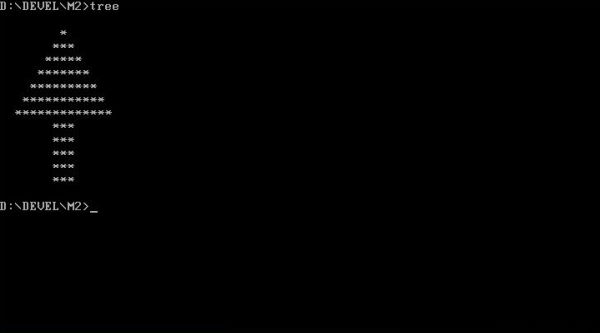
Program output:
|
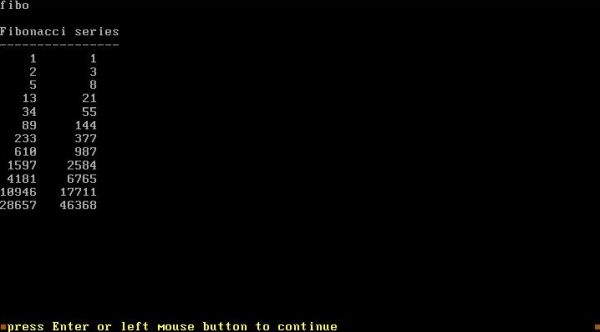
FIBO.MOD: Print out of the first 24 items of the Fibonacci series. These are a series of integers defined by f(n) = f(n-1) + f(n-2), with f(1) = 1 and f(2) = 1. The program writes out the numbers in two columns; the numbers have to be read from left to right, and then from top to bottom.
MODULE Fibo;
FROM InOut IMPORT
WriteCard, WriteString, WriteLn;
VAR
n1, n2, n, i: INTEGER;
BEGIN
WriteString("Fibonacci series"); WriteLn;
WriteString("----------------"); WriteLn;
n1 := 1; n2 := 1;
WriteCard(n1, 5);
WriteString(" ");
WriteCard(n2, 5); WriteLn;
FOR i := 0 TO 21 DO
n := n1 + n2;
WriteCard(n, 5);
n2 := n1;
n1 := n;
IF i MOD 2 = 0 THEN
WriteString(" ");
ELSE
WriteLn;
END;
END;
END Fibo.
Program output:
|
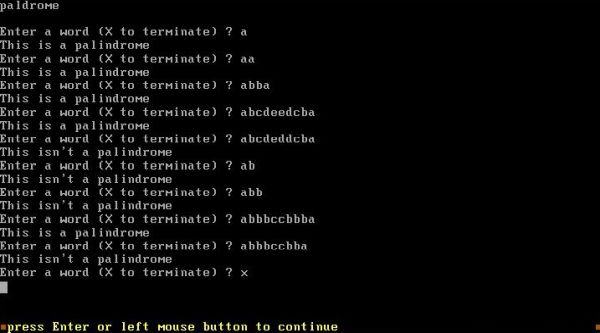
PALDROME.MOD: Check if a word is a palindrome. Palindromes are words that read from left to right are the same as read from right to left.
MODULE Paldrome;
FROM InOut IMPORT
ReadString, WriteString, WriteLn;
FROM Strings IMPORT
Length;
VAR
i, j: CARDINAL;
s: ARRAY[0..50] OF CHAR;
ispalindrome: BOOLEAN;
BEGIN
LOOP
WriteString("Enter a word (X to terminate) ? ");
ReadString(s); WriteLn;
IF (Length(s) = 1) AND (CAP(s[0]) = "X") THEN
EXIT;
END;
ispalindrome := TRUE; i := 0; j := Length(s) - 1;
WHILE (i <= (Length(s) - 1) DIV 2) AND ispalindrome DO
IF s[i] <> s[j] THEN
ispalindrome := FALSE;
END;
INC(i); DEC(j);
END;
IF ispalindrome THEN
WriteString("This is a palindrome");
ELSE
WriteString("This isn't a palindrome");
END;
WriteLn;
END;
END Paldrome.
Program output:
|
This program uses a string variable, and strings are not as simple to work with in Modula-2 that they are in Pascal. In fact, there is no
STRING data type in Modula-2 (The Logitech Modula-2 manual shows how to implement a module defining dynamic strings and the related procedures);
as in original Pascal (and in C), strings are implemented as arrays of characters. Example: Declaration of a string variable with a maximum of 51
characters:
VAR
s: ARRAY[0..50] OF CHAR;
Besides treating such variables just as any other array, they may be treated more "string-like" by using the function of the STRINGS module. From the point of view of these functions, a string is defined as follows:
- They are ARRAY OF CHAR.
- The lowest bound must be 0.
- The size of the string is the size of the array (as defined by its declaration), unless the null character (0C) occurs in the string to indicate the end of the string.
The individual characters of a Modula-2 string may be accessed by accessing the elements of the character array. Difference with Pascal: In Pascal the indexes to be used with a STRING variable range from 1 to length-of-string; in Modula-2 the indexes range from 0 to length-of-string - 1.
With the 0C character present within the string, the function Length() may be used to return the dynamic length of the string.
The function ReadString() reads characters from the keyboard until the ENTER key is pressed. The function argument is an array of characters, that will be filled with the keyboard input. With the ENTER key being pushed, the string terminator 0C is added to the array, and Length() may be used to determine the effective length of the string entered.
To note that the ReadString() function does not support to enter an empty string, nor seems it be possible to enter a space this way. That's why, in my program, I ask the user to enter the letter X to terminate the program. As you probably figured out, CAP transforms a character to upper-case.
This program is also an example, where the strict data type checking of Modula-2 manifests. The function Length() returns a CARDINAL, and this means that you'll have to define the variable i as a CARDINAL, too. In fact, if you declare i as an INTEGER, the comparison i <= (Length(s) - 1) DIV 2 will yield an Incompatible types error during compilation.
That it is, my Modula-2 tutorial. I hope that you enjoyed it and learned something new. If you preview to do some further Modula-2 programming, search the Internet for documentation and examples. There are several books in PDF format available...
If you find this text helpful, please, support me and this website by signing my guestbook.