System and Security: Managing Search History in Windows 10 File Explorer.
"If you care about your privacy, you shouldn't use Windows 10", I read in some forum, and it's effectively not possible not to have the impression, that there
is a negative evolution of the latest Microsoft operating systems. Not only, that there are incomprehensible bugs, such as displaying the content of a folder with
some dozens of files, sorted by date, taking 20 seconds or more on an Intel i7 based laptop, but also Microsoft seems to make all efforts to impose things to
users, without caring of users' privacy. Deciding yourself concerning Windows Update ended with Windows 8.1 (and how to justify that it
resets the search engine of Edge to Bing?), Office help is only available, if Enable connected experiences is active and yesterday,
they put their News and Interests widget in my taskbar without asking!
If you use the search box in File Explorer to search for some particular files in a given directory, Windows remembers your search keys
and if you enter the search box with the mouse, your recent search keys will be displayed as search suggestions. This existed in previous
Windows versions, too, and may of course be useful. But, if users' privacy was their concern, wouldn't there be a possibility, to turn this feature off? In Windows
8.1, this option existed; in Windows 10 Settings, there is no option to tell File Explorer not to remember recent searches!
 |
Clearing search history in Windows 10 File Explorer.
It is however possible to clear Explorer's search history manually. Do a search by entering some text in the search box (and pushig the arrow button at the right of the
box). Access to the Search Tools tab is added to Explorer's main menu bar. To delete your actual search history, in this tab, select Recent searches and then choose Clear search history.
 |
You can automate this procedure by using a batch file (for example executed at Windows startup or shutdown), as explained in this
article at the Windows TenForums website.
Disabling search history in Windows 10 File Explorer.
If there is no possibility to disable search history in Windows 10 Settings does not mean, that there is no possibility to do so. One of these possibilities is to
disable search history in the Windows Registry. The Registry Editor may be started from Administrative Tools
in Control Panel, or by pressing Windows-Key + R and typing regedit as run command.
Please, be aware, that editing the Windows Registry is an advanced feature and you should only use it, if you know, what you are doing!
To disable Windows 10 File Explorer search history in the Windows Registry, follow these steps (details below):
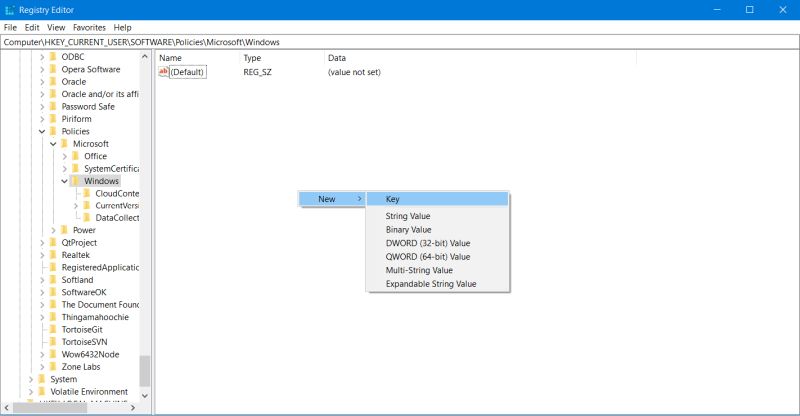
Creating the key HKEY_CURRENT_USER\Software\Policies\Microsoft\Windows\Explorer.
Windows 10 allows to browse to a given registry path by simply entering it in the address bar. If this bar isn't actually visible, choose View >
Address Bar. To create the new key, be sure that you actually are in HKEY_CURRENT_USER\Software\Policies\Microsoft\Windows\. Right-click in the right pane
of the window and in the opening context menu choose New > Key. The new key is added, similar to a new folder in File Explorer. To name it,
just type Explorer (or when it has been created with some default name, right-click it and choose Rename). Should
this key already exist, you can skip this step, of course.
 |
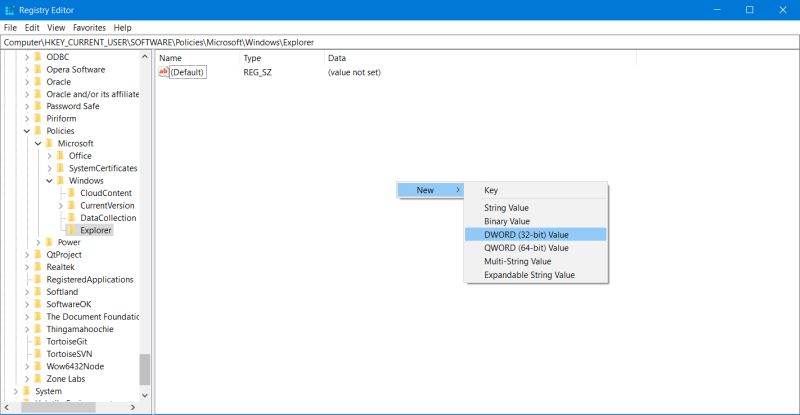
Creating the Explorer value DisableSearchBoxSuggestions.
With HKEY_CURRENT_USER\Software\Policies\Microsoft\Windows\Explorer selected, right-click in the right pane of the window and in the opening context-menu choose New > DWORD (32bit) Value. Name this value DisableSearchBoxSuggestions, by simply typing this (or using Rename as described above).
 |
Setting DisableSearchBoxSuggestions to 1.
Right-click the DisableSearchBoxSuggestions value of the Explorer key and in the opening context-menu, choose
Modify. Then, in the opening Edit DWORD (32bit) Value dialog, change Value data from 0
to 1.
![Disabling search history in Windows Registry: Setting the Explorer value DisableSearchBoxSuggestions to 1 [1] Disabling search history in Windows Registry: Setting the Explorer value DisableSearchBoxSuggestions to 1 [1]](../screenshots/searchwin10e.jpg)
|
![Disabling search history in Windows Registry: Setting the Explorer value DisableSearchBoxSuggestions to 1 [2] Disabling search history in Windows Registry: Setting the Explorer value DisableSearchBoxSuggestions to 1 [2]](../screenshots/searchwin10f.jpg)
|
And here, how your new registry entry should look like, when all is done:
 |
Some final notes.
Normally changing the registry has immediate effect, but I think, that in this case, the user has to log off and log on again, to make the changes become active. Also note that these settings only apply "from this moment on", i.e. that your previous search keys, even if no longer suggested, when you do a search, are still memorized. You'll see this, if you have a look at Recent Searches in File Explorer's Search Tools tab. Do delete recent searches, use Clear Search History. For additional details (including another way to disable search history), have a look at this article at the Windows Central website.
If you find this text helpful, please, support me and this website by signing my guestbook.