Manually assigning drive letters to USB devices.
Note: The tutorial has been written for my Windows 11 Pro, actually a VMware Workstation 16 virtual machine. It also applies to physical machines, as well as to Windows 10, and older releases of MS Windows.
A drive letter is a single alphabetic character that is assigned to a physical or logical drive in your computer's file system. It helps you identify and access different storage devices, such as hard drives, solid state drives (SSDs), universal serial bus (USB) drives, and compact disc read-only memory (CD-ROMs).
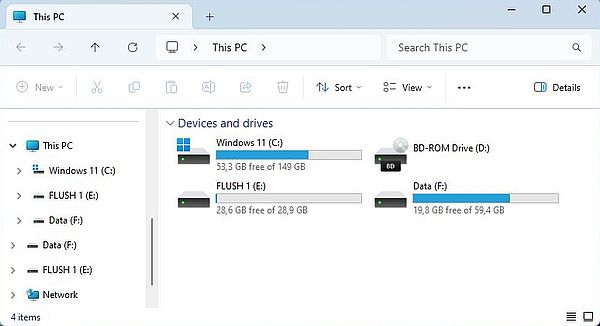
You can see which drive letter is assigned to which device or partition by opening "This PC" in File Explorer. The drive letter is displayed between parentheses after the device/partition name/label. Under normal conditions, Windows is installed on the C: drive. If your harddisk has a single partition and a CD/DVD drive, or a memory card, this device will normally be assigned the D: drive letter. What happens now, if we connect USB devices? Which drive letters will they get assigned? Will a given USB disk always be assigned the same drive letter? Must we bothering about the drive letter that will be assigned? Can we change drive letters manually? Should we change them manually? Are such changes permanent?
Let's start with having a look on which drive letters are available for assignment to newly connected devices. As said above, the C: drive is already used for the partition, where Windows is installed on. The A: and B: drives were originally reserved for floppy drives, and they still are nowadays. Thus, on a computer with one disk drive with one partition and no CD-ROM or memory card, D: through Z: are the drive letters available.
Note: On modern Windows systems, there are always several partitions. Besides the Windows partition, there is the EFI boot partition, the hidden reserved system partition, and normally also one or two recovery partitions. You cannot assign a drive letter to the first two of those (using the Disk Management application); by default, the recovery partition hasn't assigned any drive letter.
MS Windows normally assigns drive letters, using dynamic drive letter assignment: Drive letters are assigned in alphabetic order, starting with the lowest letter available for the first device connected, passing to the next letter for the second device, etc. If you created a supplementary partition during Windows installation, this one will be assigned to the D: drive. Other devices, being part of the computer, such a CD/DVD drive or a card-reader device will be assigned next. Then, when you connect some external media (USB disk, flush drive, smart phone, camera...) the drive letters will be assigned as you connect the device. Thus if, on my Windows 11 virtual machine, with C: being my Windows partition, and D: being my DVD-drive, I first connect my 32 GB flush drive "FLUSH 1", then the 64 GB drive "Data" (actually a memory card on the host machine, that will be connected as a USB drive to the VM), "FLUSH 1" will be assigned the E: drive letter, whereas "Data" will be assigned the F: drive letter (screenshot). However, if I had connected the "memory card" drive first, it would have been the "Data" drive that had been assigned the E: drive letter, and drive letter F: would have been assigned to "FLUSH 1".
 |
Lets try the following: In the system tray, click the Safely remove hardware icon, and eject the "FLUSH 1" drive; then remove the USB stick from the VM. Now, reboot (it is supposed that VMware is configured not to connect any USB devices automatically, thus the VM will boot with only the "Data" drive connected). When you open File Explorer, you will see that Windows assigned the F: drive letter to the "Data" drive (drive letter E: remaining unassigned). This remains the case, if we shut down the computer, reboot without USB drive connected, and then connect the "Data" drive. Does that mean that Windows remembers which drive letter has been assigned to which drive? It normally does, but this is not really reliable with dynamically assigned drive letters. To permanently assign a drive letter to a given device, you should manually assign it the drive letter that you want to use for that drive.
If the flush drive is assigned to E: or to F: or to whatever other drive letter is without importance for the user, for whom drive letters are transparent (except if they work in Command Prompt). With external harddisks/SSDs, making sure that they are always assigned the same drive letter may be vital. Some examples (taken from my actual Windows 10 laptop):
- I run VMware Workstation on this machine, and it's obvious that the SSD of the laptop is far to small to store the virtual disks of the VMs. In fact, I store them on two external SSDs. In VMware configuration of the different machines, the location of the virtual disks and the location of the disk snapshots are given by a path, that includes a drive letter (either G: or H:). If, for whatever reason, the SSD with the virtual disks is assigned another drive letter, VMware Player wouldn't find the virtual disk, and the VM couldn't start up.
- Windows File History requires an external disk for file backup. In my case, it's the "Data" memory card, that has assigned the D: drive letter. If this drive letter was changed, backup and restore of the files would fail.
- My music and video libraries include both, besides the standard Music resp. Video folder in my user directory and the corresponding public folder, another directory, located on the E: drive. If the drive with the music and video files was assigned another drive letter, the files would no longer be available in the libraries.
Manually assigning a drive letter.
On Windows 11, open All applications > Windows Tools, and run Computer Management; in the left pane of this application, choose Disk Management. To change the drive letter of a given volume, right-click the corresponding partition and from the context menu, choose Change Drive Letter and Paths....
![Manually changing the drive letter of a USB flush device [1] Manually changing the drive letter of a USB flush device [1]](../screenshots/driveletters2.jpg) |
Two successive dialogue boxes will show up. In the first one, with the drive letter to be changed selected, push the Change button (screenshot on the left). In the second one, with Assign the following drive letter checked, choose the new drive letter from the drop-down list and push OK (screenshot on the right).
![Manually changing the drive letter of a USB flush device [2] Manually changing the drive letter of a USB flush device [2]](../screenshots/driveletters3a.jpg)
|
![Manually changing the drive letter of a USB flush device [3] Manually changing the drive letter of a USB flush device [3]](../screenshots/driveletters3b.jpg)
|
A warning message that programs relying on drive letters might no longer run correctly pops up. If you are sure, what you are doing, push the OK button to confirm the drive letter change. The new drive letter assignment is immediate. No need to reboot the computer...
Important to remember when changing drive letters:
- You should never change the letter assigned to the drive where Windows is installed on.
- Only change drive letters of a volume, if you are sure that there aren't any important applications with path settings including the drive letter assigned to that volume.
- You should not use the first available drive letters for removable media (cf. below). Using I, J... for external harddisks/SSDs, P, Q... for CD/DVD-drives and flush sticks, and V, W... for network drives should be a good choice.
- When you installed Windows from a DVD and change the letter of the DVD drive, you'll get an error message when you add Windows features, that need the DVD to install them. That's not a big deal: In the error dialog box, just replace the specified (old) drive letter with the actual one.
Benefits of manual drive letter assignment:
- Permanent drive letter assignment: A given drive is always assigned the same drive letter.
- Improved organization: By assigning specific letters to different types of drives, you can quickly identify the purpose of each drive (in particular in Command Prompt).
- Consistency across multiple computers: If you use multiple machines, setting the same drive letters across all of them can make file management much easier.
- Network mapping: When setting up network drives, using consistent drive letters can simplify access for all users.
Note: There is no 100% certainty that drive letter assignment is effectively done permanently. In particular, if you use drive letters such D: or E: for external disks, and connect some new external media before connecting the disks, the new device will be assigned the first drive letter not actually used. The disks, that were assigned the drive letters D: and E: before, would then be assigned the next available letters, i.e. drive letters that are different from those, that we manually assigned as permanent. These new assignments would also be used when starting the computer without the new device. To get things as they should be, we would have to redo the manual assignment of the disks. Using drive letters such I, J for the disks from the beginning should be a "protection" against this problem.
Assigning drive letters in Command Prompt.
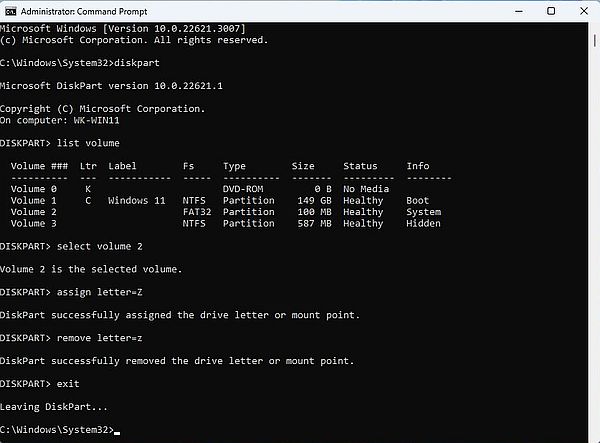
The Command Prompt offers a powerful way to set drive letters (this also offers the possibility to change drive letters from within a script or program). Open Command Prompt as administrator, and run the program diskpart. Type help to display the commands available (use exit to terminate the program).
Some important diskpart commands:
- list volume: Display all available volumes.
- select volume N (where "N" is the volume number as shown in the volume list): Select the volume that you want to make changes to.
- assign letter=X (where "X" is the new drive letter): Assign a new drive letter to the selected volume.
- remove letter=X (where "X" is the actual drive letter): Remove the drive letter assigned to the selected volume.
The screenshot below shows how I ran diskpart on my Windows 11 virtual machine.
 |
Surprisingly, using this command line tool seems make it possible to assign a drive letter to the EFI partition...
If you find this text helpful, please, support me and this website by signing my guestbook.